Project Managers Sleep Better When Exposing Their Project Statuses
Klient Tips #35
FOR BUSINESS LEADERS
Project Managers Sleep Better When Exposing Their Project Statuses
How Weekly Project Status Updates Can Reduce Stress and Improve Communication
Transparency is the cornerstone of successful project management. At Klient.com, we believe that sharing project statuses weekly not only builds trust but also ensures that everyone involved can sleep a little easier. Here’s why consistent project updates are a game-changer and how you can implement them effectively.
Why Weekly Project Status Updates Relieve Stress
As the end of the month approaches, anxiety builds up for project managers and consultants, causing insomnia and restless nights. This is because an invoice will soon be sent to the customer. The customer doesn’t know yet, but he will be angry because the team went over budget. Want to sleep better? Weekly Project Status Updates!
Awareness and Accountability
When everyone is in the loop, there’s a collective understanding of the project’s progress, reducing surprises and fostering a shared sense of direction. Weekly updates put the spotlight on accountability, encouraging team members to stay on top of their tasks knowing their progress will be reviewed regularly.
Early Error Detection
Frequent updates ensure that any issues are caught early. This means problems are less likely to escalate, keeping the project on track and minimizing stress.
Communication is Key
Weekly updates provide an excellent opportunity to check in with your customer and discuss project progress. Building regular communication makes tough conversations easier when issues arise.
Implementing Effective Project Status Updates
To reap these benefits, here’s how you can set up a robust project status reporting system:
1. Clear WBS from the Get-Go
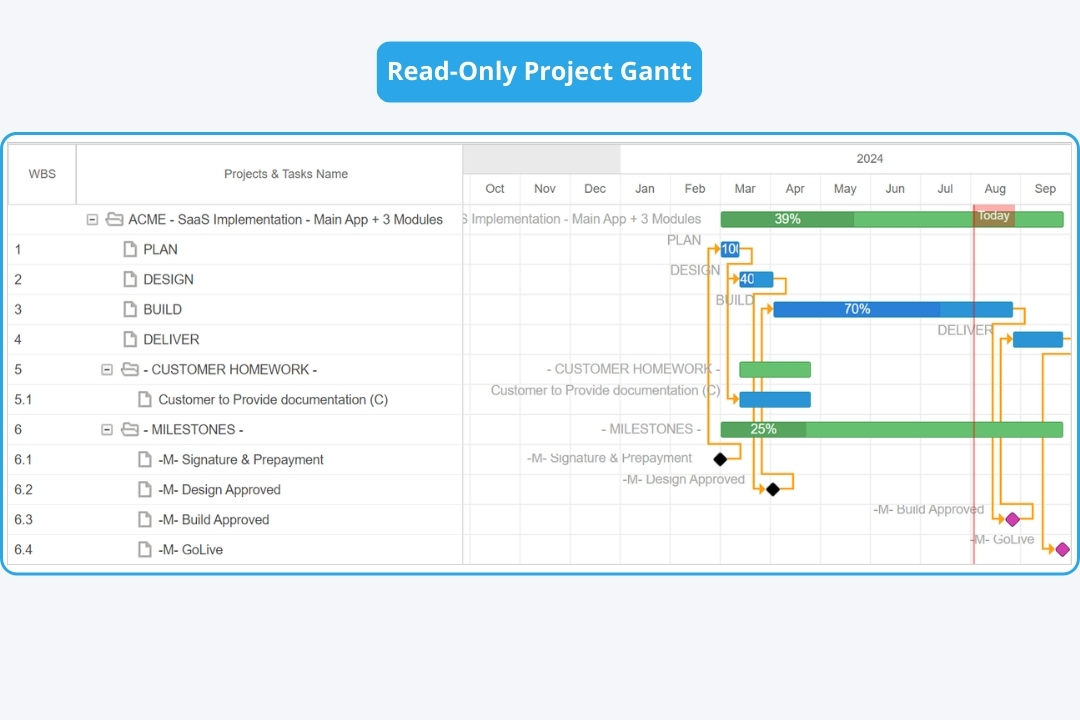
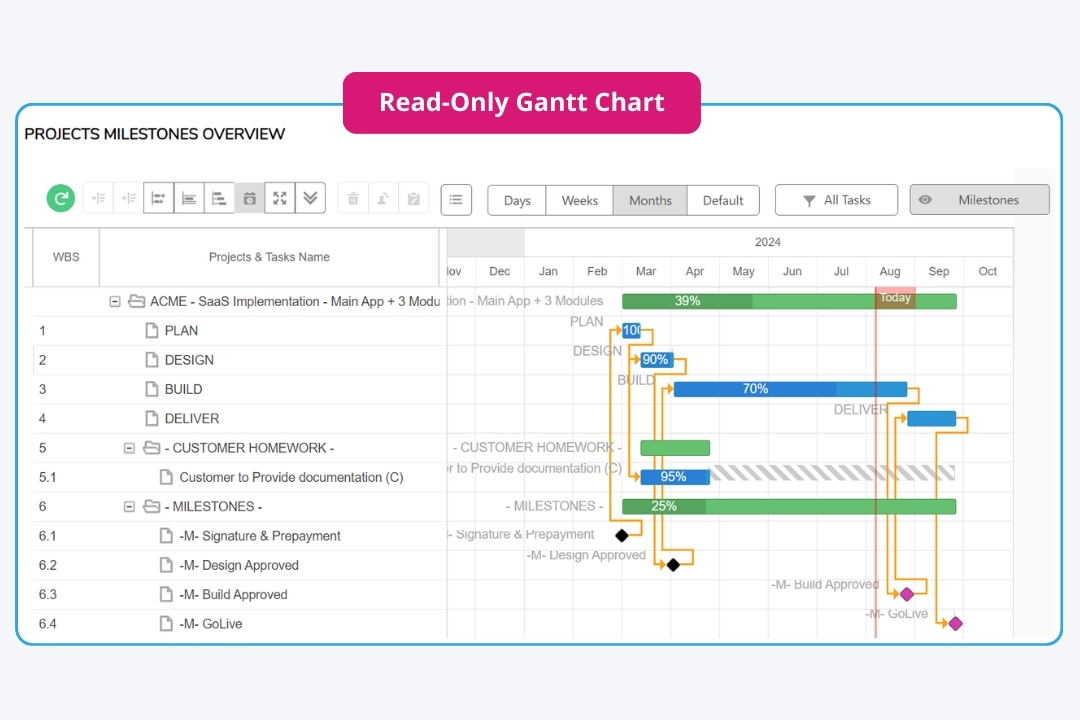
Start with a clear Work Breakdown Structure (WBS). Define a proper deliverable structure and identify key milestones, such as the kickoff, completion of User Acceptance Testing, and the Go-Live date. This provides a solid foundation for tracking progress.
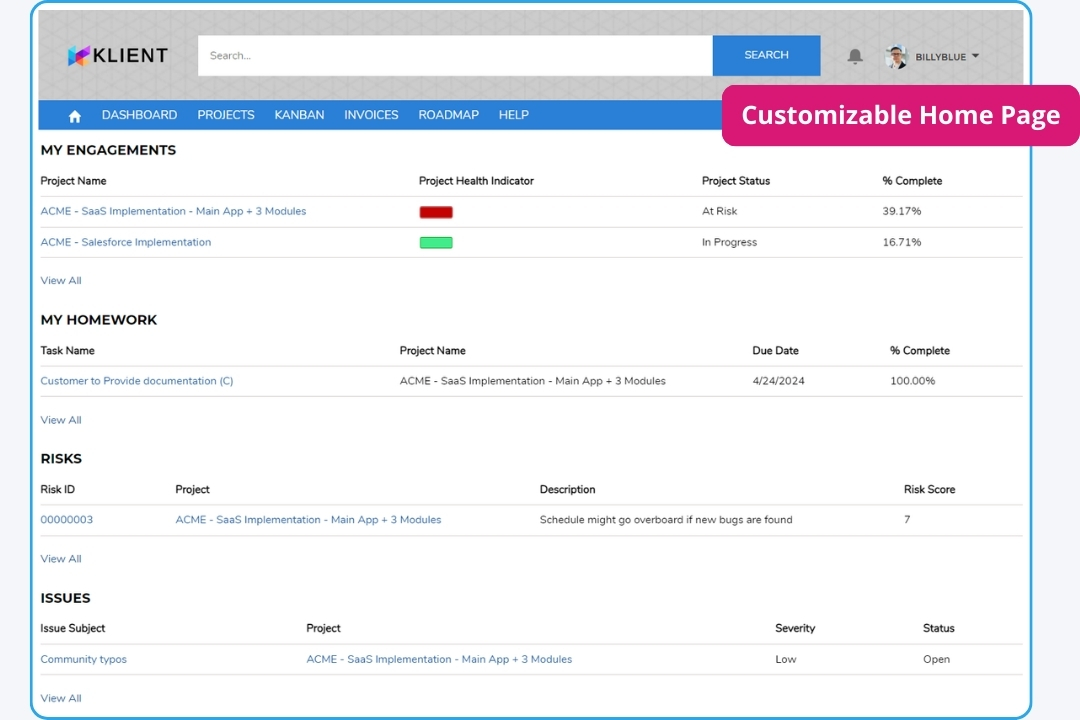
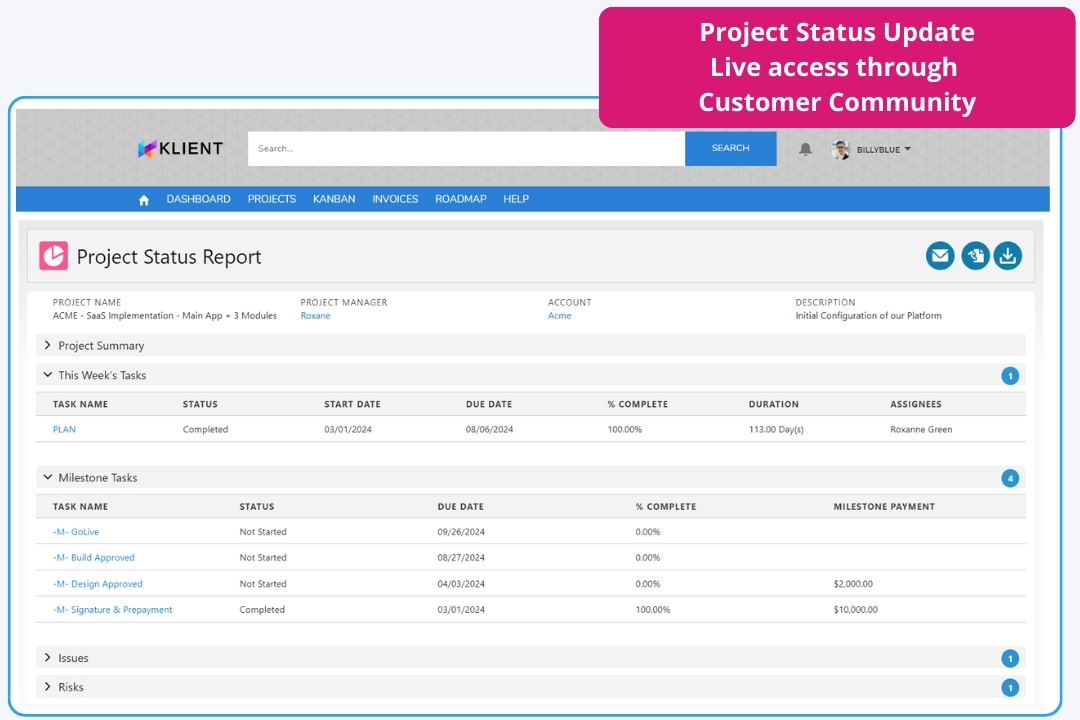
🔦 How we do it at Klient: Through our Customer Community, we share a Read-Only Project Gantt to expose the calendar of key milestones. See a Screenshot example here.
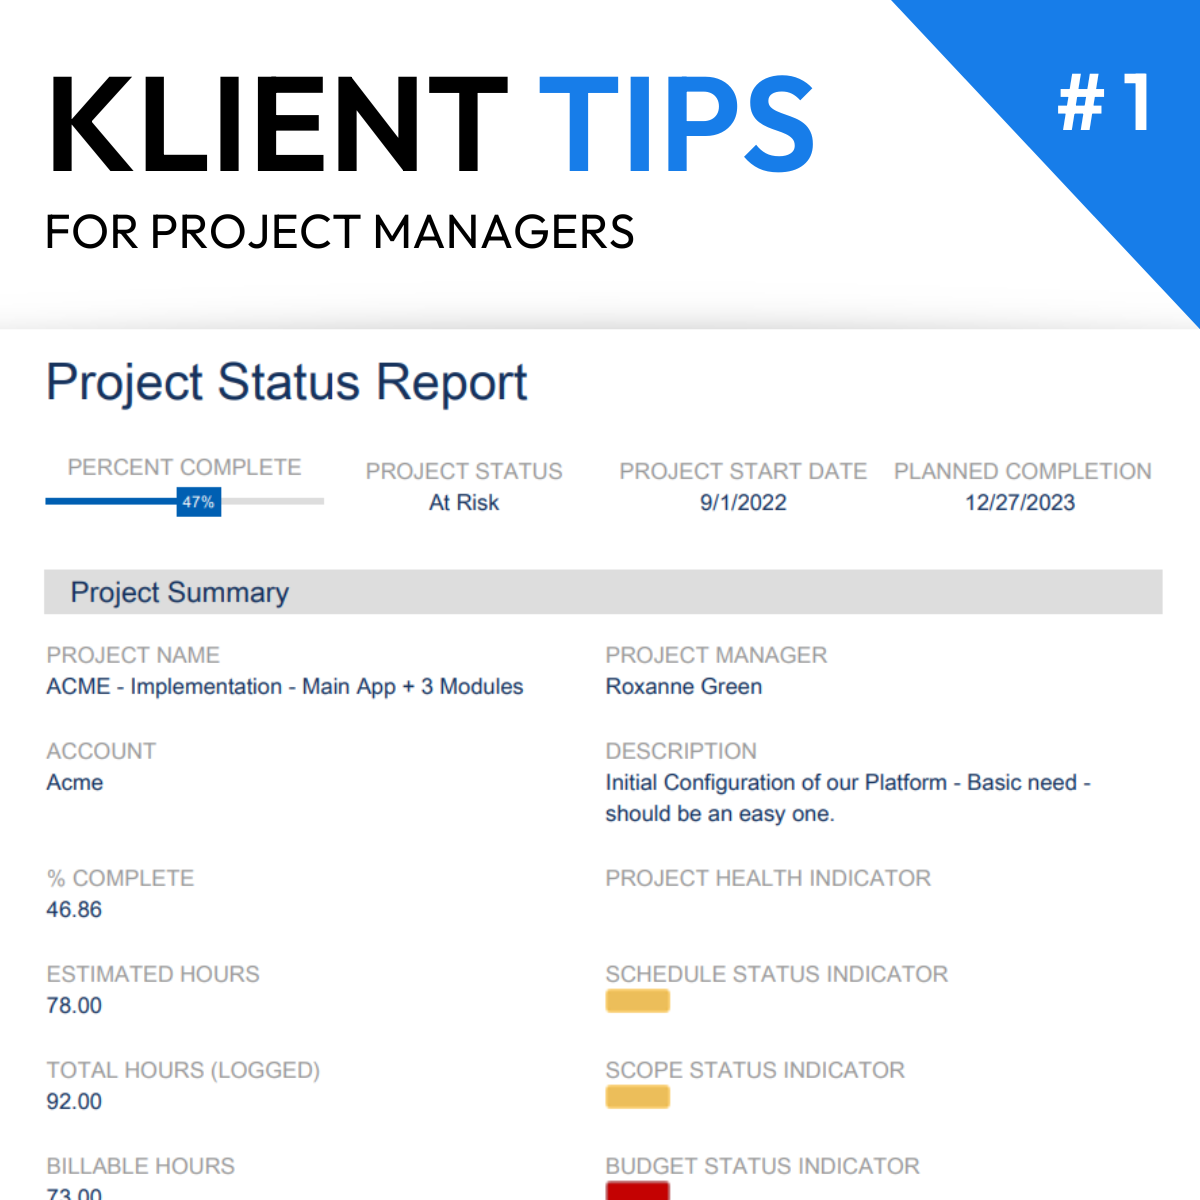
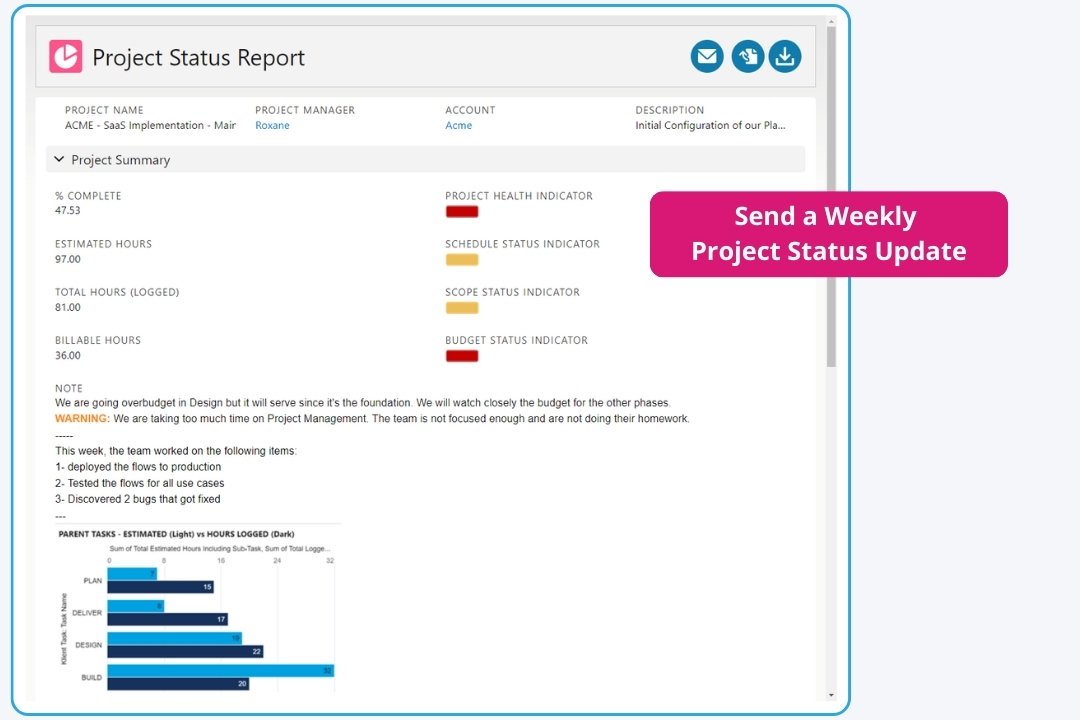
2. Use a Good Project Status Template
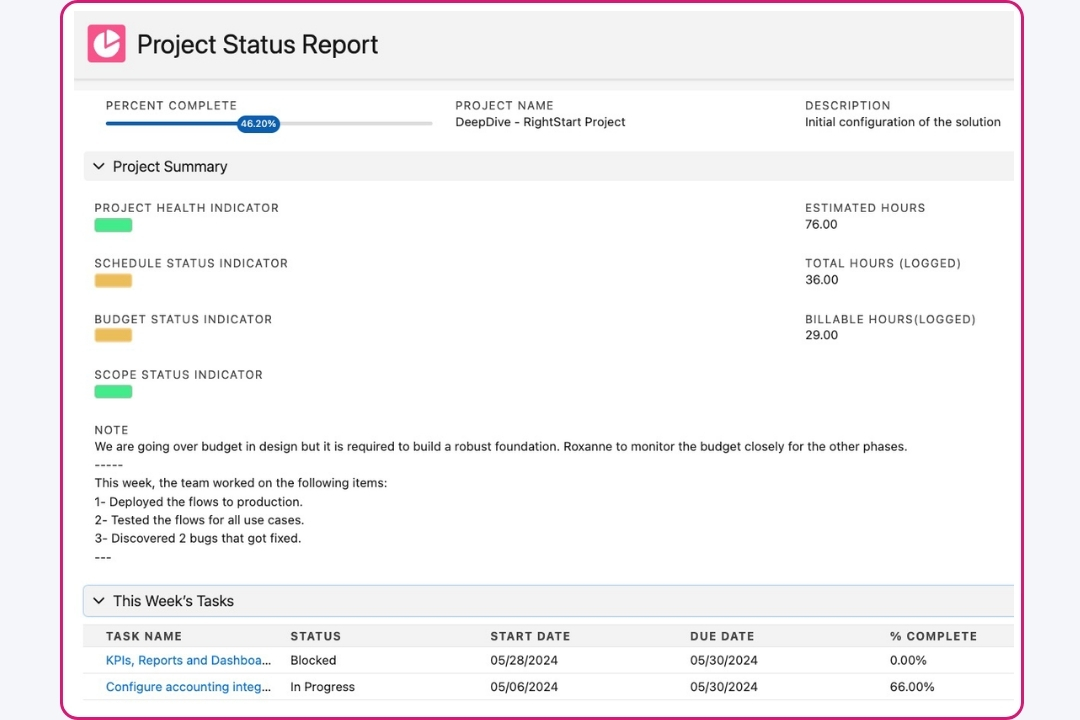
Create a project status template that includes all relevant fields. Ensure it captures the necessary information, like current status, % completion, upcoming tasks, and any issues. Consistency in reporting helps in understanding the project’s trajectory.
🔦 How we do it at Klient: Here is our default Project Status template Screenshot1 – Screenshot2.
3. Ensure Proper Project Management by the Team
All team members should ensure that their status and % complete are updated accurately. Implement automatic notifications for missing timesheets to ensure all hours are accounted for. This keeps the data accurate and the project on track.
🔦 How we do it at Klient: We recommend logging hours daily. This ensures better tracking and is fairer for both the customer and the employer.
4. Monitor and Automate Status Report Submissions
Monitor whether the project manager sends the status report weekly. Use tools that automate reminders and notifications to ensure timely submissions. This keeps everyone accountable and the project moving forward.
🔦 How we do it at Klient: At Klient, we ensure that our Project Status Updates are sent every week to all our customers. We track this with a report and an EOS L10 Weekly Data point. The Salesforce formula for it is: % Budget Status Sent Last Week = Project Status email sent / total active customer projects.
5. Craft Compelling Email Titles and Use a Proper Email Template
Your email titles should be compelling to ensure they get the attention they deserve. A well-crafted title increases the likelihood of the report being read and acted upon. Additionally, use an email template that clearly presents the project status. It should be easy to read and highlight the critical information. A well-designed template makes it easier for stakeholders to grasp the project’s status quickly. With standard Salesforce Activities and email templates, you can build an automated email with Salesforce Flow that merges fields from your Klient Projects and Tasks and selects a predefined title automatically.
🔦 How we do it at Klient: At Drakya (Klient’s inception), we used three automated email titles to ensure our messages stood out and got read. When we merged Drakya and Krow Software to become Klient, we retained the spirit of Weekly Project Status Updates, though in a less automated way. The automated and straight to the point title were:
URGENT – Project Overbudget
WARNING – Project Slightly Off Track
ALL GOOD – Your Project is On Track
Conclusion
By following these steps, you’ll not only keep your projects on track but also foster a culture of transparency and accountability.
I know I sleep well knowing my team is keeping their customers informed. Every project manager deserves a good night’s sleep—start your weekly project status updates today!
Written by Yanick Abraham.
You can reach me on LinkedIn, I’m usually very responsive.
Related Feature Spotlight
This month's Feature Spotlight is on Klient Customer Community. We've created several pieces of content that we hope you find useful.
-

Feature Spotlight: Klient Customer Community
Centralize information, enhance communication, and provide project insights to build trust and keep customers engaged with Klient’s Customer...
-
Feature Spotlight: Collaborative Tools: Chatter & Files
Centralize information, enhance communication, and provide project insights to build trust and keep customers engaged with Klient’s Customer...
-
Feature Spotlight: On-Demand Project Status Report
KLIENT FEATURE SPOTLIGHT On-Demand Project Status ReportKeep Your Customers in the Know with Live Sharing of Project Status through Customer...
-

Feature Spotlight: Read-Only Project Sharing
KLIENT FEATURE SPOTLIGHT Read-Only Project SharingSmoothly share project information with your customers using Klient Customer Community With Klient...
![]()
You liked this Klient Tip? Share it with your team!


Replace all your tools with Klient, Salesforce #1 PSA platform
Run your entire SaaS and consulting business on a single professional service automation platform native to Salesforce!


