00:00 Introduction
Thank you very much for attending our Klient Inception webinar. This is episode one of season two, and today we’re gonna be digging into the five projects that drive success and revenue for Salesforce SI partners. I do believe it’s gonna be very interesting for all consulting firms as well. I’m Yanick Abraham, I’m the Inception Architect. I’ve been in the Salesforce ecosystem for the past 16 years. And I’m Klient CEO. I’m joined today by our Growth Agent Sean. Hi Sean!
Hi Yanick! Hi everyone! Thanks so much for joining this webinar. Make sure you stay at the end because we’ve got a special offer for you. You wanna make sure you stay tuned for that.
Here we go, the sales guy talking already! So we are from Klient PSA, we are an all-in-one project management suite, fully native to Salesforce. So we help you manage your project directly in Salesforce. We are a partner since 2015. The Klient inception, quite often we feel that we live in a dream. We used to be an SI partner, then we became an ISV partner. Now we’re developing a tool that helps SIs grow their business. So we are you and you are us. And it’s bringing that great movie of Leonardo DiCaprio, Inception. So a dream within a dream. So today we’re trying to seed some new ideas and we have a guest speaker with us, Sean today?
Yeah, absolutely. So I wanna welcome Katie Bluth. Katie started her career, actually at the prestigious Culinary Institute of America. I have a lot of questions about that later, Katie. But, you know, she somehow got into the Salesforce admin world and she focused on really, solution-based architecture. She started SaasInct in 2016 and since then has been developing solutions, for some of the better-known brands in the financial services world. So, welcome Katie.
Hi everybody. Thanks for having me.
Awesome. Thank you for being here, Katie.
02:00 Customer Success Equals Project Success
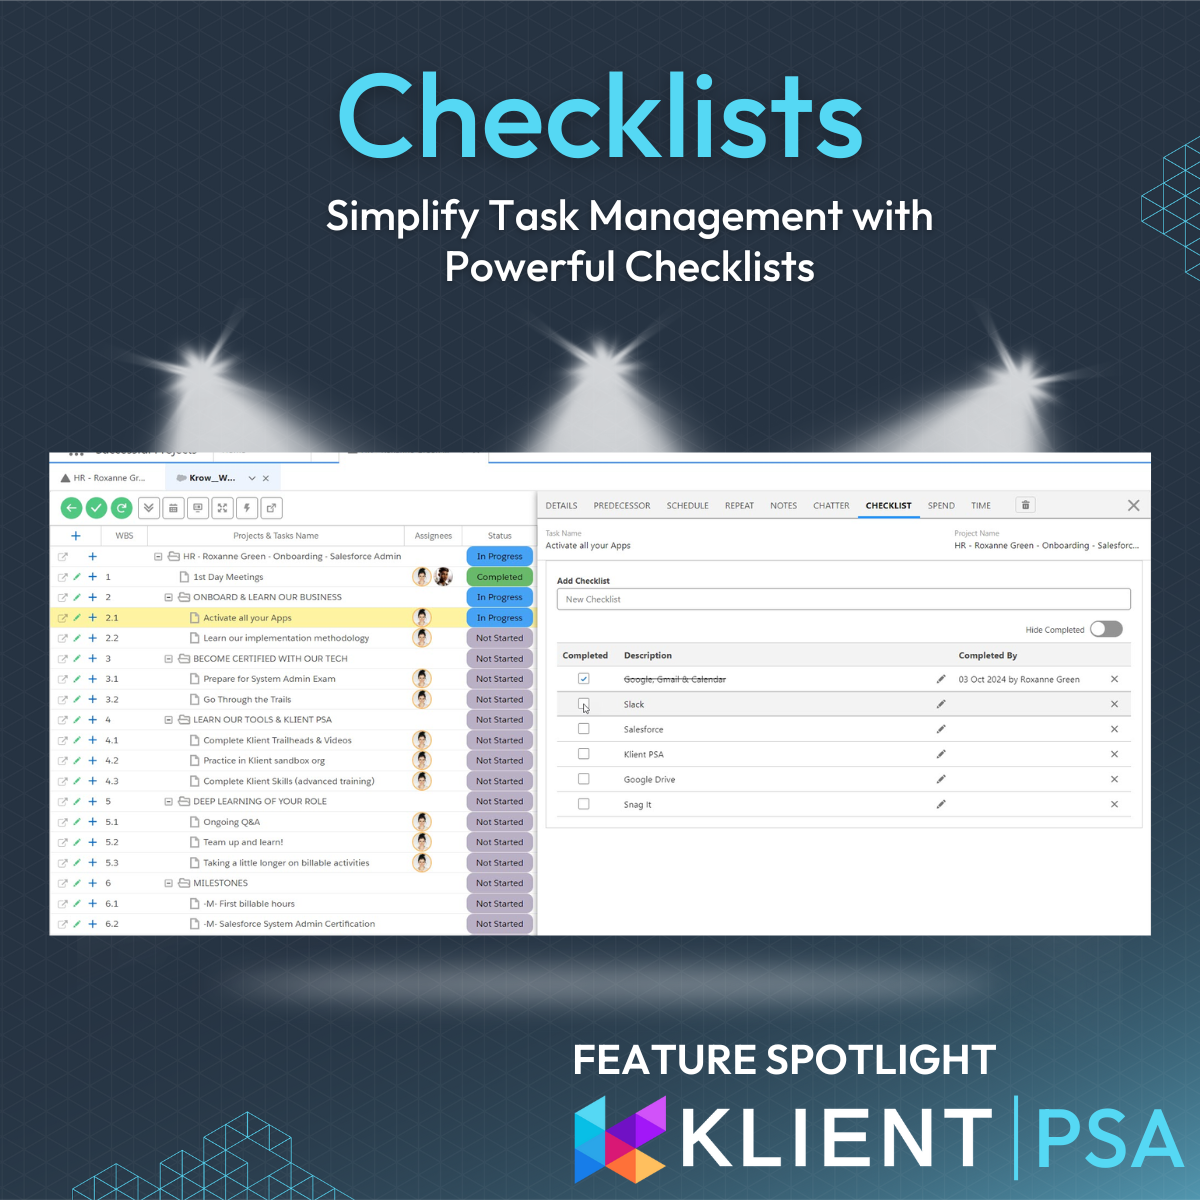
So the title, Customer Success Equals Project Success. What does that mean? So, let’s just start by maybe redefining what a project is because at the end, a project really helps drive your business and it’s a key driver for the success of your business. So, a project has a start and end date, just the way that it’s structured with tasks and checklists. It’s really a good way to streamline your business by structuring your processes and by assigning people to the task. Making a project owner visible and aware creates responsibility across your team.
So really, a project helps on several levels, including providing a ton of visibility to stakeholders. So when it’s a customer billable project, you want to have your project aware of the development, but also maybe the Salesforce AE might have some interest in terms of the progress of the initial deployment because he wants his license to be renewed the year after. Structuring a project well and creating visibility helps a lot. Plus, all the data points you have on a project can help you take better decisions with the business insights it provides, whether we’re talking about margin, utilization of your resources, billable versus non-billable. And the most beautiful thing is that you can templatize a project, meaning that you can make a template out of it. And every time you’re done executing that project version of that template, you can improve it and always improve your business process and always streamline your business.
So that’s why, Sean, projects run your business.
03:36 Overview of the 5 Projects that Drive Success
Okay. So what’s the first one we’re gonna be talking about? Oh yeah. The five projects that drive success and revenue for Salesforce SIs. So, what are those five types of projects, Yanick?
Yep. So what we recommend at Klient is that when you implement a project management solution, whether it’s Klient or any other PSAs, that you structure your business and implement those five projects within your company. The first one is a classic, you need to bill your customer. So we’re gonna be looking at the structure of billable projects because there are different types of projects in the billable world. After that, we’re gonna look at the customer roadmap project. So this is something you need to start building to create future revenue. We’re gonna also spend time looking at a non-billable customer support project, meaning that this is pure support and pure costs so you have to monitor it closely.
And then moving to recruiting and onboarding. So, maybe at this point with the economics, it’s a bit more difficult for some of us, but some others are growing as well. So, at the end, you need to hire, and we hopefully gonna all be hiring a ton and onboarding a ton of people. So you want to be streamlined and you really wanna be able to get your first billable hours from those new resources as soon as you can, and their certification as well in Salesforce as soon as they can. So we’re gonna be looking at that. And the last one, it’s kind of our new pet project. So, Sean, we’re gonna come back to what we’re gonna use Klient for moving forward on the pre-sale side of things.
05:10 #1 Customer Billable Projects
Alright, billable projects. Do you want to kind of describe what those are and then maybe we’ll bring Katie to talk about some of her billable projects?
Yeah, because a lot of the people in attendance are from Salesforce SI or the consulting world. I won’t go too deep but usually, these are the four kinds of billing types that we see across projects. Time and expense is the most classic one. It’s the less risky because you have to deliver under a certain scope, not a certain amount of hours. If you go over, you can charge your customer. When it can get tricky is when you go over budget. So the customer might interpret the requirement that it was in scope. Well, it’s not. So you have to just maintain the budget and have a lot of transparency if you wanna make this work. But this is a classic project type. Fixed fee. You need to know what you’re doing. So it’s a lot more risky because you have a set amount of cash. You’re gonna invoice the customer for a deliverable. So if your recipe is not clear and what you deliver is not clear, you might come into margin problems.
And those fixed fees, usually the way that you get paid on fixed fees, it’s either on the first day, the beginning of a project, or at the end, or with milestone completion, let’s say after the design is approved or after the user acceptance testing is done. Okay, so those are the main classic ones. Then we have recurring, more for software but SIs quite often sell products as well, or maybe recurring products, or recurring every month for a certain amount. Some resource placement firms as well use this kind of mode to just charge the resource that they are placing at their customer. And the last one is a retainer. It’s a good model. You charge like, let’s say $4,000 in advance for 20 hours of work during the month. If the customer doesn’t use it, you still charge $4,000. And if they go over, you charge more if you have over it. So it’s a great model. The only thing is that you need to absolutely prove value if you want your customer to renew.
So we’re gonna be looking a little bit at that structure here to generate more revenue.
09:56 Klient Demo (Customer Billable Projects)
But before Sean. We’ve got Katie on the line. So Katie, maybe you can tell us a little bit more about Saasinct. And, you know, what are the types of projects that you folks do, billable projects, and maybe if you’ve got some tips or some insights you can add to that as well, that would be cool.
So we do three out of the four of these project types as billable. We do time and expense, we do retainer, we do recurring. So I think a lot of what’s nice about what I focus on is, you know, what is the project success for billable projects? And for me, it’s really about the profitability at the end of the day. That’s, as a leader, what I care about. But also, from our customer perspective, it’s making sure that what I’ve sold and what we’re doing with our customer, we’re closely aligned with them. So I like that I can have kind of the flexibility to mix and match based on the different offerings that we have because we do the time and expense for a typical implementation, but we also have a monthly managed services where we do kind of a fixed fee and then we can do the overage afterward. So this really allows us to be able to kind of mix and match all of that, and then easily generate invoices with the right rates, right minimums, all that kind of stuff. So just making it super streamlined for customers helps us be successful, but also just being able to track that profitability is really important. What did I sell? Did I sell it at a certain margin? Are we executing it at the same margin?
So we’re talking about profitability. Yannick talked about visibility structure, right? And then, we have a lot of SIs on the line. What about scope creep? How do you deal with items where the scope starts to kind of grow out of what was originally agreed upon? So maybe some tips there, if you wouldn’t mind.
Yeah, I mean, for us, we are okay with, kind of wanting to do a change order in the middle of it. We’re getting much faster at producing those change orders. We love it when our clients increase our expected revenue. So whether our client has the budget and wants to go do more than what we originally expected, we’ll do a change order and just tag it on to one of these existing projects. We’ll kind of do a roadmap project, which I think you guys are also gonna talk about. So it depends on what they’re interested in, but we can either add on to an existing project we’ve already been managing, or we have the flexibility to sell a new project.
Awesome. And I think this is a good segue as well to go to kind of the portion of the showcase of what we can do. So that Klient Inception Series, the concept, it’s a customer success series, but also with insight on how we run our business at Klient. So we wanna showcase the customer billable project, but mainly the structure of how to properly structure those for success. So for customer success and for transparency.
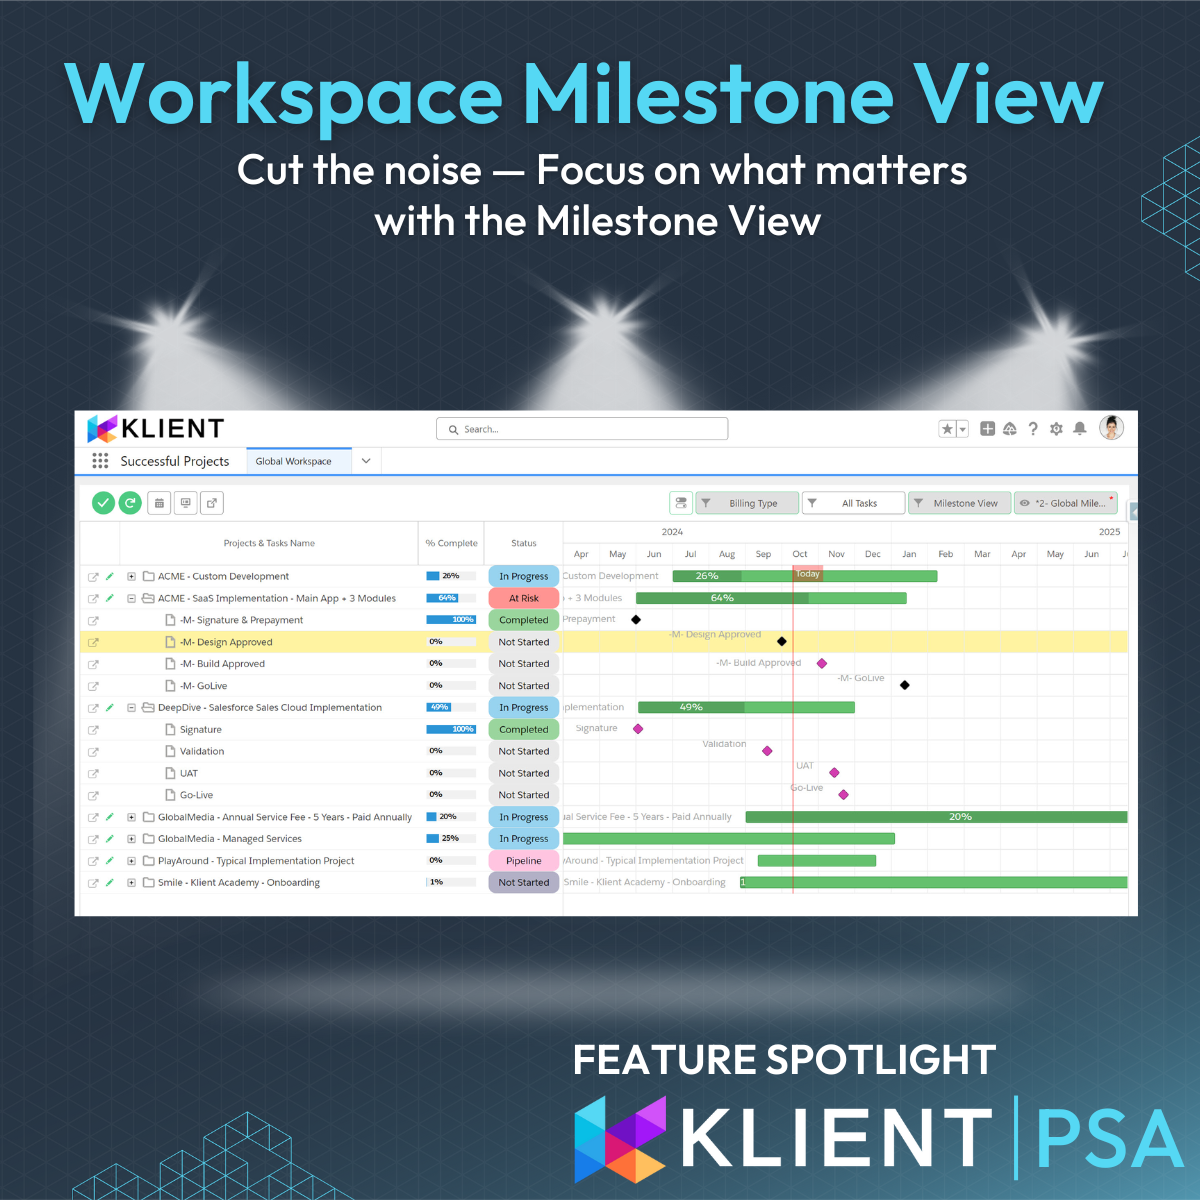
But as you can see here, I have a list of all my projects. I’m logged in Klient, and I have my billing types for the projects we discussed. What we recommend in terms of project structure, it’s at the minimum to have those phases here listed, that are big kinds of buckets. So at the minimum to have those as tasks in your project. So you can have that granularity of tracking and logging time on those buckets, at least the minimum. And the other minimum, bare minimum, is to have milestones. So a list of key deliverables that you need to deliver with specific dates.
So let me just bring that Gantt version here. So you can add that Gantt chart and really dates that are easy to focus on and target for stakeholders. So as a business owner, as the customer, I don’t wanna track every 22 tasks that we have, but tracking four milestones for when we go live, when the bill is approved, this is totally manageable and something that we encourage all our customers to maintain. So having those dates and sharing those dates with the Salesforce AE, like I said as well, they love seeing where the project is going on the Salesforce side of things.
So this was a very bare-bone structure. Let me go in maybe into something that is more substantial with the custom development project here, where I have different layers. So first we can see we have subtasks and this one is based on, we’ve talked about billing types, but there’s methodology as well. So we can be more Agile, more waterfall, or in the hybrid just in case it’s a hybrid. And we have that level of detail.
And what do we wanna point out is how efficient and how powerful it is to have good descriptions.
Yeah, absolutely. We recommend putting these descriptions very clearly, right? You’re defining that task so that the customer has an understanding and expectation of what that task means, what that deliverable is. So transparency is the key to kind of eliminating scope creep. Because they have an understanding of what you’re gonna be doing. And we also recommend that these descriptions be customer-facing. So these should be pushed out to your SOW during that sales cycle. And that way you have alignment on what’s gonna be done and when it’s gonna be done.
And there are a few things you said Katie, when we were practicing and before, it’s about the structure and one platform. So this could be customer-facing, and really to create transparency during the sales cycle and during execution. But you can also have guidance for your internal team to make sure they follow the process. So when it’s a story like that, maybe you wanna make sure that they validate the requirements, that they will write a proposed solution and get it approved. So you can build a list of checklists to really guide your people.
So again, this is within our system, but any system could have that granularity of project structure and sub-level of detail. So this is what you need to make sure that you improve your quality because based on templates, you create more and more updates.
So this is kind of the high-level review that we wanted to give on the customer billable project templates. There’s a ton of other variety that we can look into. We have four others, where we’re gonna cover some of those aspects as well.
13:20 #2 Customer Roadmap Project
Ready for the second one, Sean?
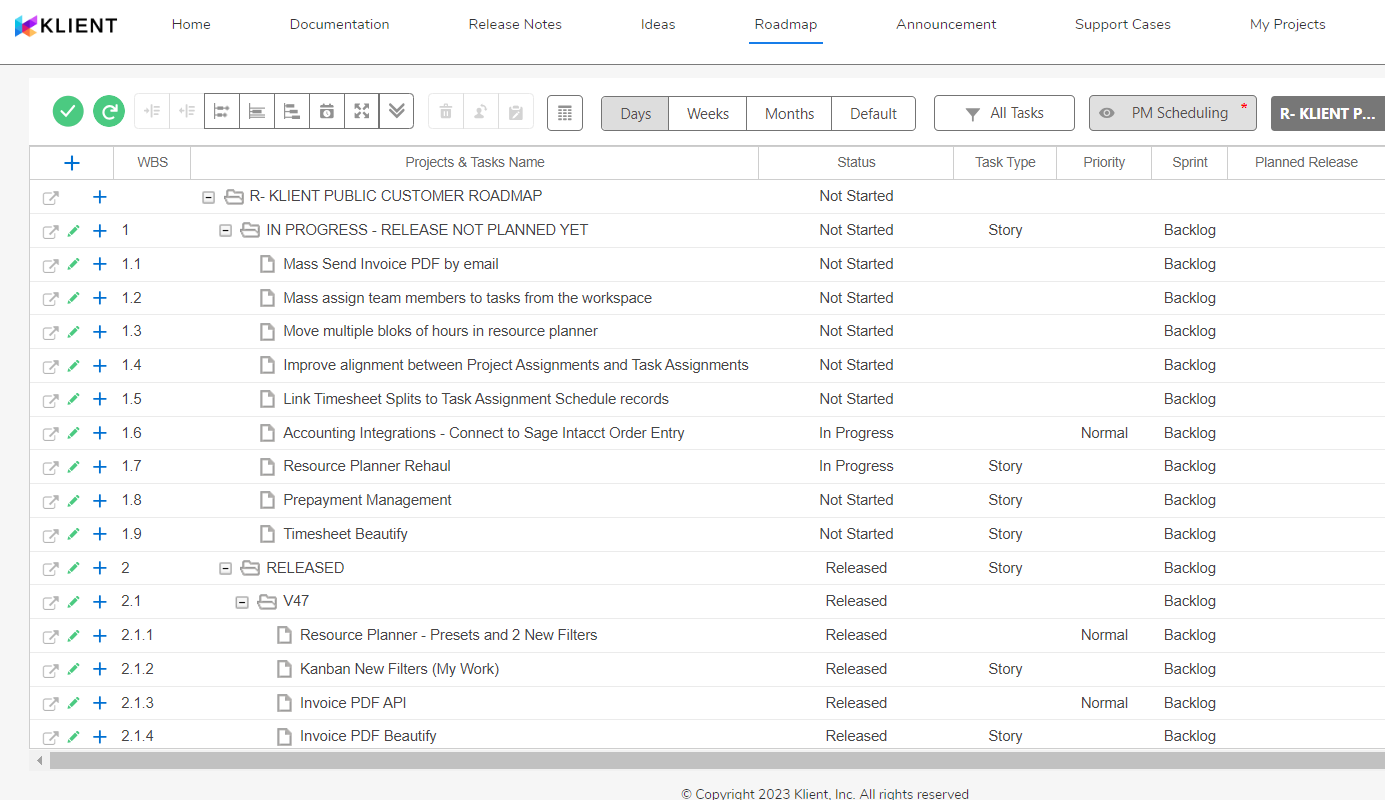
Yeah. Customer roadmap project. So I like this because what this does is create pipelines for me, right? So you don’t want to put everything in a phase one because that’s not feasible. It’s gonna scare your customer. It’s gonna be a big bill. So the things that don’t fall into phase one, fall into next phases, and that becomes a pipeline project. I think it’s very important during the delivery phase that your consulting team starts to identify those right away. And I think we should kind of do that here on this call. What do you think?
Yeah? It’s really on the sell side. Sean, already during the sell cycle, you can identify a lot. Then during implementation with the consulting team, they will get a ton of wish list items, nice-to-have, some like Katie said, you can add in your existing project. Other bigger ones not related, you can, you should park them because when you’re gonna need more revenue, you need to go have a fallback plan to show exactly what your customer needed so you can position it better.
So yes, let’s do that. Let’s do a role play. But before we jump into the role play let me switch environment and come to a Saasinct account. So, in our environment, we do have Katie because we use Klient to run our business, right? So we have Katie in our system with our contact, with our opportunity, but we also have all the projects that she’s completed with us. So we truly have the 360 degrees of our customer in terms of the project side. And you can see that she followed the Academy and all is in green. She became a partner. And now we have that customer roadmap project that we also track. Those projects are created as soon as Katie became a customer of ours. So we created it automatically.
And this year, this is where the map, the role play comes in play. This is an empty document, with only sections, but we have suggestions for your team in this case, Sean, if you wanna run and define that roadmap planning for Katie to see how she’s gonna get even more customer success. And, I’ll be your sales engineer or your note taker, and I’ll build right here that project plan to see how easy it is to build those.
We’re calling it a role play, but this is for real, right? This is real. So Katie, you know, thanks very much for being a Klient partner, and being a Klient customer as well. Obviously you have a deployment of Klient. You’re using it, you’re leveraging various kinds of modules as you’re going forward. But, what does the future tech stack look like for Saasinct, right? Where are we? Where are we going next? So maybe you could start identifying areas in the business that you want to kind of start adding value.
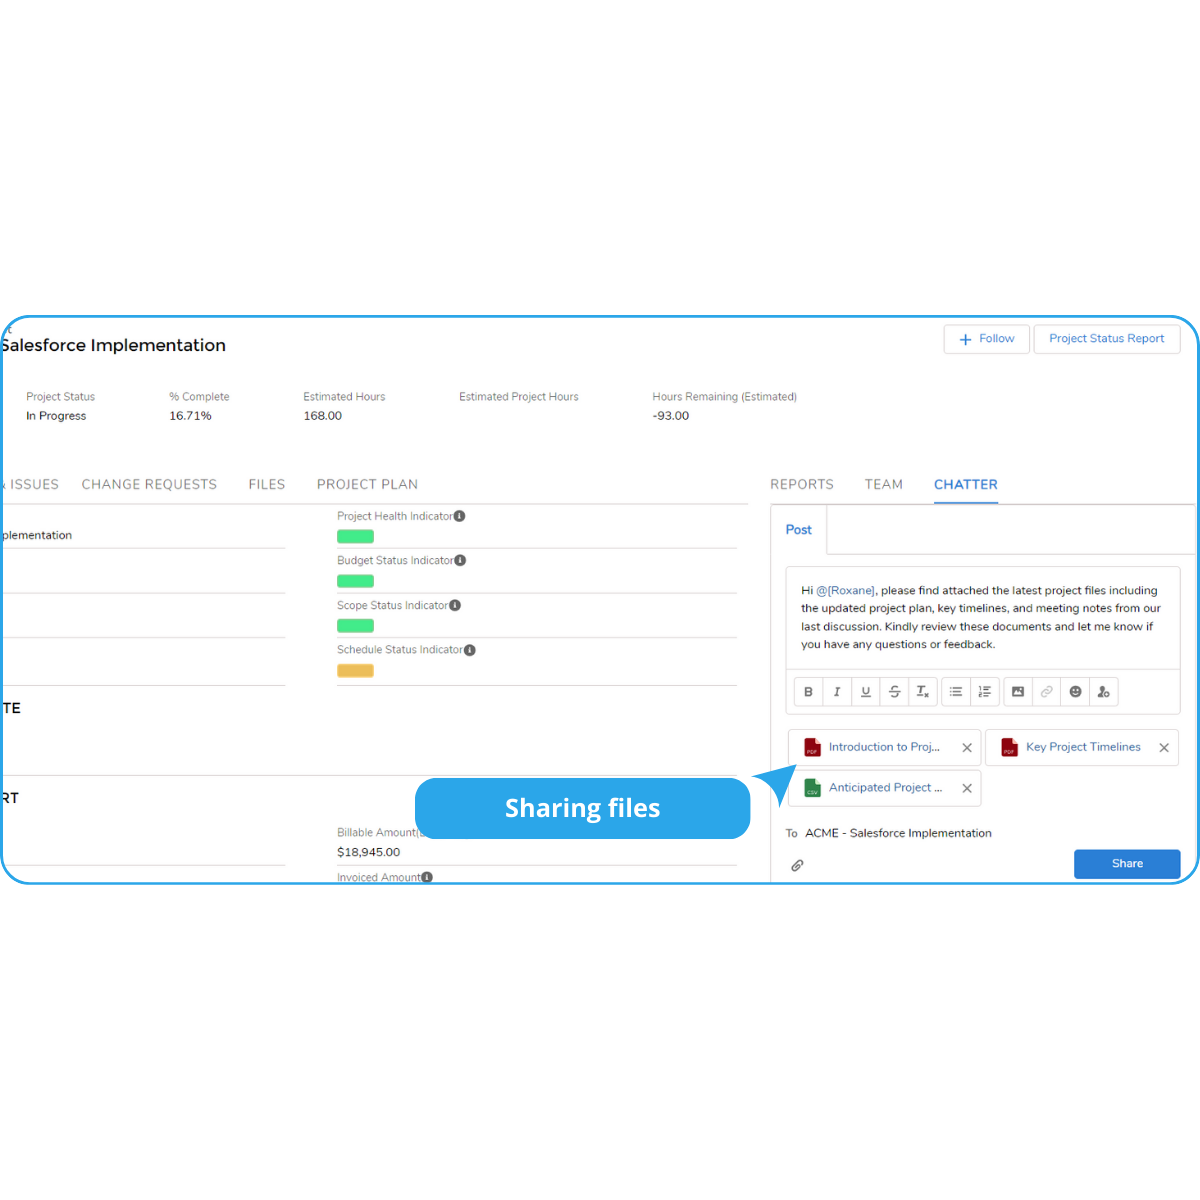
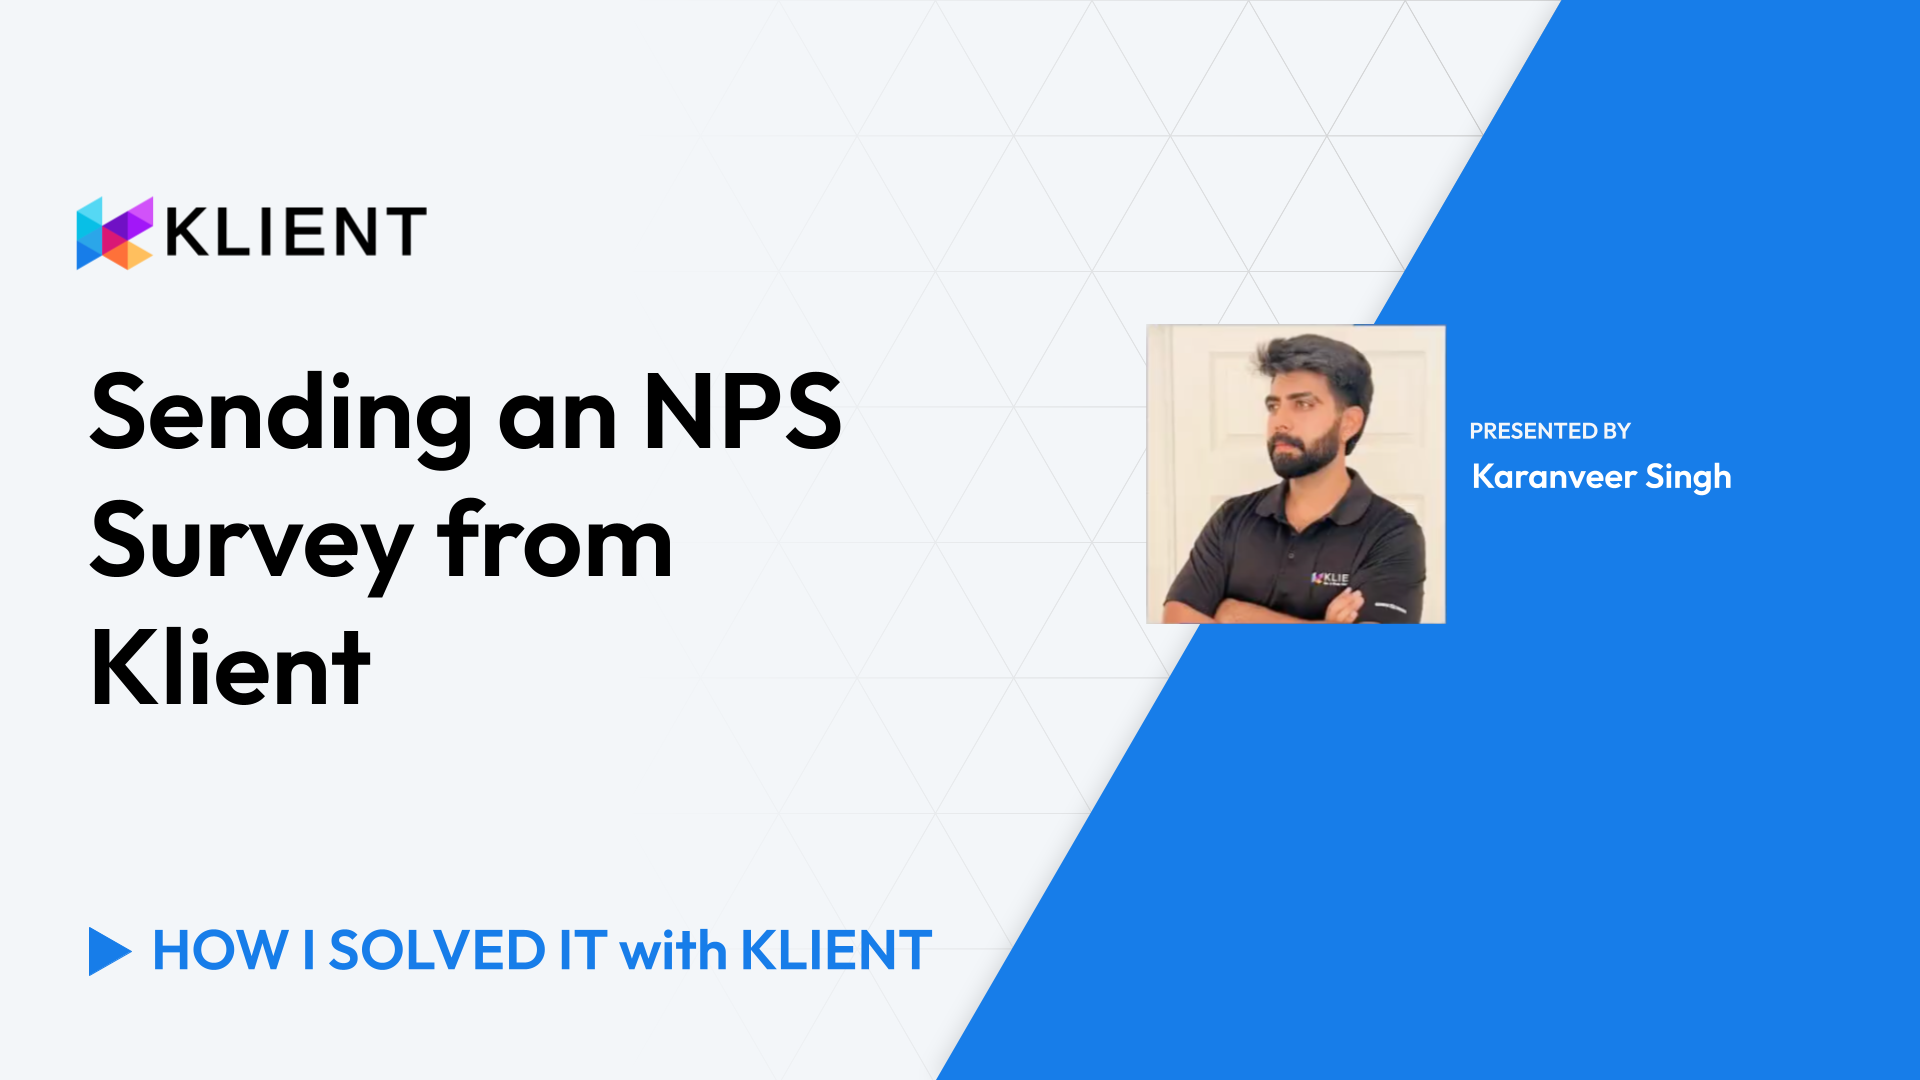
Yeah, so we’ve already rolled out the projects. We do invoicing using Klient. We do a lot of pit pieces. Now that we have all that running, there are a few more features we’d love to roll out. So I think that one of the things we want to do a better job of is getting customer surveys. I know Klient might have that feature ready for me. So customer surveys, I wanna be able to send a survey out to my customer, get their feeling of what kind of a rating they’re gonna give me, and then submit that to my Salesforce partner portal so that I can get those CSAT ratings on my AppExchange. So using the survey feature would be one thing I’d be interested in, so that I can focus on that goal of getting some of those ratings.
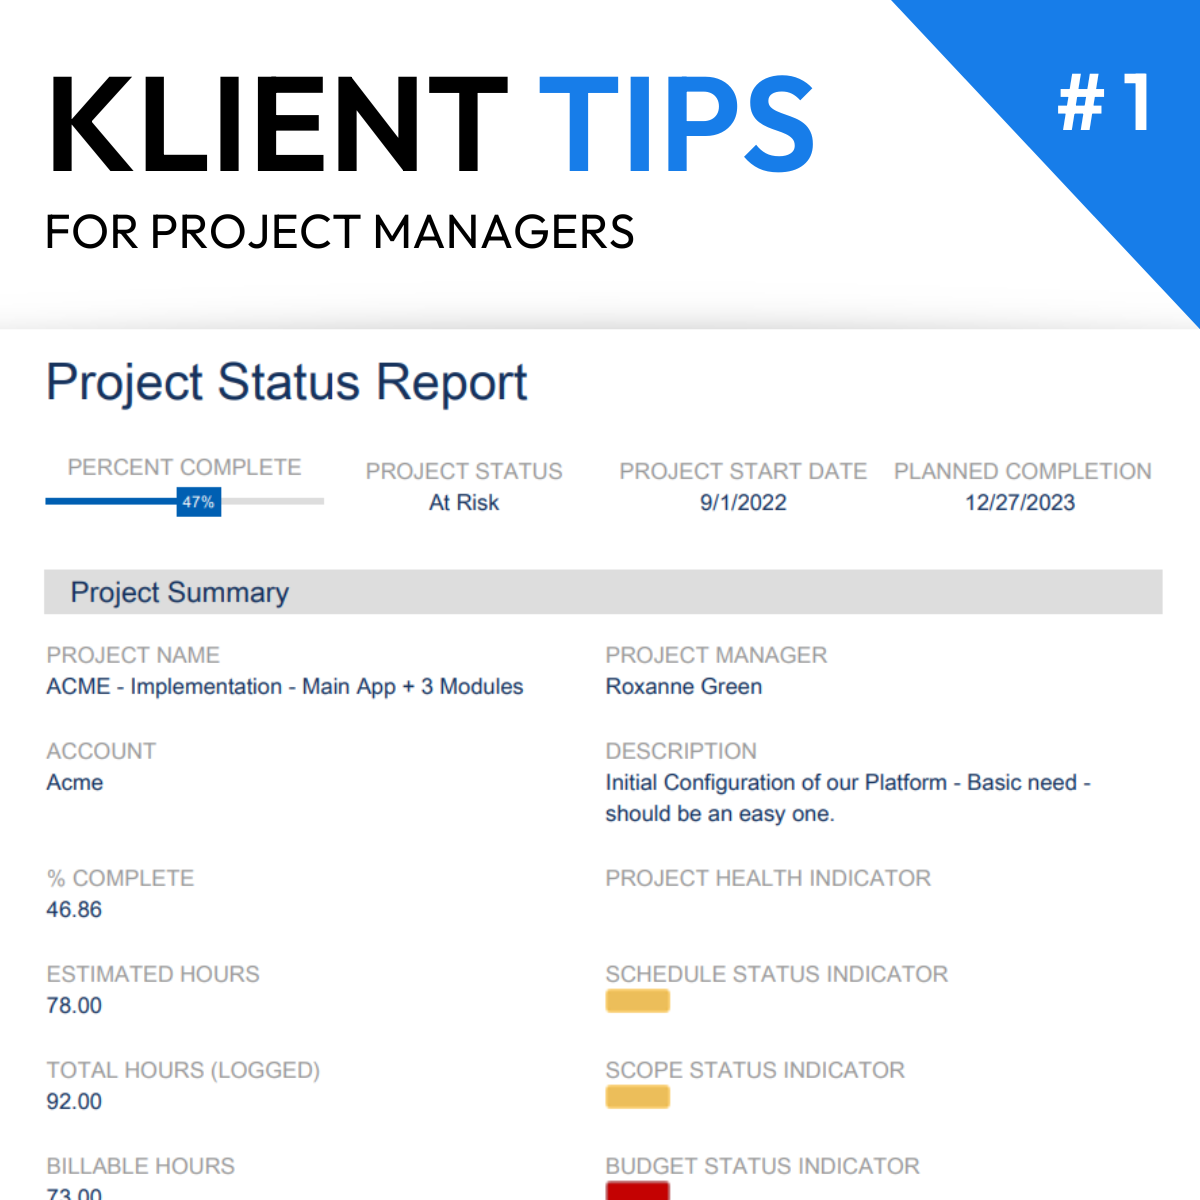
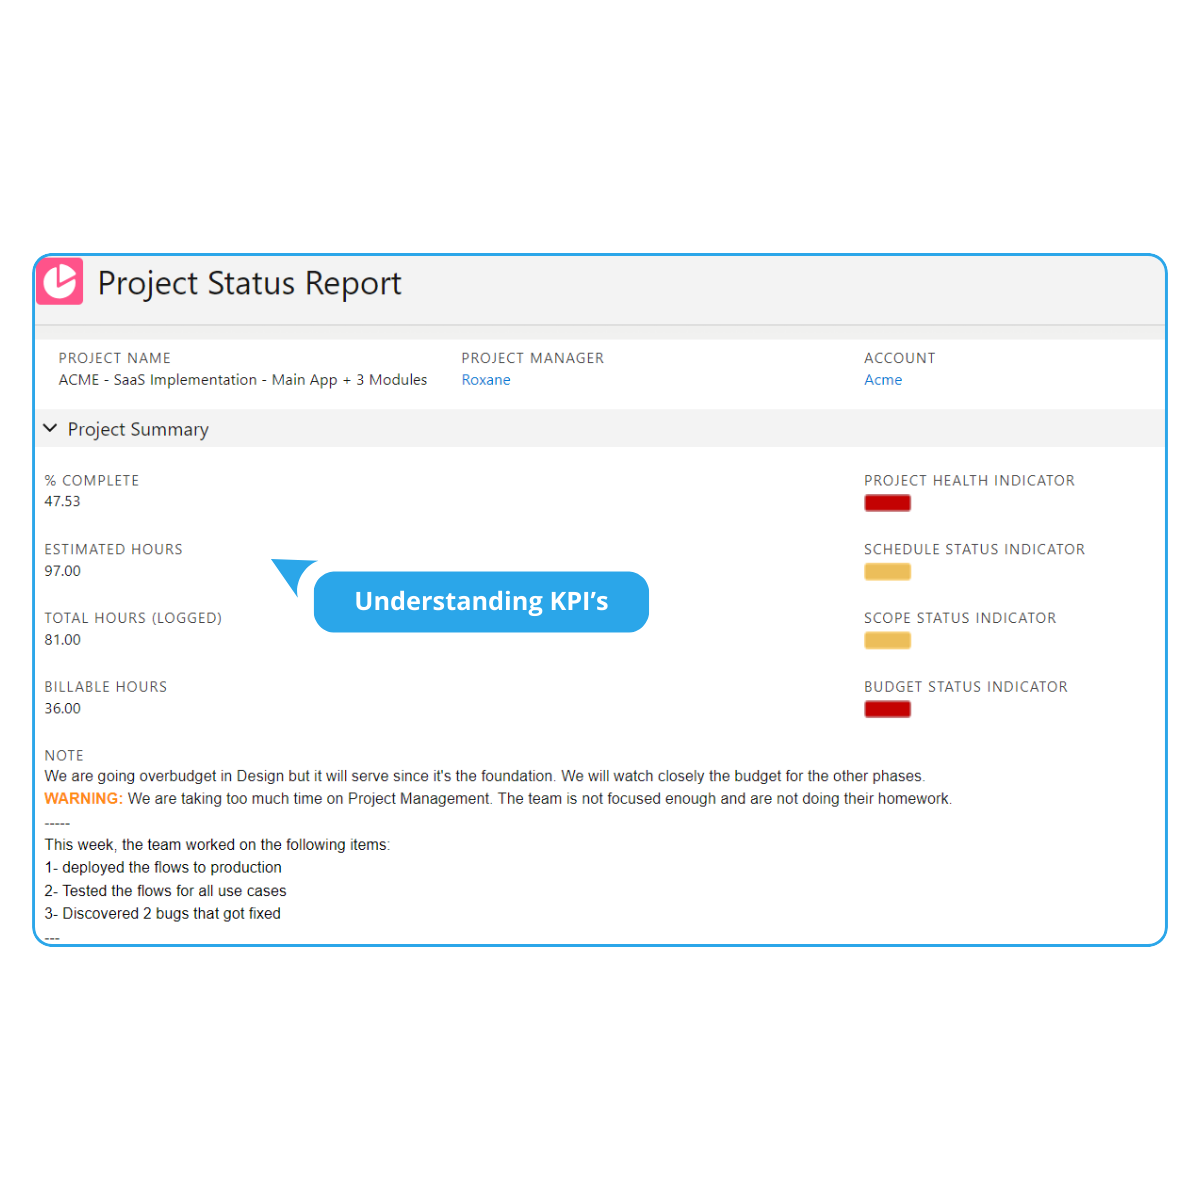
Another one would be doing weekly budget updates for our clients. So like a status report, automated out of Klient would be great. We have all this data now in our projects that our project managers are tracking, and I’d love them to be able to just click a button and send the weekly status report. I know that’s also something you guys offer, so I just wanna look more at that feature and see if we can do that for our customers and save us some time manually pulling those slides together.
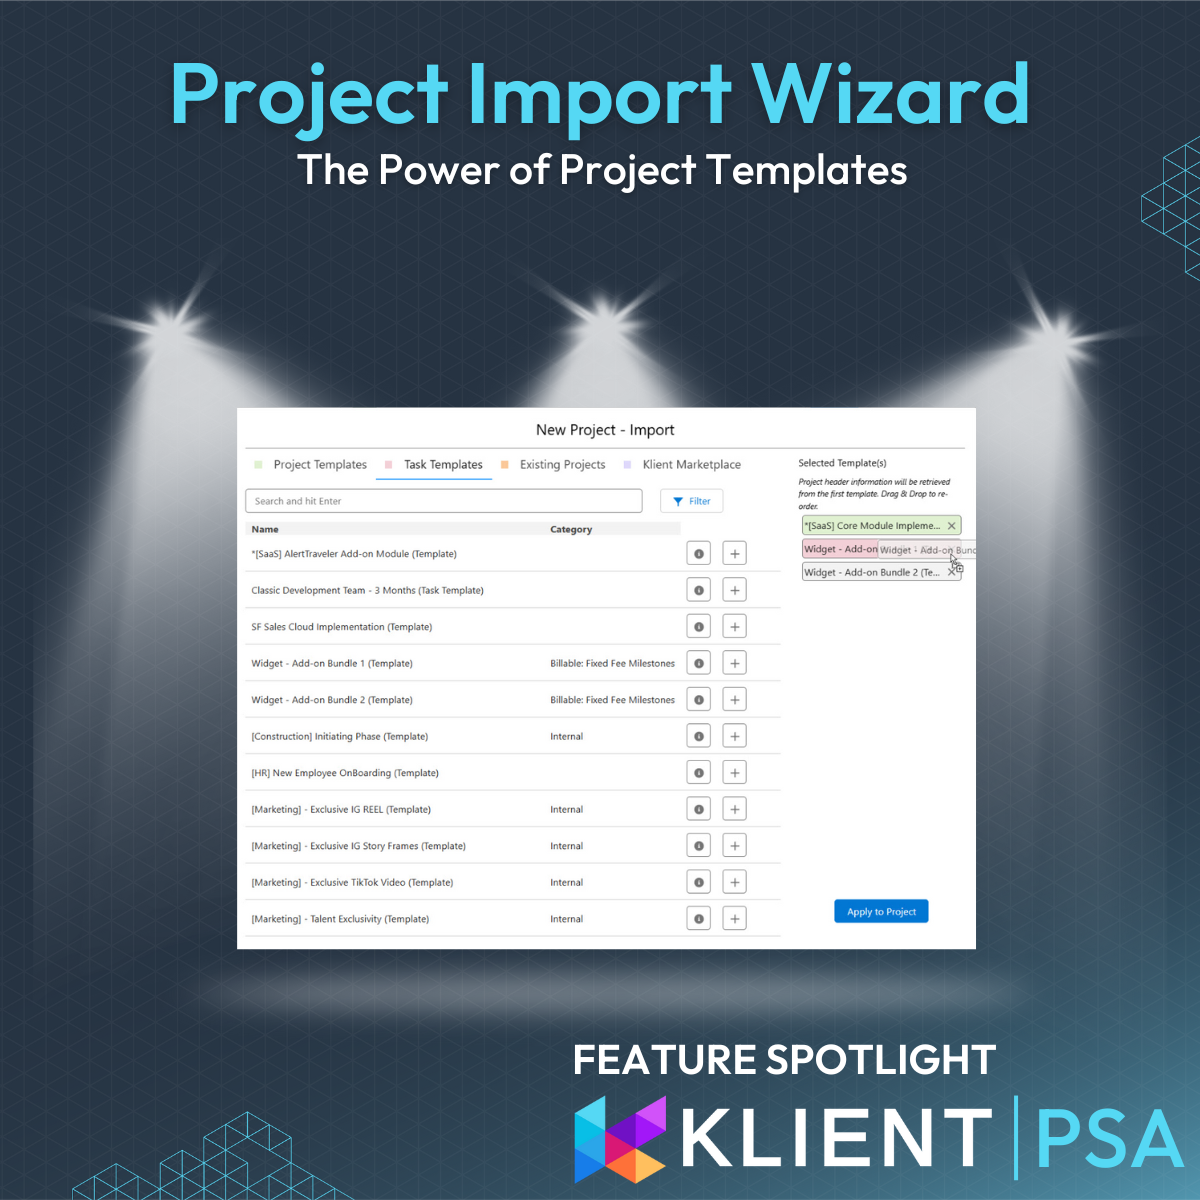
And the third thing I think we wanna do is build out some project templates. So you’re obviously showing us some project templates, but when we’re doing pre-sales activities, we have a number of offerings now that we’ve gone to market with. And so each of those offerings has a certain dollar value, certain estimates, a certain different set of tasks. So we’d like to set up templates for each of our offerings so that our sales team can kind of pull from those templates and limit the pre-sales time we’re spending on deals prior to closing them. So those would probably be the next things on our roadmap.
Awesome. Awesome. So we talked about surveys, we talked about status updates, and we talked about project templates, pre-sales templates. You know, give me a concept of priority, right? What’s the first thing you wanna work on? What’s the most, the next thing you wanna start out?
Something very relevant for us right now, I was just meeting about it yesterday actually. The project templates. So we are putting some new offerings on our website, and we wanna get that first project template so it’s repeatable and something that will help us continue to scale.
And what kind of timeline are we looking at for starting something like that?
As soon as I get back from vacation, so in a couple of weeks.
In a couple of weeks, okay. So let’s say mid-September.
Yeah. Okay. That sounds great. Thanks Yannick for building that out. And, this was a bit of a role play, but I think there’s some reality here, right?
And by the way, everything Katie did mention is available out-of-the-box. The purpose of all this, it’s not to show how fast I can type. It’s really to show you how easy it is. And it’s always something. You should always be doing it. Your consultants should always be tracking new ideas or wishlists of your customer because this is future revenue. It’s a lot easier to close with existing customers, new business on the service world, versus finding a new customer. So building that roadmap and not just relying on sales, really having the consultants, the teams, the project managers, even the developers logging ideas. Everybody should be involved, everybody in sales when you do this. We need more projects so this is a great way of doing it.
14:26 Klient Demo & Role Play (Customer Roadmap Project)
How are we doing on time? Pretty good? Non-billable customer support project. Why are we logging time against non-billable projects?
Just one second Yanick. I will say we’ve already answered a couple of questions, but there are some questions coming in. So if more come in, we can ask them now, or maybe at the end.
Yeah, I didn’t mention it. Please ask it. And we’re going good on time, so at the end, we’re gonna answer all the questions. I just wanna make sure we go through the five templates and project business recipes. And at the end, we’re gonna answer all the questions. We’re gonna have time then. Cool.
20:56 #3 Non-Billable Customer Support Project
Non-billable customer support project. So the concept here is, why do we need this? Why do you need this? As an SI, it seems to be more kind of a SaaS world thing, or just support. It’s true and not true. So at the end, it’s between paid engagement that you have holes, that maybe your project manager or your consultant are receiving questions from the customer. Sometimes it’s something that takes 2, 5, 10, 15 minutes to answer, and they will answer it for free because there is no engagement. But if you don’t do that and collect all those 15, it’s a lot of revenue that you’re leaving on the table, or it’s not a good offer that’s packaged for the customer too, so it’s important to restructure those requests from the customer, like those support cases, and properly manage them inside a project.
Because those are pure costs and if you don’t monitor them closely, it can be very expensive. And there’s a way that you can always figure out, the simplest way to answer support cases. But as a concept here, if I’m going back to Katie and Saasinct…
One other thing to add there is some of those questions become roadmap items that can add to revenue as well.
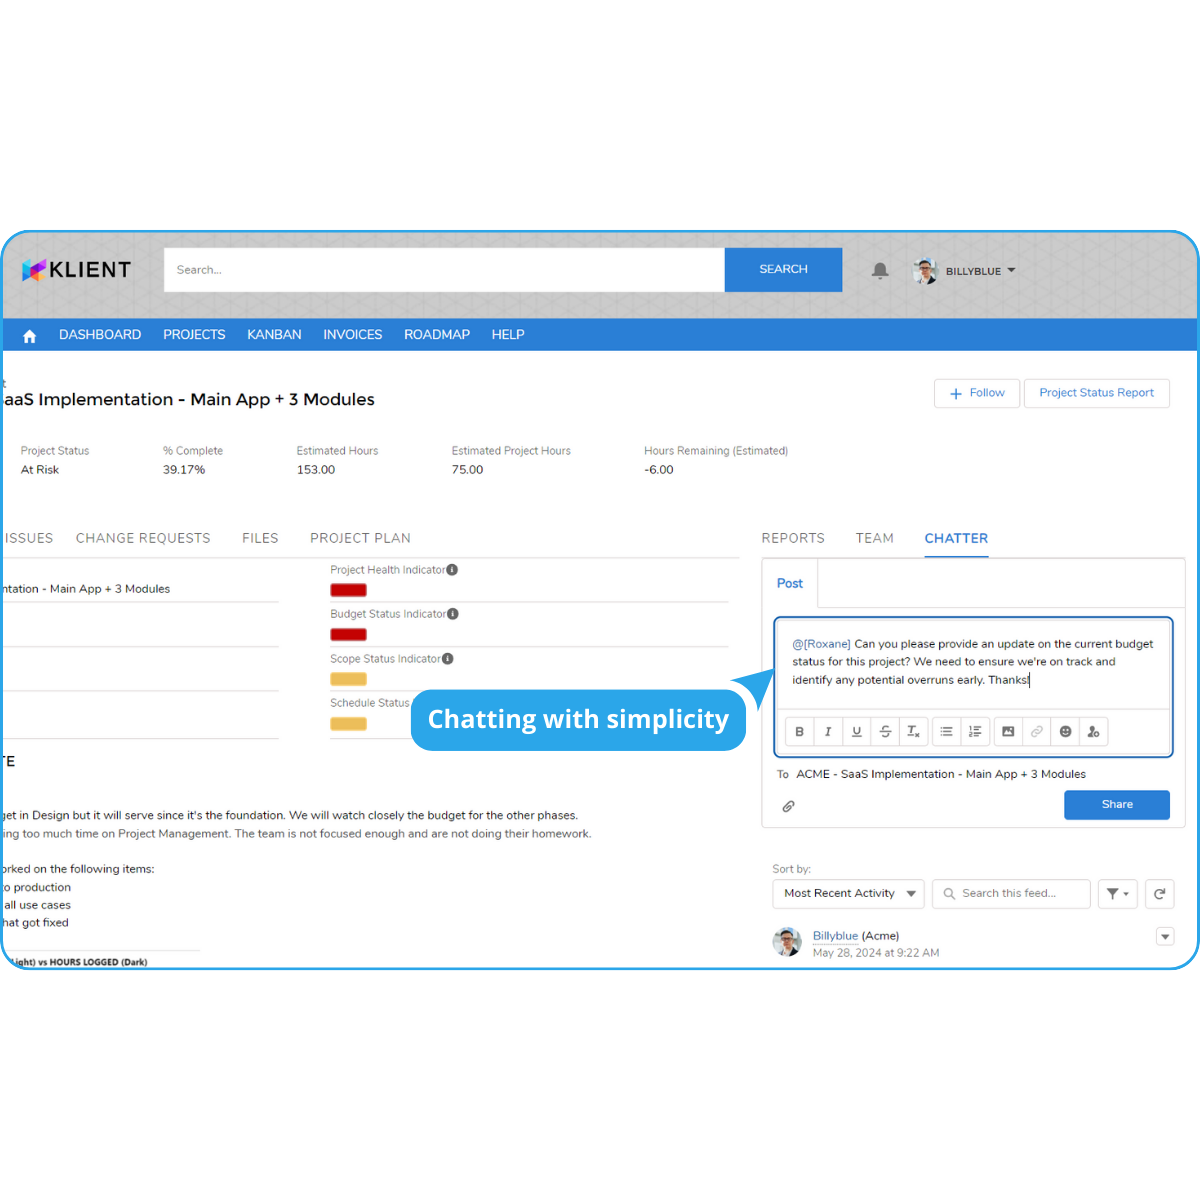
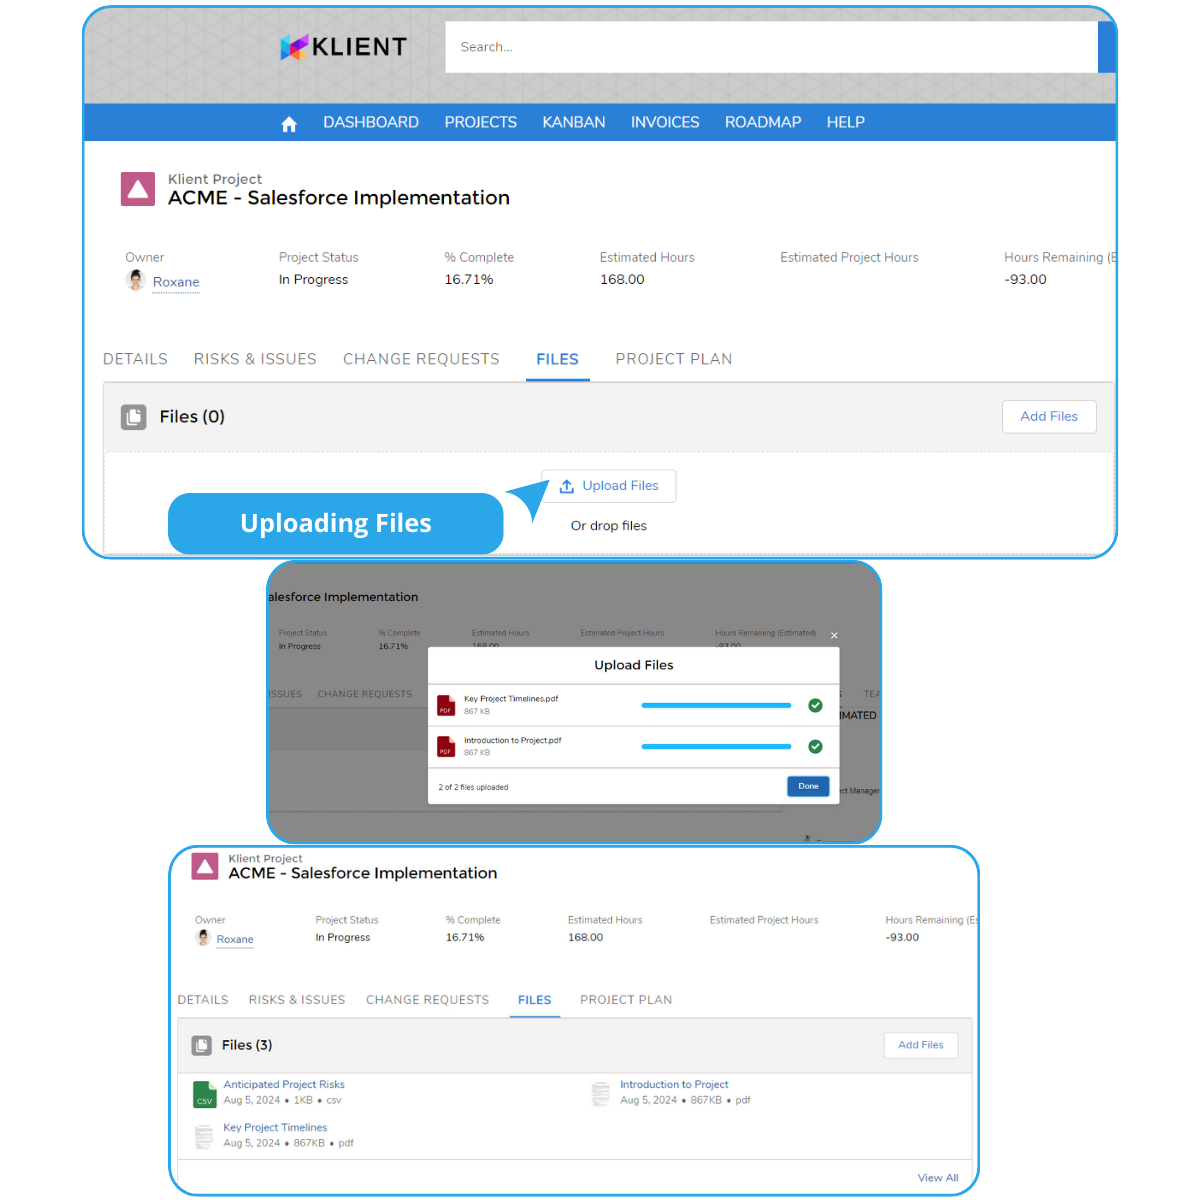
That’s exactly it. That’s the concept. When your case is coming in, you’re gonna find a solution to resolve a problem you might have with your service, but also you might find new business opportunities. So again, Katie, when you joined Klient, we’ve created automatically a non-billable support project. And in this project, it’s empty until you create cases. We use Salesforce cases for our support, for our omnichannel and everything. And every time there’s a case coming into our account on that non-billable support project, we create a relevant case. So this way you can come and log your hours to it, and we can see we use assignment and we use statuses to track it. But the key thing is that we want our people to log time so we can really measure the costs. And you can do this simply through this interface here.
But the beauty as well is that that interface, you can directly put it on your case object, so your support team can log their time directly through their case. They don’t necessarily need to come through that environment. So this is a really simple demo. There’s not a ton of structure here, but this is what has been working well for us. It’s to create a support project when you close a new customer, then create a case every time there’s one coming, and then logging hours to really measure the true costs, which is the purpose of this, right? The overall margin of our customer includes all billable and non-billable time so it’s important.
Any insights Sean?
Yeah, like we mentioned, you’re gonna get a good overall understanding of your margin because your consultant has a cost associated with it, and you wanna log that so you have an understanding of what that project margin is. But most importantly is you’re gonna get a lot of pipeline ideas from there, right? Support issues create opportunities for you to get closer to your customer and create revenue opportunities in some of those findings.
Here you can see there’s ‘gather feedback after case resolution’. So when you’re binding this through that project and that task, you can send that new survey you’re gonna build as well after a support case. So this way you can get your CSAT easily and see how’s the feeling because when you resolve a problem, it’s probably a good time to ask for an AppExchange review. So, tying it with that mechanism here really helps get those reviews out because we know it’s important for both SIs and ISVs to have good AppExchange reviews.
24:43 #4 Employee Recruiting & Onboarding Projects
So moving on to the next one. We’re going deep on the inception loop here. So it’s gonna be on the employee recruiting and onboarding project.
So Sean, why is it important, before we look at the detail with Katie, why is it important to have a project of recruiting and onboarding resources for an SI?
Speaking for myself, on day one, I knew who to go to for what, had a structured process that allowed me to kind of understand where the information was, where the buckets of information were, and what was expected of me in terms of knowledge gaps. And so, structuring that onboarding process allows you to get to that first billable hour, as fast as you can, on the consultant page. And really that requires structure and rigor. And also to be templatized.
And that full inception is that today we have a discussion with Katie about best practices on recruiting and onboarding, we’re gonna look at your own candidate record in KORG. This is our production environment of Salesforce, where we run our business. And the candidate is a Klient object. And this is where we capture everything during the interview process and the onboarding process before his 9, 30, 90-day probation period. And as you can see, here at the bottom, we have three projects. We have the candidate selection/recruiting project, we have the IT onboarding, so all the credentials that need to be generated and all the payroll stuff for the internal people before Sean gets in. And then we have the workforce onboarding. So from day 1 to day 90 or to his first billable hour, if he was a consultant or to his first sale for Sean, if he’s in sales. Or to his first demo as a sales engineer, this is the workforce onboarding.
So Katie, let’s look at how we structure it and then you can tell us what works well for you in terms of recruiting.
The mechanism I’ve been doing in recruiting with the team is pretty much the same for the past 12 years, in different environments, is that we have a structured way, which is always the same. And for us, it goes through those steps. So Sean went through an intro call, then he did a Battle Station Challenge, which is something on the Trailhead on the AppExchange that he has to do, and then record himself to show that he can express the business side of things and the technical side of things. Then we do a psychometric test. So we have that all structured process that we do all the time. So for us, this has been very key to our success, and that’s why we’re templatizing it adjusting the questions, adjusting the checklists, the descriptions, and logging all that information back.
So that’s why you can see, one system to rule them all. We have the notes, standard Salesforce notes, standard Salesforce files, but with all of Sean’s psychometric tests, videos, all the notes that we had so all this recorded in one system.
So, a first for you Sean, right? You had never seen that side of the business either?
No, and it makes complete sense to me. I always understood why we had offboarding projects. You wanna make sure you get people logged off of their systems and get their computers back and all. I always understood that part but honestly, and this is real stuff that he’s showing you, this is literally my candidacy profile. This helped me get accustomed to Klient, the way Klient does things, who does what here, where the information is, very very quickly, in a very structured way. I knew from the moment I started at 8:30 AM, what are the tasks I need to complete that day. So yes, it was very helpful.
So this is the recruiting. We’re gonna jump in onboarding in a sec. So Katie, on the recruiting side, any tip, or advice that help you get the right people for your team?
Actually, I just learned a whole lot from this, so I’m excited to take some of this. The Battle Station Challenge looks pretty cool. It’s something to add to our recruiting process but I think learned lessons for us is really having a recruiting process. You can spend a lot of time going down the path. Spending my time interviewing people that maybe aren’t the right fit. So we wanna be really organized in our recruiting process, so we’re maximizing everybody’s time. And then obviously investing in resources is a very expensive thing for us. So we wanna make sure we’ve kind of thoroughly vetted all of our candidates before they join the team. And so we found that having that process in place, especially for a small team where many of us are wearing multiple hats, where we can kind of share and team up on activities and finish them based on all of our skill sets. So I would say the process is the most important for recruiting, onboarding, offboarding, and tackling, kind of swarming things as a team to help finish it.
And then the other thing we’re doing right now is we’re building out more training materials. So because we’ve consolidated everything and Klient is the main use case for all of our users, and then we also use Slack, those two things are kind of the key to all of our teams. So we’re doing more role-based training as we onboard new people, so that project managers can get up to speed with how we run Klient, how we execute projects and get the tools and templates they need. And then, also kind of architects and technical people. So we’re kind of really focusing our training for each type of role that we’re hiring so that they can get onboarded and up and running with our best practices as quickly as possible.
25:48 Klient Demo (Employee Recruiting Project)
Exactly. And while you were talking, I was showing our onboarding project, or Sean’s onboarding project, and it’s exactly that. Like, what should I learn? I’m in sales, my track is a bit different, but the main track of learning the company, the codes of ethics, the values, the vision, all the same. So that’s why I think structuring it makes everything faster. We don’t see it here because Sean is in sales, and I decided to go with Sean for the demo, but when you look at the consultant one, we have a milestone that we track for the first hour billable and for the Salesforce certification admin, let’s say if it’s a project manager coming from the outside of Salesforce, we want them to become admin fast. So we have one of our resources, Francois-Pierre that did it in record time. So we track those because we want our people to be billable as bigger than 85% as soon as we can. So this is the milestone you need to track plus is he happy in the role? So that’s why also getting that structure for the first 90 days helps. After that, there’s a lot of other things that’s gonna help that new employee to be happy, but at least he’s gonna be definitely structured to learn your business and your practices.
30:47 Klient Demo (Employee Onboarding Project)
Exactly. And while you were talking, I was showing our onboarding project, or Sean’s onboarding project, and it’s exactly that. Like, what should I learn? I’m in sales, my track is a bit different, but the main track of learning the company, the codes of ethics, the values, the vision, all the same. So that’s why I think structuring it makes everything faster. We don’t see it here because Sean is in sales, and I decided to go with Sean for the demo, but when you look at the consultant one, we have a milestone that we track for the first hour billable and for the Salesforce certification admin, let’s say if it’s a project manager coming from the outside of Salesforce, we want them to become admin fast. So we have one of our resources, Francois-Pierre that did it in record time. So we track those because we want our people to be billable as bigger than 85% as soon as we can. So this is the milestone you need to track plus is he happy in the role? So that’s why also getting that structure for the first 90 days helps. After that, there’s a lot of other things that’s gonna help that new employee to be happy, but at least he’s gonna be definitely structured to learn your business and your practices.
32:09 #5 Pre-Sales Projects & Klient Demo
So we’re going to the last one. Sean, this is new, it’s not even released. This is a new thing we’re gonna start, right? We’re going deeper into the dream and the inception.
Yeah, absolutely. So up to this point, we talked about best practices for those common projects, right? These are what you should be doing, the best practices, but what we’re gonna talk about now is next practices, right? So how can we use the project management concepts for completing a sales cycle? So you may already be sharing your discovery notes with your customers. I do. So this is what I understood from our discussion, can you validate these notes that I’ve taken? But what about structuring the process and giving visibility into that sales process to the customer and actually involving them? Yanick, maybe you wanna show how we’re planning on doing this.
Yeah, exactly. So this is still in the work. I cannot show the real thing. While we still run this process all the time, now we’re restructuring it and we are exposing it, and we’re making sure that the customer collaborates during the pre-sales cycle. We are already collaborating with our customers through the community during the execution of a mandate. Now we wanna bring it even earlier in the process so the customer can already see our structure, can see his project. We can build his roadmap with him right from the get-go.
So from day one, Sean, moving forward, we’re gonna be sending credentials to our prospects, and they’re gonna have access to their pre-sales project, which we all have a certain flavor of. In the SI world, you have your ideal sales cycle that you want to follow, and you don’t want to deviate too much. This is ours. A full sales cycle up to a go-live can be as short as three months. For SI partners with a sales cycle of a month and a half. So this is our typical cycle that Sean will adjust with the customer. So that concept of having this project here and assigning the customer to some of the tasks will allow us to expose this into our Klient Customer Community. This is the overall one, where it’s gonna be a lot more streamlined just for the pre-sale cycle, but here you can see that we’ll expose that cycle where we stand, where we are, but we’re gonna also assign tasks like we saw. So the customer can come in here and can see that Sean asked me if we can do a proper demo of the platform that I submitted a statement of work, a work breakdown structure, an invoice. The customer can just come in here and upload it and even chat to Chatter directly to Sean because all this is within the sales experience, Salesforce Experience Cloud.
So that’s the beauty of having this. I wanted to show the checklist, but they’re not showing now. But even checklists will be shared with our customer.
So we’re managing engagement right off the start, right? We’re exposing his project, the milestones are his, Mr. Customer do you want to go live on this date? In order for you to go live on this date, we’re gonna do a reverse timeline. You’re already doing this, right? These are the things that need to happen. You can go live by this date. But I create that project plan, I expose it to him. Guess what? He starts using my tool right away in the beginning of that sales process. So he’s more familiar with it.
There’s the inception. The inception, it’s the dream within a dream. And to not confuse, this is the sales process that we will share and collaborate on. And this block here, it’s the implementation we will sell. This one is based on our standard Academy, which is a two-week thing that you can get rolled in Klient. Sometimes it would be a six-month project, that block here. And we would spin another project for this. We’ll not build that within this one, it would be another professional service project, starting from a template that we will generate. So this is really pre-sales. We’re gonna start experimenting with this.
So Katie, do you have any comments? This one is out there so we’ll tell you the results in the next episode, but what are your thoughts so far? Would that be useful?
Yeah. I mean, the sales process is a science. It’s just a checklist. That really is what we do in sales. So I love the idea of being able to teach other salespeople that it is a process. And especially when I’m co-selling with Salesforce, I’m typically trying to line up very quickly with their sales process. So being able to kind of get through that scoping, that discovery, and getting those proposals turned around, the more organized we are and again the more I can pull in other people to help me expedite those sales processes… I like this. I think this would be really helpful.
I wanna say this is a great way to hold your account, your prospect, accountable to the milestones they set, and the dates they set, right? Awesome, awesome. This is not relying on emails, this is the actual project you’re interacting with. So that’s what I like about it.
So this was number five. I will tell you how it goes when we start experimenting with it but for now, Salesforce partners on the line, it’s time for you to live the dream so you can become a role model and also run your project in Salesforce, with the Klient PSA.
37:38 Special Klient Offer & Conclusion
And Sean, what’s that special offer you advertised before? This is an incredible offer, an opportunity for you to start using Klient, right? Remember this email address, [email protected], essentially I want you to reach out to me, I’m the one who’s gonna receive that. You’re gonna get two free lifetime licenses, so it’s not a one-year thing. I wanted to do that but Yanick said no, it’s a lifetime thing for two licenses. We’re gonna give you five project templates via our marketplace so that you can get started using that right away. And one of those spinners that they use in the inception, so that will be mailed to you via snail mail, just go ahead and reach out to me and we’ll be happy to talk about that. Of course, Saasinct is available for your deployment services.
Thanks so much Katie for attending this webinar as well. Do we have any more questions to take online? I’m seeing a lot of comments here.
Yes, we do have time. But first I would like to thank you Katie, before we jump into the questions, thank you very much for being here with us and showing those insights. And Sean, thank you for being a good growth agent throughout this episode. We’ll come back with episode two, which is gonna be about how to deliver a product. We’re gonna have our product development team talking about how we manage our sprints and development stories, and ideas coming from our customers. This is gonna be the topic of episode two.


 How We Do It at Klient: