Rosalie Chassat: Good afternoon, good morning, everyone!
Rosalie Chassat: Thanks for joining us. I’ll wait a couple of seconds, time for everybody to get in.
Rosalie Chassat: All right.
Rosalie Chassat: Alright, let’s get started.
Rosalie Chassat: Okay! So, welcome to our April product update webinar with Client. I’m Rosalie, I lead the customer success here at Client, and today, as always, I am joined by Yannick, our CEO, who will be walking us through our products and demos. Yannick, I think you’ve been pretty busy these past few weeks slash days.
Yanick Abraham: Hi, it was Aliyah, we’ve been traveling quite a lot, we’ve been on the road, so, we were coming back from the Salesforce TDX in San Francisco, so it’s the,
Yanick Abraham: the tech conference of Salesforce. Dreamforce is more kind of the user conference, while TDX is the developer conference, so we’ve learned quite the interesting stuff that’s upcoming in the next few releases of Salesforce.
Yanick Abraham: Plus, two weeks ago, we were in Utrecht, Netherlands, to see, to be part of the Agent Force World Tour, but, we’ve met some of our customers as well, so…
Yanick Abraham: Hi to Cobra, Grootech, and Balance Force that we’ve met before. Cobra and GrowTech, they also had a booth at the event, and we’ll be on the road. Rosalie, we have other dates to announce at the end of this webinar.
Rosalie Chassat: Yep, exactly. And as always, we also have Natalie, who’s on camera today! Hi!
Nathalie Adam: Hi, everyone!
Yanick Abraham: Yeah, it’s good to see you.
Rosalie Chassat: She’ll be, helping us in the chat, answering your questions, and I think everybody, all our customers know Natalie by now, so… Alright, perfect. And before we move forward, just keep in mind this webinar is meant to be interactive, it is not a one-way presentation, so don’t hesitate to send questions, react, drop comments, etc. And speaking of interaction, we’ll just start with our
Rosalie Chassat: very first poll. As always, we are curious to know who is attending those webinars. Is this your first webinar or not? I’ll leave a couple of seconds, and we can move forward with our agenda. So today is a little bit different from what we usually do on product update webinars. We are focusing on client agents and our new feature hub, and this is really where we’re pushing our product forward. So what you’ll see today is already live.
Rosalie Chassat: There’s a couple of things that are coming next, and in terms of agenda, we will start with talking a little bit about, the feature hub, then we’ll show, how the agents, fit directly in client, and how you can use them. Most of the time will be spent on the demo with Yannick, and then we’ll wrap up with what’s coming next, roadmap, those Salesforce events we mentioned, etc. So, let’s… and it looks like we have a lot of newbies today.
Yanick Abraham: Yeah, recorded attendance today, so welcome, everyone.
Rosalie Chassat: Record registration, yeah. Perfect. Okay.
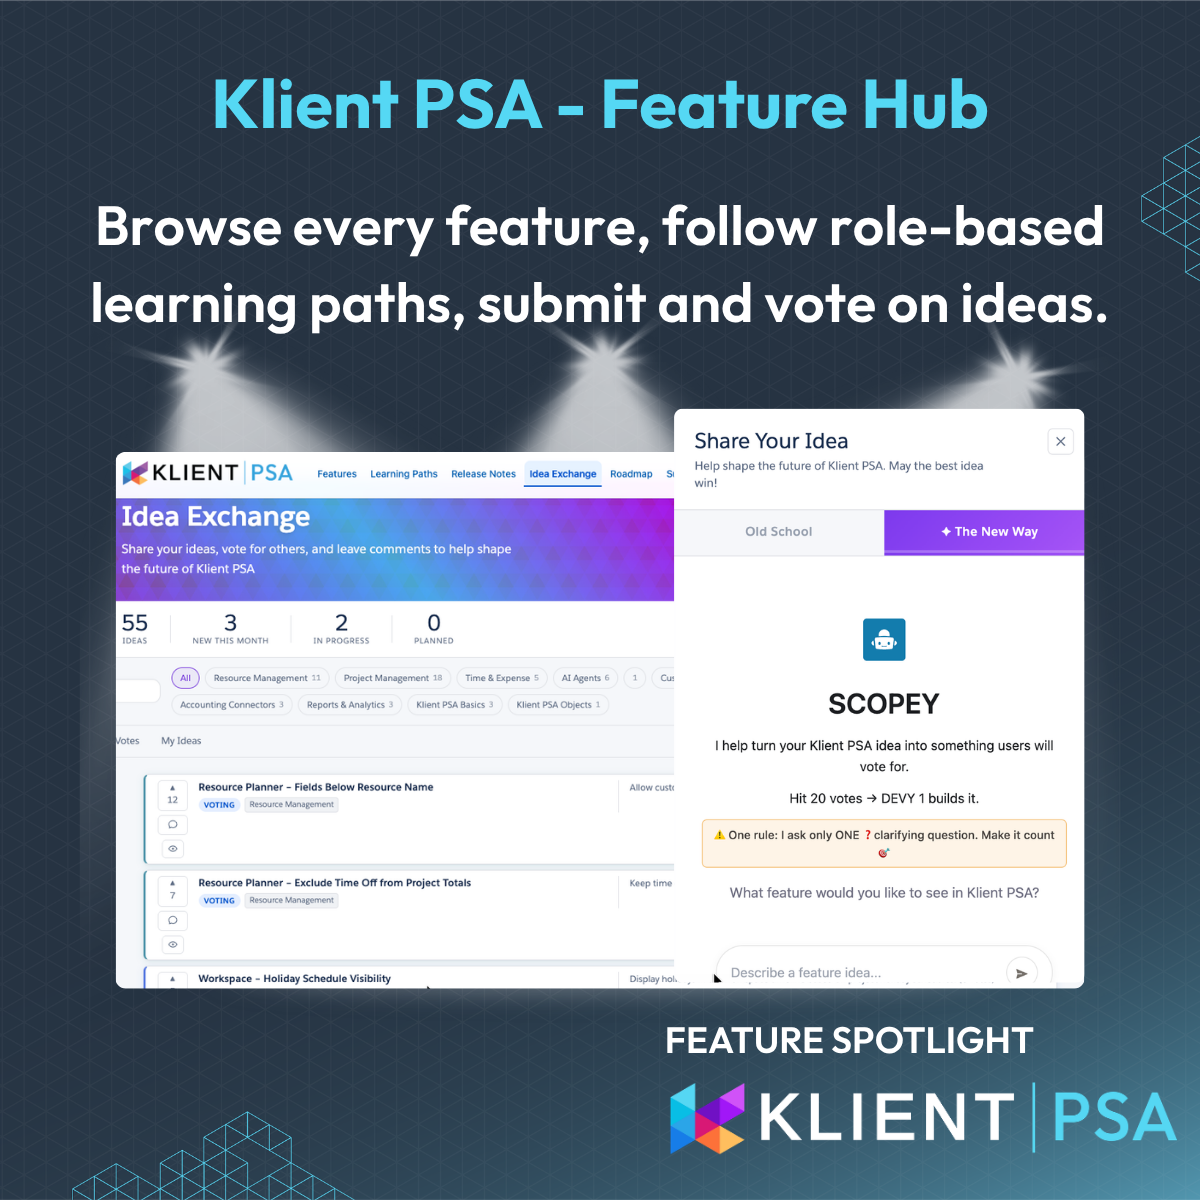
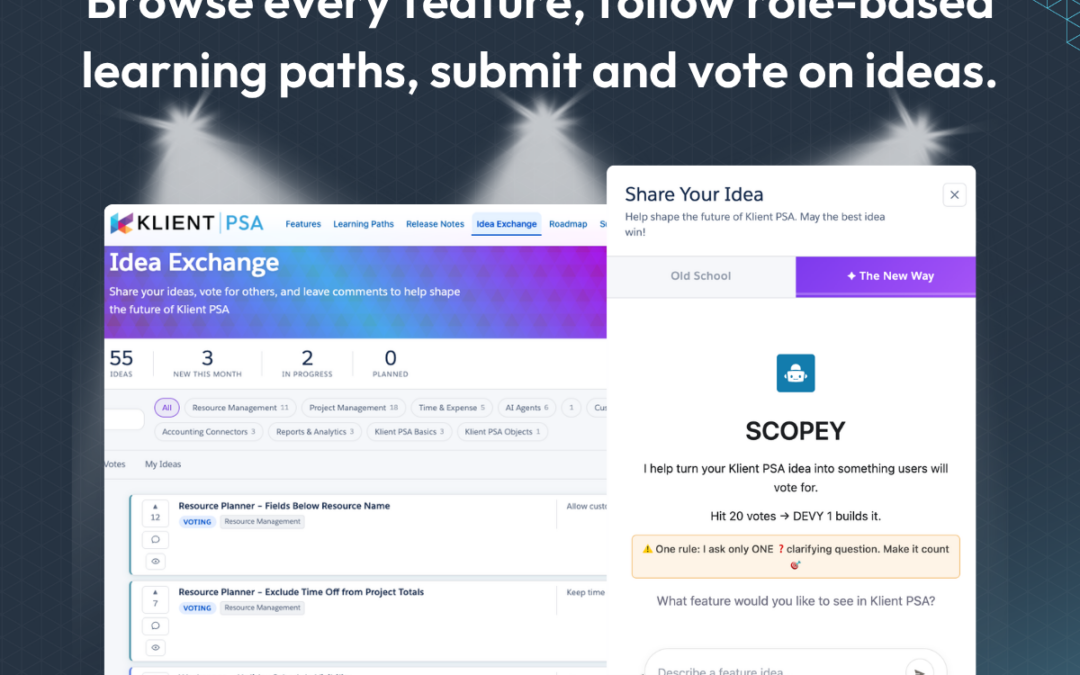
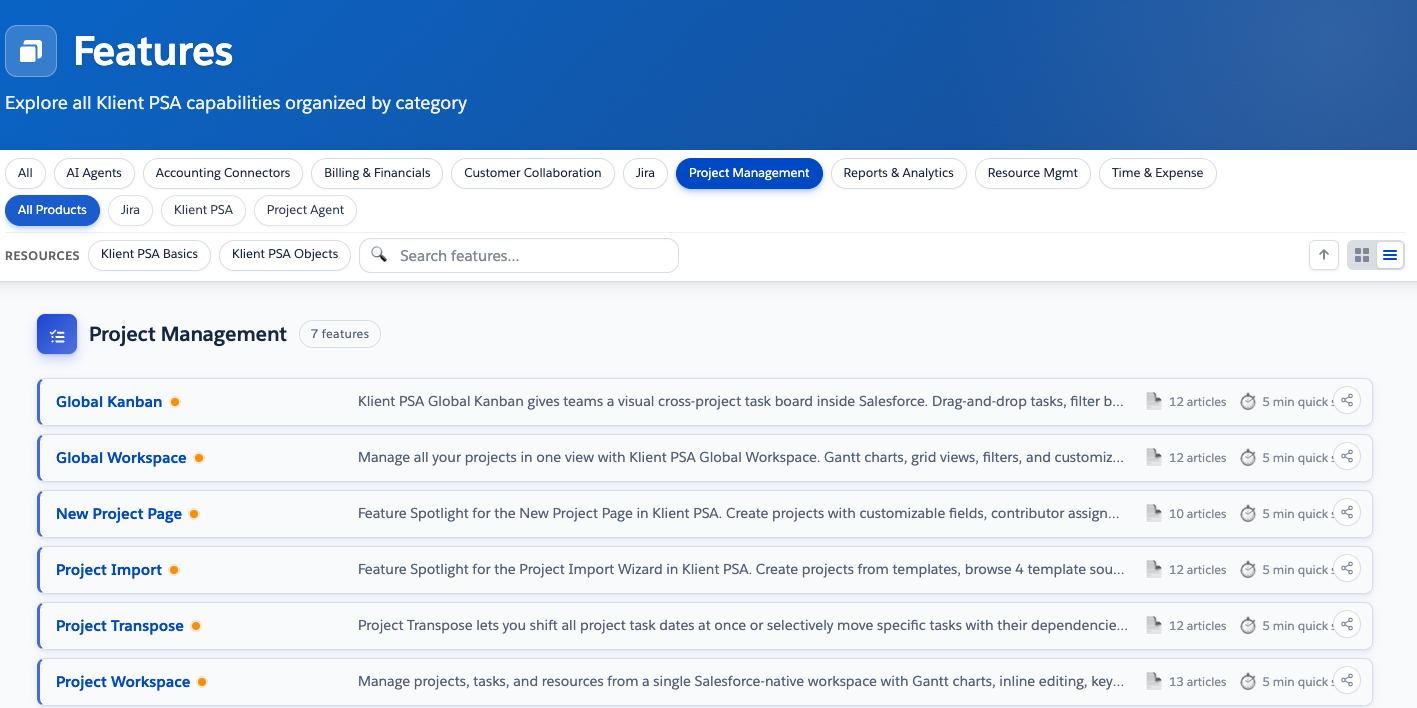
Rosalie Chassat: So, before we jump into agents, quick highlights. This week, we are officially launching our customer community, the Feature Hub, as you can see on the screen. So this is really our new home for knowledge, answers, how you stay up to date, how you make sure your team are adopting clients faster. We did introduce this on our last webinar, and I’ve been mentioning it on quarterly check-in, but this is now the standard way moving forward. This is where you want to be.
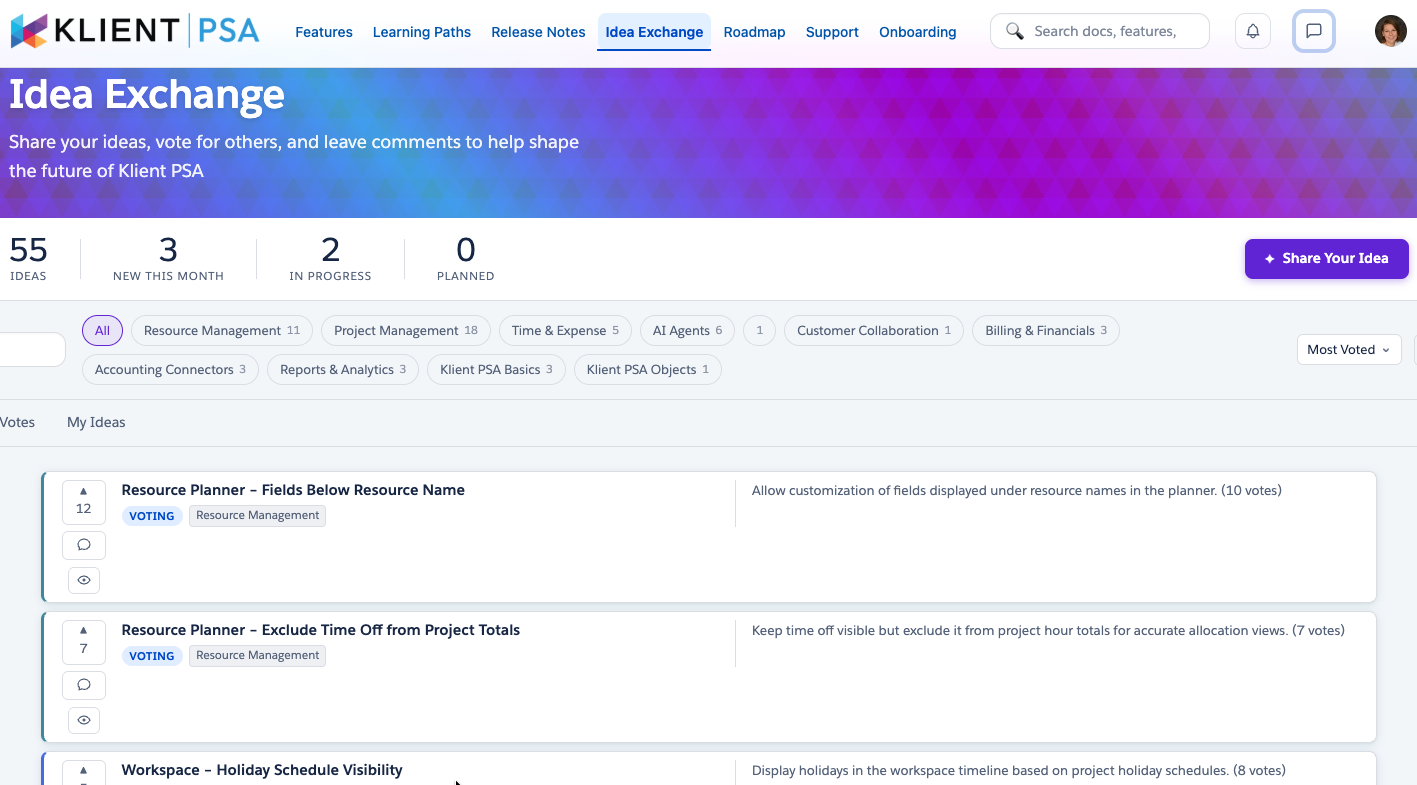
Rosalie Chassat: And, this is something we care about. You also see our ideas exchange. We’ll be touching on this, during, the webinar. It’s been live a few weeks, and hopefully you get to try it out, and if you have any thoughts, if you have been trying it out, let us know, how your experience was in the chat.
Rosalie Chassat: All right, anything you wanted to add there, Yannick, on the feature, Hub?
Yanick Abraham: Oh, I think we’re gonna dig in, but a lot of this is, we are able to do this because of AI and what we’re gonna be showcases later today, so, it’s kind of, again, we’re trying to be role model. We are customer zero, so we’re trying everything on ourselves first.
Yanick Abraham: So today’s demo, we’re gonna feature the agent and how they help us on our day-to-day life.
Yanick Abraham: It’s a preview, so not everything is live. There is… we’re submitting some of those agents to the AppExchange, so they’re going to be trusted and secure, but this is what is upcoming in the next few releases. We want to iterate and release a lot of those agents in a rapid sequence, and you’re gonna know about them inside that feature hub, where you’re gonna get all your knowledge.
Rosalie Chassat: Yeah, and I see Darren is saying,
Rosalie Chassat: Future Hub, the new one, 100% better than the old one, and I agree. I think everybody, at least on the team, agrees. All right, so speaking of those agents, so we recently launched a new track, or hybrid project delivery platform, so Yannick mentioned we were there, where human leads and agents help delivery. You will hear us say that a lot. Simply put, you can now assign your agents to your project, your task, work alongside with them. We are introducing 8 agents.
Rosalie Chassat: Along with an MCP server, and that’s what we’ll cover today, a few of them.
Rosalie Chassat: The concept behind all of them is very simple. So they are specialized, each agent is focusing on a small set of 5 actions.
Rosalie Chassat: Always 5 actions that they do really well, and they always require human approval. So 5 actions, and then the human approves. So you stay always in full control. Soon they will be available in the agent exchange, and just keep in mind, all of these agents are consuming Salesforce Flex credits.
Rosalie Chassat: So, if you don’t have those yet, make sure you do get them to your AE. Yannick, do you want to walk us through the catalog from our website? I don’t know if…
Yanick Abraham: Yes, absolutely. So, the website, already have a listing of our catalog that we’ve launched while we were in Utrecht.
Yanick Abraham: So, like you said, it’s 8-agent, 1 MCP server. There’s gonna be questions about pricing, so they consume flex credit. For the majority of you guys, you need to buy those directly from Salesforce. Then on our side, we’re gonna sell them as a $1,000 once…
Yanick Abraham: Meaning that they’re going to be able to use them at opportunity for $1,000, and they’re going to consume less credit. This is version 1. We were going to be releasing a version 2 and version 3 of those agents.
Yanick Abraham: Which you’re gonna be able to purchase as well.
Yanick Abraham: Today, we’re gonna be focusing on our PSA squad, so we’re gonna be looking at Scopi with its 5-action, Plani. Tiny, I know it’s one that you wanted to cover, Rosalie, today, we’re gonna postpone a little bit, it’s coming, but we’re gonna leave it for a further demo.
Yanick Abraham: We’re gonna go over Touchy, which is our touchpoint agents, one of Rosalie’s favorites, and KC, which can be seen a little bit as our Clara in terms of support. Plus, you’re gonna see a live demo of our MCP server and what you can do with it. This one could be available in the next few weeks.
Yanick Abraham: If you are interested, this is not an App Exchange package, it’s gonna be something else that we can supply you, that MCP server.
Yanick Abraham: So you can see those actions. You can see we’re trying to put kind of dates or statuses of our release, even here on our website, where we stand. So, until it’s version 1, this is when we’re going to sell it to you officially, but you can expect, end of, beginning of summer, to be able to, try those products.
Rosalie Chassat: Yeah, and just to clarify, if you go on a website, you just click on product, and then it’s the last option at the bottom if you want to get there, and each of those agents you can click on, and then there’s a full-page description on everything it can do. So, after the webinar, some reading.
Yanick Abraham: And this is what I was doing, they’re still, until they are released officially, and you have the documentation on the feature hub, all those actions they do, those five actions, plus the year review approved, they’re still subject for approval, because we want to ship them
Yanick Abraham: To make sure that they are reliable, they always do what they’re supposed to do, they’re working very well, so we might trim down some of the requirements to make sure we ship those faster and with more reliable functionality, so the feature hub will be the real reference for the feature we launch.
Rosalie Chassat: Right.
Yanick Abraham: Okay, so let’s jump with the first one, was that it?
Rosalie Chassat: Yeah, first agent, that’s a special one to me, so touchy, which is focused on customer meetings and follow-up. So, this is a really, real one, because I do spend a lot of time on calls with customers. The challenge is not doing the call, but it’s doing the prep before, and then the recap after updating the project, sending the follow-up, all this. It is critical, it takes time, it’s easy to miss things, so the goal here is very simple.
Rosalie Chassat: help you stay focused on conserving every… on the conversation, everything that’s important. It’s all based on that transcript, called transcript that you would have. So, prep, recap, follow-up, project updates, all in one place.
Rosalie Chassat: So yeah, instead of talking about it, let’s just, show it out. And again, I encourage everybody to use the chat to comment, ask questions, you can use the emojis, etc.
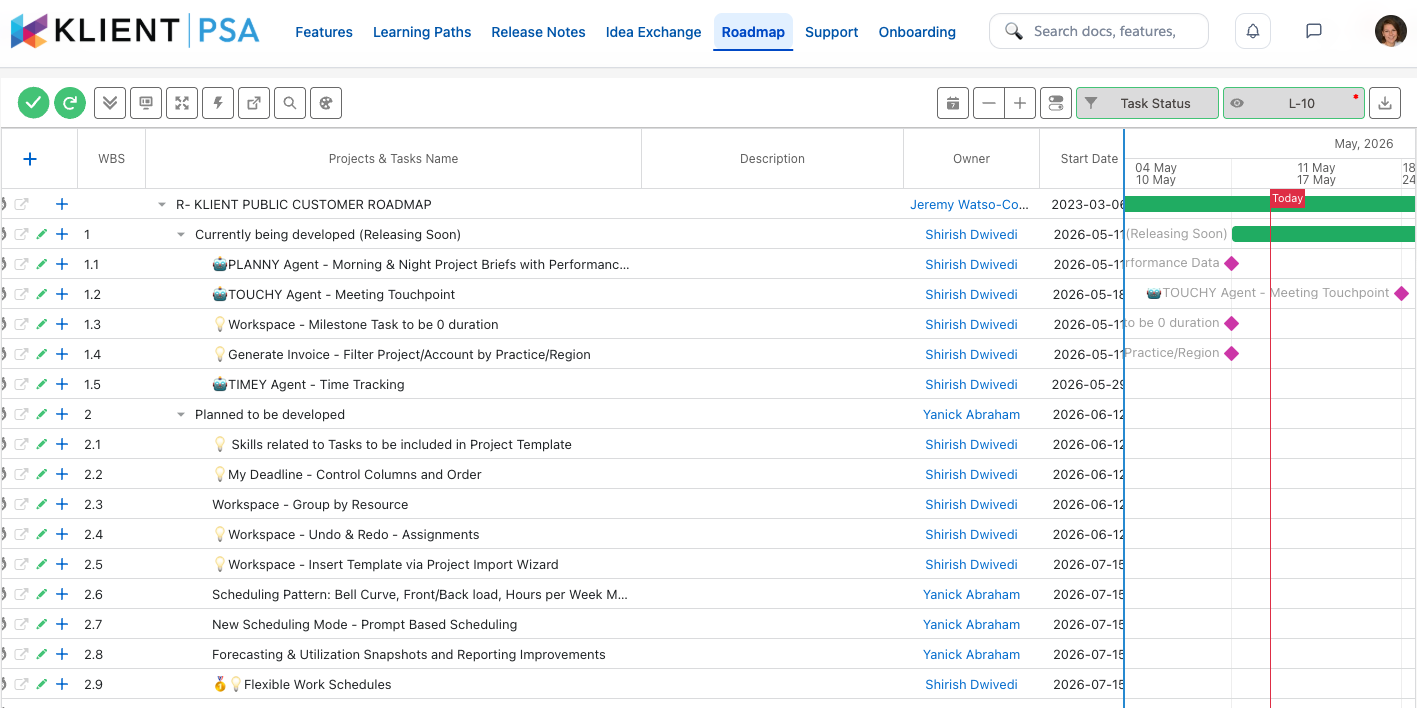
Yanick Abraham: Perfect, yeah, so, this one, and you will see all our agents, they have project at their core. So, Techie will work with project, and all our agents, we’re gonna show to look their core object is the project. So, what we’re looking at here, it’s a standard workspace with a standard onboarding project. This is also something we improve on the community. You’re gonna have onboarding project, each one of our customers on the community, you’re gonna have access to, that specific project.
Yanick Abraham: And you can see that, myself, I’m the customer, you can see Rosadi here is assigned on that call, that self-onboarding kickoff call we have.
Yanick Abraham: The new thing with our hybrid project delivery, where human leads and agents deliver, you can now assign agents on project and on task. So you can see here that I have touchy, that’s assigned on my project, and Guide D, as well, that’s assigned on my project.
Yanick Abraham: Even though it’s not a feature that we’ve released on the past release, so I’m going to show you a few of the cool things we can do. So now, for example, what I could do is I could just drag and drop a touch here and bring it to that specific task here, so it can now start performing its work.
Yanick Abraham: So, there’s two things about it. So, because it’s assigned on a project, when a new task comes in, it could be self-assigned. So, if it can see that small emoji, or if it knows it’s a meeting task, it could even self-assign, or it can do self-action. So, this is the concept, you can assign an agent on project and or task.
Yanick Abraham: You can talk to them like we saw the other way on the… by clicking the small icon on the left side. But let me open up the task in the… did I open up a good task? Yeah. Open up the task, self-onboarding kickoff call, fully here, so this is a standard record of Salesforce. You can see that we have dropped that agent…
Yanick Abraham: Right here in that page layout.
Yanick Abraham: And, for example, one of the things I could do is that you had that meeting you mentioned, so now you can just call for a meeting prep.
Yanick Abraham: So what used to take… our aim for Rosely is that what used to take 15 minutes to scroll through cases, the different reports, we made some good page layout where she can read through easily, but now with Agent, we’re able to resurface and bring more data easily. So you can see, for example, it got the prep, and it told me that, for example, there are zero open case for a total of
Yanick Abraham: 10 cases.
Yanick Abraham: And it can bring me all the information that I need to get ready. So we can look into this into details. You see, as well, like, to be frank, we’re still playing around with the layout. You see this one has way too much white space, so that’s why we are customer zero, making sure that all those fine details, it’s pixel perfect before we ship it.
Yanick Abraham: But this is still a good tool that Rosalie is starting to use right now, has been using and developing with the team for the last few months.
Yanick Abraham: The other cool thing is that when you assign it to a task, and the task know that it’s a meeting, and we’ll tell you more about this later on, but it gets the meeting invite, so either a Google Calendar meeting or the Outlook meeting, and then it can get the transcript and download it automatically here in the files for you, so now Tachi can even have access to the transcript.
Yanick Abraham: And can do its action.
Yanick Abraham: For example, we can have Tachy do a follow-up email based on that customer service call that Roseti has done, or that onboarding call, and quite often, the customer asking you what, Roseti, like, documentation, right, updates that we can…
Rosalie Chassat: Some next steps that we discuss are, yeah, resource-specific features we talked about, things like that, yeah.
Yanick Abraham: And I think what we’ve said, right, is what takes you a lot of time, it’s like that recap, like, every AI agent is doing it, right? But then it’s getting all the Salesforce information, meaning it can get you some dates in our project. So, for example, that the next check-in is booked for April 1st.
Yanick Abraham: You can even have some promotion of our webinar. Let me zoom in maybe a little bit. Our next webinar is on the 23rd, and put the link here. But the cool thing is that you can see here, Tetsi has automatically updated your onboarding project with adjusted dates. So Tetchy went in and changed the training, because during the transcript, it’s been said, no, no, we’ve pushed the training to a week down further, so Tetsi can go ahead and just move
Yanick Abraham: things around. So that’s what she’s doing, and that’s hoping, hopefully it’s gonna save you.
Yanick Abraham: How much time, Roselli, do you think you’re spending in the prep and the after recap?
Rosalie Chassat: Too much time.
Yanick Abraham: Too much time.
Rosalie Chassat: And then at least half an hour afterwards, depends, but yeah.
Yanick Abraham: Yeah, so that’s the aim of this one. Touchy, it’s very simple. Every one of our employees that’s doing meeting, customer meeting, consulting meetings, or any even internal meeting, and you want to update project, you have Touchy work on it, and it’s going to save you prep work and after work. So this should one… which should pay for itself.
Yanick Abraham: Ready to move on the next one?
Rosalie Chassat: Yeah, I think that’s it, and obviously, I’ll start using it more and more, so if customers are getting those emails, then share your feedback as well, if you like.
Yanick Abraham: Yes!
Rosalie Chassat: We can make improvements.
Rosalie Chassat: Now you know that we’re using Touchy for that. Perfect. Okay, so that’s great. Next one, Plani. So you can see all the five actions. One of the biggest challenges that we see our teams come across is prioritizing. So when you’re managing multiple projects, not always clear what needs your focus right away. We do have different ways of getting that information in the platform, but Plani solves this by resurfacing what’s really
Rosalie Chassat: important. So, Yannick, do you want to show us? And that one is particular, we’re showing it on Slack, correct?
Yanick Abraham: Yeah, exactly. We want the work… we want our agent to work exactly where you guys work, and we know that you spend a lot of time on Slack, or on Teams. For now, it’s gonna… we’re showing Slack. But the idea is that we… we want
Yanick Abraham: our agents to be available wherever you’re working from. So, let’s say you are on Slack, and you are starting your day, and you want to talk to our agent, you can just reach our Planee agent, it’s going to be listed at the bottom here in your agent section. And, for example, the different action that Planee is doing is
Yanick Abraham: The action that is available is give me my morning brief.
Yanick Abraham: And I have to apologize in advance while it’s loading. Rosalie, I didn’t do a proper cleanup job before the demo, in terms of my project, so this is my personal project, so I have a lot of re-add, because those are a project that I haven’t updated in a while. This being said, it’s resurfacing a lot of interesting stuff.
Yanick Abraham: Including, not just giving you a status, but also giving you,
Yanick Abraham: not oversight, but insight into what you should fix first, so you can even ask him to dig in a bit deeper, and just to maybe narrow down a little bit and to focus on what we’ve been looking at so far in terms of project, let me ask about that project that we’ve been looking at, that Drachea onboarding project live, to see if there’s anything out of, outstanding year. And actually, and this morning, I ran this to
Yanick Abraham: prep myself, and I was like, no way, this is an overdue milestone in that project. I was sure it was clean, and in fact, yes, in the project we’ve been looking at, and I’m not sure if you guys spotted that, but in that project, if you look at the different milestone, there is a milestone here, the signature milestone, like Tiny just told me. That is overdue, as we can see with that red circle here.
Yanick Abraham: But the key thing is that there’s some money, because it’s black, there’s some money assigned to it, meaning this is cash.
Yanick Abraham: And, how many days was it? How many days it told us? 13 days? So, it’s cash that could have been in our bank account 30 days sooner.
Yanick Abraham: So, now I’m catching it on the 13 days, but let’s say I’m using this every day, I’m gonna catch it on the spot, so nothing will fall through the cracks, so it’s… this doesn’t mean more money in you, and this is only one example, milestone with cash.
Yanick Abraham: But you can think of all the other priorities and everything else that you can dig in in terms of those agents. Those agents, they are chatbots, so you can definitely go and ask more questions or dig into some of those things.
Yanick Abraham: At some point, they will stop, because there might be things they’re not able to do, it’s not part of their five actions, but they’re gonna tell you at that point what it is.
Rosalie Chassat: Yeah, perfect. Yeah, so this is essentially a more proactive way of getting your information starting the day.
Yanick Abraham: And this is one thing that we saw at Salesforce EDX as well, and they’ve been talking about it a long time, for a long time now. Slack is one of the places, one of the UI they are aiming at, and they call it as well, EdList360, so meaning that you can access Salesforce from everywhere now more easily as well.
Rosalie Chassat: Yeah, curious to know if this is something of interest to people on the call, but you can just mention it in the chat, or send the emojis.
Yanick Abraham: I’m curious, as well, to see, eventually we can do a poll, how many people have Slack versus Steam? I’m kind of feeling it’s a bit more… it’s, it’s, yeah.
Rosalie Chassat: Oh…
Yanick Abraham: BSNF, maybe.
Rosalie Chassat: Oh, it’s fine.
Yanick Abraham: No? You don’t think so.
Rosalie Chassat: There’s more Teams than Slack from.
Yanick Abraham: I’m surprised.
Rosalie Chassat: Yep.
Yanick Abraham: Yeah, there’s a battle coming in the Slack… the channel now. I think it’s TreatTree.
Rosalie Chassat: That’s pretty sad. All right.
Rosalie Chassat: Okay, our next agent, so we talked about touchy, planning, now moving on to Scopy. So one of the biggest inefficiencies that we see is, at the very beginning, scoping. So, some requests can be unclear, incomplete, you may spend a lot of time trying to structure all that, slowing everything down. Scopy solves this by turning your ideas or requests into something structured, actionable.
Rosalie Chassat: From the start. So, Yannick, this one, we’ve been using it quite, quite a lot already, and customers may have used it without realizing it.
Rosalie Chassat: Do you want to walk us through that flow, how we use it in our community?
Yanick Abraham: Yep.
Yanick Abraham: Yes, and Scopi, ancestors are the project agent. So the project agent, you could do a lot of the creation of projects that you can do with Scopi. So, in the past, in a previous webinar, when we’re talking to the agent in the project, and we’re creating tasks, creating description, this is Scopi for your internal needs.
Yanick Abraham: What is cool is that you can also expose our agents to your customer, and this is exactly what we’re doing with School Pierre.
Yanick Abraham: And I’m very excited about this, and this is Roselli, again, pushing for you guys, in terms of having more of your ideas developed in the product. She pushed us to release that idea exchange sooner than later. And I must say that without Scopi, without the MCP server that we’re gonna show you later on, this would not have been possible. So this is our version 4, I think, of our idea exchange, so now
Yanick Abraham: we’re back at you guys can submit ideas. It’s a full-fledged comments and voting environment, but now we’ve even bona fide it with Scopi. So, usually you have to fill out a form to submit an idea. Now you can discuss with Scopi. And let me just do a demo, because it’s going to show you the real power
Yanick Abraham: of that hybrid platform, project delivery platform that we’ve been talking about. So, let’s say, this is something we’ve heard, we didn’t talk about it, so it seems that we need an AI agent that can help me staff my project, right? I’m surprised that I didn’t see that in the chat already, so where’s the staffing guy, or the scheduling guy? So, it’s, in Scopi, you just go there, and then you can just
Yanick Abraham: It’s asking you always one question. In this case, it’s telling me, is it that feature? No, it’s totally different.
Yanick Abraham: Again, if you’re using it, we know that that search is not very reliable at this point, we’re improving it. This being said, now it’s asking me another question, so okay, let’s refine your idea. One question, that is copy goal, only one clarifying question per…
Yanick Abraham: pass, so…
Yanick Abraham: Is it staffing based on skills, or availability, or both? Great question. I want both. I want my staffing agent to be able to look at my schedule, look at my skills, and define a good person to do it.
Yanick Abraham: So now it’s creating that idea for me, it’s respecting the frame or template we decided as a company for idea. So the title, AI Agent 4, it put it in the good category. What problems does it solve? What could be the ideal solution?
Yanick Abraham: Do you want me to create that idea?
Yanick Abraham: I can say yes, I could have said the current workaround is using the resource planner, it’s a great tool already, you can do a ton of things, we’re still improving it, but let’s just go yes in the sake of the demo. So now, Scopi is creating
Yanick Abraham: on an idea on the idea exchange. So, your idea has been submitted, and a task has been created for review by our team.
Yanick Abraham: So if I’m going back here, and I’m looking at my AI agent section now, you can see that I have a new idea that just popped up.
Yanick Abraham: AI agent for project staffing based on skills and availability, and it’s under review.
Yanick Abraham: Okay, so that’s a key point to remember, it’s under review, okay? So if I click on it, I have the details. You can even scan if you want to do it now, you guys. If you want to scan it, you can just go ahead and scan it, and if you want to vote for it, maybe it’s something that you are interested in, you need just your regular credentials that
Yanick Abraham: You have access to our community, it’s those standard credentials, there’s no new credentials, so if you want to go ahead and scan it, or we can even send that link in that chat window, let me just do that in here.
Yanick Abraham: If you want to vote for it, and then this idea is what it is at the end, because now it’s… this is your… you can start voting on it, even if under review. The cool thing, and the way that we manage all this, is that we use a standard
Yanick Abraham: Salesforce… not Salesforce, so standard client project to track all that… those ideas that you guys submit, okay? So you can see, for example, that I have 60 ideas now in that… or 60 tasks in that project.
Yanick Abraham: If I open up the workspace, and I’m just gonna switch my preset to my idea exchange preset.
Yanick Abraham: I can see that I have those 60 ideas here listed, with their name and description, with their future category. But if I continue scrolling down, I can see at some point that, oh.
Yanick Abraham: We have Scoopy that’s starting to make its, appearance on those, on those new tasks, so the bottom are the newest tasks, right? So Scoopy started scoping tasks for us.
Yanick Abraham: It created this one that we just looked at here, with the exact title and description that we’ve created together here. But the cool thing is that it created another field and populated another field for us, the proposed solution, and gave us some more insight
Yanick Abraham: Maybe the conversation for you to create this was longer. It also did some analysis on its sides before proposing the idea, so this is the proposed solution that we see internally.
Yanick Abraham: Okay, so that’s very cool. The thing that you can also notice is that he’s assigned, but it’s also under review.
Yanick Abraham: And now agent can do a lot on our task, as we can see, but there’s something… is there something left to be done by us, the human? So, absolutely. So we need to review, and we need to approve the work of the agent, and this is what we’re gonna see next.
Yanick Abraham: Like it so far, Rosalie?
Rosalie Chassat: Yeah, and I know some, some people, like Darren, that mentioned in the chat, I know a lot of customers already tried to, log in some ideas, so I do encourage we put the link after the webinar, you should go and try and submit any of the ideas that we do… you do have, and give it a run. Yeah.
Yanick Abraham: Excellent. So, and the key thing here is that it’s a project underneath, right? So, it’s a project, it’s structured, it’s structured that, Scopi even helped us to structure it more. So, this is like, okay, we’re going somewhere here. So, the next step is that we had that under review, so now somebody from the
Yanick Abraham: A customer and an agent work on it, so should we just start developing it right away?
Yanick Abraham: Maybe there’s another step we can do internally, right?
Yanick Abraham: So, and then this is where things change. So now, it can be a non-technical people person that could look at it, so it can be Roselli that’s been a sign of some of those, maybe it’s me. So, you can see here that in our newest release, in our newest interface that we’ll be releasing, within the…
Yanick Abraham: the spring and summer release for our agent. We’re gonna come with that outcome review interface, where it’s… you can see it simply as an approval on top of task.
Yanick Abraham: So it’s really kind of a simplified way of approving what agent does on your task. This is the way you should see this. And you can see here that we have that top one that got created, AI agent for project staffing. I can click on it and explore what was the description, or what is the proposed solution, like we just saw a few seconds ago.
Yanick Abraham: I could go ahead and just approve it, but let’s say I want to talk to Scopia a little bit more, and maybe refine that idea, or maybe validate. Is it a good idea? Is it something that’s going to be very tough for us to do? Because you…
Yanick Abraham: Knowledge base can be integrated into this whole place, and your code base can be integrated here, so it can have all the information to work with.
Yanick Abraham: So let me, say, maybe, it’s a great idea, I love it. So maybe we can find a cool name, a cool name like yours, Kopi, or maybe the other one, Plani One, or Touchy One.
Yanick Abraham: So, what is it proposing first? Staffy is the first name that it’s proposing. It’s strange, because it’s also the same name that our staff internally are voting for, so Staffy1, so I can go ahead and say, oh, I like Staff E1,
Yanick Abraham: Update… The proposed solution… I’m not sure if this…
Yanick Abraham: And then the concept is that now Scopi can refine that idea, and it can add it on top, and now it just… what is needed, it named it here, and you can see my button became blue, so I can save this as the proposed solution on the task.
Yanick Abraham: And now there’s been a tracking, an auditing, you can come back and see which agent were working with which human to get this approved, and you can see here that my… the description and my economy review has been changed. Let me go ahead and go ahead and approve this now, with notes if there are any.
Yanick Abraham: And if I’m going back to my project.
Yanick Abraham: my client ID exchange project, and I just refresh it.
Yanick Abraham: If I scroll down, you’re gonna see that, now it’s not… no more under review, it’s now in voting.
Yanick Abraham: And that if we look at the description, actually it’s the proposed solution, right, we’ve modified. So if we look at the proposed solution, we can see now that the name, the proposed solution stack has been changed.
Yanick Abraham: And and yeah, this is it for the… that… that part of what’s Copy and that outcome review, the new interface that’s coming in the next few releases, to help you work with your agents, so…
Rosalie Chassat: And now this agent is now on voting status on the IDS.
Yanick Abraham: Yeah, exactly, so if you go back to the community, and we, again, we refresh that page, we’re gonna go see the AI agents, and we can see now this one is in voting, officially in voting, this being said, so nobody of you guys want to vote yet, so…
Yanick Abraham: We might not.
Rosalie Chassat: You’re listening carefully to what you’re saying.
Yanick Abraham: We might not be developing a team.
Yanick Abraham: I’m gonna… I’m gonna take a few days before.
Rosalie Chassat: And you can also comment, so if someone wanted to add comment…
Yanick Abraham: Okay, so, let me, show you another cool stuff that’s working with Agent in the next,
Yanick Abraham: the way that you’re gonna be able to work with Adrian, okay? So, we’ve mentioned that some of those ideas were rooted… were to me, Yannick, some of them were assigned to you, Rosalie, right?
Yanick Abraham: So, and there was some action after I approved, so the stage changed to voting, and different things changed. So, the really cool thing, I find, is that based on… it’s based per region, but also per project.
Yanick Abraham: you’re gonna have a new field called Agent Instruction, and you’re gonna be able to define what it does. So, for example, root the AI agent request to Yannick, this one was an AI agent, right, so that’s why it was assigned to me, while Arl, the other one, was to Roseti.
Yanick Abraham: And on approval changes stage to voting.
Yanick Abraham: So, I don’t know if you grasped this, but this is, very powerful, meaning that you’ve given them… he already has a lot of context with the task, proposed solution, the project, but now you’re even giving him
Yanick Abraham: that agent some, grounding rules or some instruction to follow. So, for me, this is, just wonderful. Jose, I think,
Rosalie Chassat: If tomorrow Yannick wants to stop, being routed all these requests, we’ll just modify the instructions, and then they all come to me, and then that’s it.
Yanick Abraham: Yeah, exactly, so that’s exactly what’s happening now, and this is plain English, right? It’s no developer, no, it’s a plain English routine.
Rosalie Chassat: You don’t have to go in the… somewhere obscure, like, I can do it myself, I’m not super techy, but very easy to manage for me to just update agent instructions for anyone on your organization just to be going doing that, so it’s, it helps us be able to improve our workflow much faster as well.
Yanick Abraham: Nope.
Yanick Abraham: Okay, so, and I saw a question about pricing, we can come back to it later, but, version 1 is $1,000, and it will work for eternity until Salesforce discontinued the Agent Force platform. This being said, it’s one, so it’s version 1, but we won’t be updating version 1. We were gonna make sure that it’s delivering the five actions very well.
Yanick Abraham: That’s gonna work all the time, very reliable, but we won’t be adding more action. Version 2 will have added, things, so you can understand our business model around it. It’s about innovation, it’s about adding new stuff, so you guys always want to be on the latest version. We’re gonna give you as much as we can on version 1. This being said, we know that we cannot develop everything at once, so that’s why we have a version approach to this.
Yanick Abraham: And we make it at $1,000, kind of inexpensive to get into that clay, and then you just buy and use it on consumption. If you don’t use it, it’s not costing anything.
Yanick Abraham: Okay, moving to the other guy.
Rosalie Chassat: Yeah, once, you’ve got everything structured, next challenge is, how do you prioritize? So, because now it’s just not one idea, one request, you have everything across all your projects, etc. This is where the struggle happens.
Rosalie Chassat: But, hopefully we can use our MCP, and Yannick is gonna show us something really cool on how to turn all this into actionable.
Yanick Abraham: So this is kind of the new way of doing things. This, again, works very well because we are in Salesforce, and it’s structured data, but also because we are using Project for everything. So without Salesforce, without Project, I could not do that, and I could not go as fast as I can. And I see how Darren is asking how you can enter in AI, just by having the platform you have here. You have already the structured data, which is the first step, so that’s a good first step.
Yanick Abraham: then it’s just using our agent, we’re gonna get into it. But this one is a bit more techy, and it’s a bit more, like, you already have LLM, you already have other tools, some of your team might be using Cloud Code or other LLM to develop. Now you can connect to client data through our MCP securely with the MCP server. So the demo I’m going to show you, it’s using Cloud Code.
Yanick Abraham: And to use… and using that, project that we, that we had, the IDEXchange, we’re gonna do something.
Yanick Abraham: Okay, first thing I’m gonna show you is that in Cloud Code, if I’m doing MCP Server, I’m gonna see here that I have my client Salesforce MCP, it’s gonna be a rebranded client MCP1, but this is my server here, and I can see, for example, it has a few tools, and it’s able to create and update Salesforce object. It has the knowledge of our client object, so the object architecture, so it knows how to create or address a change of stage.
Yanick Abraham: of a task, it knows which field exists, things like that. And what you can do is that you can ask questions. So, for example, if I do
Yanick Abraham: this thing here, how many tasks in the project client idea exchange, so the project that we’ve been looking at so far, and please group it by feature category. So now it’s going ahead, and as you can see, it’s querying that MCP that we just looked at, that client MCP, and it returned me that table, 60 total. It didn’t lie, this is the number I’ve told you before, right, at the beginning of the demo.
Yanick Abraham: And then it broke it down this way.
Yanick Abraham: So if you understand, you can create reports on the fly just by asking questions.
Yanick Abraham: You can do that with RMCP, but also with LE, you’ve been using Slack, right? Slack AI to do this, Slack is connected to Salesforce, I didn’t mention that before. That’s how Plani works, but you can also do those kind of things. And you can do very complex cross-mapping here. So again, for the techie, so you’re not limited to what the Salesforce report do. You can do pretty much everything.
Yanick Abraham: So, what I did on top, and what we’ve developed with the team, is that we have a triage team… triage skills and code, so I’m paying… I’m just telling my skills to triage that project.
Yanick Abraham: And for now, because it’s a 60, it’s a bigger list, I don’t want that demo to be too long. So just to focus on that AI agents category that we’ve been exploring, okay? So you can see we found 6 tasks that are related to AI agents.
Yanick Abraham: And now it’s for getting that list for us, so we can decide what to develop next. So that’s the key, and that’s why we’ve relaunched the idea exchange.
Yanick Abraham: The idea backlog that you guys submitted throughout the years, it’s like 900 ideas, and we receive several per week, meaning that that bucket grows and grows, so at some point, you don’t have visibility
Yanick Abraham: But now, with those AI tools.
Yanick Abraham: Oh, now we can really focus on what’s important, what are the quick wins, so you can see here that recap, it gives me a few things. First, it told me all the opens, feature that we asked for, so we can see that that staffing agent that we’ve submitted is here. We have zero votes so far. Come on, guys, I’ve asked you to vote. So, it’s not there, so that’s why, if I’m looking at the blog.
Yanick Abraham: two recommended picks, it’s not there. Safi, it’s not there, because I’m not sure why it’s not there. We should maybe ask him. So, what about Safi? Why is it not first?
Yanick Abraham: So, and then you can do things like that, and then he’s gonna tell me, good question, staffy, it should probably be ranked higher.
Yanick Abraham: So, actually, let’s do this. So, let’s go and approve Staffy for our next stage. We’re gonna be developing Staffy. It’s a promise from you guys to you. We’re gonna do it. So, let’s do Staffy, change the stage to selected.
Yanick Abraham: And, now it’s going. It’s gonna change in my project that stage to selected, so success. If I just go back to my project here, looking at my IDExchange…
Yanick Abraham: If I just refresh…
Yanick Abraham: Must have been refreshed. You can see now that that idea is unselected, so this has been done by the cloud code and our MCP server, and if I go back to the idea exchange, and I scroll back here on top, you can see it’s zero plan, right? But if I replay and refresh, now we have one plan.
Yanick Abraham: Meaning that we are gonna develop that, even if you didn’t vote for it, we’re gonna develop that staffy agent, right away. We’re still gonna wait for the naming convention, but this is where we’re going with this. We’re gonna develop another one.
Yanick Abraham: Pretty nice, right? Pretty neat.
Yanick Abraham: This is a full-cycle demo I could have done, I was ready.
Rosalie Chassat: No, no, I agree, I agree. It makes, yeah, prioritization, make sure all your ideas… so, yeah, do submit the ideas, you’ll see the status move. This is because our agents are running in the background.
Rosalie Chassat: And, yeah, hopefully that makes us, better at delivering what you guys really care about, and make sure our features are the most.
Yanick Abraham: Yeah, there’s a few questions if I can answer one, maybe one before we move to Clara and Casey.
Rosalie Chassat: Yeah, one question we had earlier was, Bill asking if it’s limited to client objects, or if the agents can see accounts, opportunity, and other objects.
Yanick Abraham: Our agent, agents, usually they see account contact, they see, projects they have, depending if you have licenses, you could throw in cases, but they might become a bit more custom at that point.
Yanick Abraham: But they see account contacts, absolutely. All the project tasks and all client objects do. The NCP server can address any objects that you have in Salesforce.
Yanick Abraham: Depending on the tools we’re gonna deliver on version 1, but, yes, it does support everything.
Rosalie Chassat: Perfect. And then…
Yanick Abraham: There was another question about, how does MCP Surfer compare to the project agent? So, our agents, like you saw, they do 5 things. They don’t do everything, they do 5 things. When I’m working with cloud code, it can do everything. So, that’s the thing. So, it’s not the same concept. It can do everything, but he can break everything, too.
Yanick Abraham: So the agents, you’re gonna… those are vetted, those are trusted, those are doing 5 things that you control with permission sets.
Yanick Abraham: So those you can distribute to your employee, and then the MCP server, if you know what you’re doing, and you have a process to access it, then you can bonify a lot of your stuff.
Yanick Abraham: with the MCP server. With MCP Server, you can do anything. You can change every data, or delete every data in your system, so you need to be careful. This being said, our tools, we don’t have the delete tools, but
Yanick Abraham: Those LLM, they find some ways.
Yanick Abraham: You need to be careful, but this is very powerful.
Rosalie Chassat: All right, I think our last one was a Casey, that we wanted to quickly touch on, because I know we’re, 7 minutes before the end.
Yanick Abraham: We wanted to do Clara, right?
Rosalie Chassat: Yeah, case.
Yanick Abraham: Yeah, and I think I’ve messed up. I just did a change just before, and I don’t see my Clara here.
Yanick Abraham: Do we have a Clara page not ending?
Nathalie Adam: On the support.
Rosalie Chassat: Yep.
Yanick Abraham: True support, yeah, you’re right.
Yanick Abraham: Okay, so, you know, there’s a bubble that should be showing, I just…
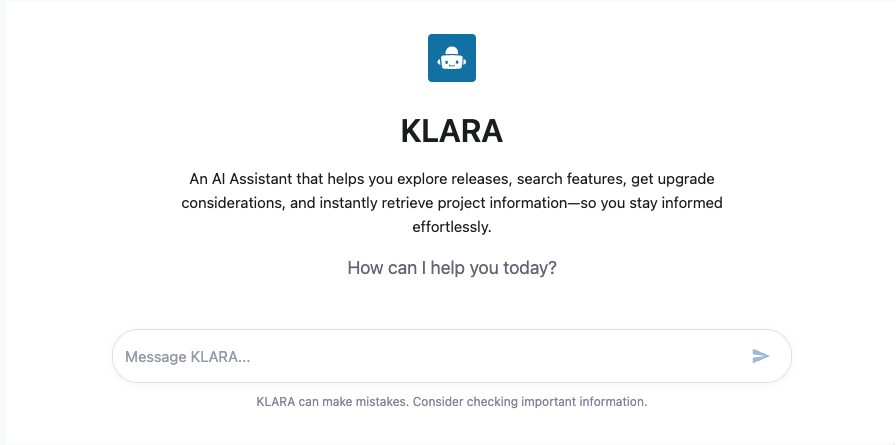
Yanick Abraham: Made a quick change, it didn’t work. So, in Clara, what we’ve bonafide, so Clara, and if we go back to my slide deck, I’m sorry, so, do you want to introduce a little bit what Casey and the concept of this? Clara is similar a little bit, or do you want me to do it, Jose?
Rosalie Chassat: go for it, because, we’re.
Yanick Abraham: KC, it’s one that we’re not officially launching, but KC, it’s a little bit similar, so KC helps you solve your cases, but it works with projects, meaning when you have a new case coming in, one of our recommendations is that you create a support project with your customer, and then KC starts to work, so making sure that your resources will log their time on that case, it can track other things.
Yanick Abraham: So Casey also can be exposed to a customer, like we have it here. So, for example, for us, we’re calling her Clara, so it does a little bit more than what Casey will do. But let’s say I ask a question to Clara, and you guys are starting doing it. What we’ve bonafide now is that if we’re not satisfied with the answer, or if Clara doesn’t find the answer, you’re gonna be able to create Case automatically
Yanick Abraham: from our Clara, butt on our community.
Yanick Abraham: If it comes back from thinking, I’m not sure it’s working properly, yeah.
Rosalie Chassat: You can try it after the webinar as well, if you have a case that you were thinking of submitting, you can try Klata first, and then…
Yanick Abraham: Yeah, I’m very sorry, I’m, I’ve removed it without being logged in, you don’t have access to it, and now I think,
Yanick Abraham: I might have messed up the…
Yanick Abraham: That part of the demo. If you don’t just do this, it’s, okay, I got it here.
Yanick Abraham: So I found something here. Did I answer my question? No. She’s gonna propose it, but just because we’re running out of time, I’m gonna say it to her, create a case right away.
Yanick Abraham: And then, do you like me to create a case? Yes, and then she’s gonna create a case. She’s gonna… the support team will be looking at the,
Yanick Abraham: on the spot. And the idea is that, yeah, I’m sorry for that part of the demo, it’s gonna… if it’s not working out, it’s gonna be, working at the end of the day.
Yanick Abraham: The concept here as well is that we wanna, root you on that learning community, where you’re gonna find all the information, such as the information about our different agent, you’re gonna be able to see it here. For the people that are asking about Project Agent versus Pliny 1, Scopy 1, Project Agent is there, you can keep it, but we’re not gonna evolve it.
Yanick Abraham: So, project agent, it’s been pretty much given away to everyone, and we figure out that an agent that’s doing too much is not useful, so having an agent that’s doing something very good is what we’re aiming at and going with.
Yanick Abraham: So this is where we stand in regards of that project agent.
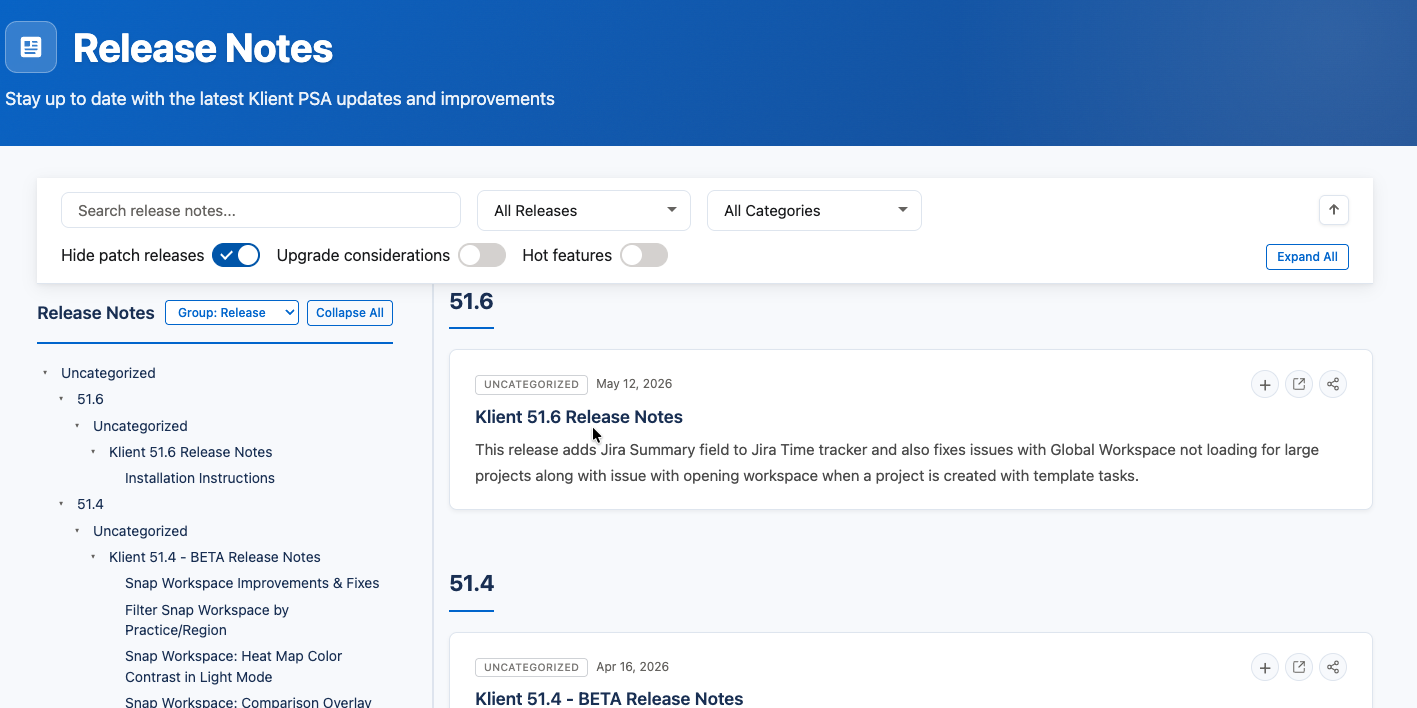
Rosalie Chassat: Yeah, and just, this is, like, first look at agents, but every upcoming webinars, we’ll keep talking about agents, so there’s much more to come. Speaking of project roadmap, just as an FYI, version 51.3 was released last week, so it’s now available. We talked about it on the March webinar, if you’re curious. Looking ahead, 51.4 is coming tomorrow.
Rosalie Chassat: That one is mainly focused on Snap workspace improvement, better filtering, cleaner UI, more accurate data, so if you have been playing in the SNAP, go upgrade maybe to that one, check it out again. 51.5 plan for May. And if you want visibility, you can always log into the community, look at the roadmap page. Quick reminder as well, new community live, so after today, make sure to log ideas on the feature exchange, ideas exchange.
Rosalie Chassat: open cases with Clara, etc. On the next slide, on the event side, we did mention there’s a couple of events that we will be attending. So, three things in the horizon. Next week, we will be at Agent Force New York City. We’ve been reaching out to customers, and we know some of you are attending. If we haven’t talked with you, please let us know if you or anyone on your team is joining, and come see us at the booth.
Rosalie Chassat: We can arrange to meet…
Rosalie Chassat: some other way. Then the week after, we are based in Montreal, so we are attending Agent Force Toronto, May 7th. Again, if you are going to that event around, let us know. And then, this one is, like, very, very recently booked, but in June 18, we will be at Agent Force London. So we were in the Netherlands a couple of weeks ago, but London, we are coming. We have a lot of customers in the UK,
Rosalie Chassat: Even if you’re in Europe, other countries around, you’re planning to go there, please let us know, we want to meet you.
Yanick Abraham: We’re having a happy hour and a dinner the day before, correct, Jose? Yeah, yeah, absolutely.
Rosalie Chassat: Need to know who’s there, how many people we have to get all this planning, but please let us know.
Yanick Abraham: And we have a booth, just to be clear, we have a booth to all of those, so if you want to come see us, we’re gonna be there at the tuned.
Rosalie Chassat: Yep, and then I’m just gonna launch the end of the poll, but upcoming webinars, so I will be sending a follow-up email to this webinar, including the next dates for webinars, so May 28th, we’re gonna talk about version 51.4 and 51.5.
Rosalie Chassat: and June 25th, for the next version. I think that’s it, and one last thing I will mention, if you know anyone that could use Client, would find it useful, please refer them to us. You can share their name with us, or you can let them know to reach out to us, but a lot of our best customers actually come from world of mouth. I think there’s probably a bunch of you on the webinar now that can testify to that.
Rosalie Chassat: And yeah, before dropping off, please make sure just to leave a little bit of feedback on that form. Yaning, do you have any last words?
Yanick Abraham: No, that was enough. I’ve talked enough. Hopefully, you’re excited, though. I know it’s a preview, but they’re coming, and we’re gonna be releasing them fast, and they’re gonna be reliable, that’s my guarantee.
Rosalie Chassat: Yeah, and please share your feedback. All right, have a great rest of your day, we’ll see you next month for the webinar, and we’ll stop the recording right now.
Yanick Abraham: See you on the road.