April 2025 Klient Product Update Webinar
Professional Services Automation (PSA) Webinar
April 2025 Klient PSA Product Update
Klient PSA Webinar
April 2025 Klient PSA Product Update
In this April 2025 Product Update Webinar, Klient CEO Yanick Abraham and Customer Success Manager Rosalie Chassat walk you through the most impactful new features, improvements, and customer-requested enhancements now available in Klient PSA.
Whether you’re a delivery lead, operations manager, or system admin, this session is packed with actionable insights to help your team optimize resource planning, streamline billing, and reduce admin time.
New in Klient PSA v50.2.2:
-
Improved Resource Planner UX:
Hide empty rows, new default Scheduled View, and project owner filters for faster planning sessions. -
Shared Preset Upgrade:
Automatically apply saved views to both current and future project resources — no extra clicks required. -
Enhanced Release Notes:
Look out for (customer idea) and
  (admin action required) icons to help you prioritize updates and notify your team accordingly.
Enjoy & subscribe to our next professional services automation (PSA) webinar.
Rosalie Chassat: Hello, everyone. Welcome to today’s product. Update webinar, April product. Update webinar. If you can see us and hear us, you can go in the chat. Say, Hi, let us know how the weather is where you are. We’ll wait a couple more seconds, and then we’ll get started
Rosalie Chassat: and happy Easter to everybody.
Rosalie Chassat: All right, you should be seeing my face. Yannick’s face and the presentation deck right now.
Rosalie Chassat: Perfect.
Rosalie Chassat: All right.
Rosalie Chassat: let’s get started. So welcome everyone to our April product update webinar. Today we will be talking about our current version, which is 50.2 point 2.
Rosalie Chassat: My name is Rosalie, and I’m a customer success manager at client. I’ll be your host today. We also have our CEO Yannick. Hi!
Yanick Abraham: Hello, Daddy Happy New Year.
Rosalie Chassat: And we have Isabel again today who’s from our customer? Success team, and she will be answering your questions in the QA and in the chat.
Rosalie Chassat: all right. So if we go to the next slide, perfect, how to be a great webinar participant, as always, just make sure you participate to our polls, you can use the react button at the bottom. You can see the image there, and you can send us claps, fireworks, whatever you want, and use the chat and Q, and A to ask question whatever you prefer. And then when you use the chat, you can decide for everyone to see it or just us.
Rosalie Chassat: And without further ado, let’s just get started with our very 1st poll. As always, we are curious to know. We know we have some customers that are new, some existing one. We want to know if this is your 1st client, Webinar. So yes, no, I’m a regular. I know I’ve been to a couple, and always I see there’s always a couple of new faces that are joining so welcome. Hopefully. You like today’s webinar, and you join next time.
Rosalie Chassat: Alright, thank you. Let’s move ahead to our agenda. Perfect.
Rosalie Chassat: So today we’ll be covering fixes new features and improvements that were released in 52.2. That was released last week on April 16, th
Rosalie Chassat: and then we will be talking about our new idea voting initiative that we launched last month. We talked about it on a webinar as well, so we’ll just talk about which ideas get the most votes, and which one will be up for voting next, and then we’ll end by looking at our product roadmap as always. So shall we get started
Rosalie Chassat: perfect.
Rosalie Chassat: So 1st of all, if you have a look. We just have on the screen. We’re showing a screenshot of a release notes. I just wanted to mention that.
Rosalie Chassat: yeah. Sorry. I just wanted to mention. We’ve added a couple of emoji. There it is. We’ve added a couple of emojis
Rosalie Chassat: to make the release notes a little bit more readable. So the 1st one is the light bulb emoji, which indicates that this specific idea came from a customer so moving forward. Any idea that you see, has. That means directly coming from customers. And we’ve also added another emoji, which is the rotating light, the red light, which means that as an admin, if you’re looking at a release note, it may mean
Rosalie Chassat: that you have to notify your user of this specific release, this specific feature, or you may have to do something after the upgrade. So it’s kind of a upgrade consideration for you. So if you were to look at all of these, and you see those lights popping out.
Rosalie Chassat: It means there’s something for you to do, so be extra careful and make sure to read that one and just so, you know, we’ll continue making improvement to the release notes overall, like the readability of it on the left side the menu, just to again make it easier whenever you have to do upgrades to know what the information is that is most relevant. So we’ll keep you updated. Every webinar.
Yanick Abraham: And we’re gonna upgrade as well. The menu on the left side to bring all those notification or upgrade consideration. They’re gonna be showing on the left side here as well. So you won’t drop any if you’re an admin and upgrading clients. So it’s gonna make it make your life easier as well. This should be ready for their next webinar hopefully and talk about it next time.
Rosalie Chassat: Yeah. And we know that ideally, everybody upgrades every quarter or so. So you do that often. So there’s not too much to digest. But we’re also conscious that sometimes customer upgrading after a longer while. And yeah, it can be a bit trickier to go through those so hopefully that will help
Rosalie Chassat: otherwise for this specific release you’ll notice that our team focused a lot. You can see on the screen, focus a lot on tweaks and adjustments. To be honest, the team has been delivering so many new features and improvement lately, as you have seen in our webinars, that it may be a good thing that there’s not as many for this one but overall. For this release we have 31 new fixes, tweaks, adjustment. However, you want to call them. That has to be a record for one release.
Yanick Abraham: Yeah, it’s a lot. The idea is that we we focus a bit more on the stability and the performance of the release. There were no, not any major blocker, but all small thing that could be reproducible sometime, only on the customer environment. But yeah, we decided to to go ahead and do and proceed with those announcement so we focus on that. This being said, we still have a lot of cool stuff to show today. During the demo.
Rosalie Chassat: Perfect, and as always, you can click on those links and then get direct access to the release notes from our community. We also included a list of yeah, there they are, the less notable improvements still important, I think, Yannick, you wanted to talk more specifically about 2 of those right.
Yanick Abraham: Yeah, we won’t be demoing it. So I thought that maybe just including a screenshot. So we’ve added that assignee column a few release ago, and as of today they were this release, they were showing pretty much every assignee that you add, even the close assignee, either on the project side on the task side. So now we remove that. If it’s a close P or T. They’ve been removed from that column, so they won’t be showing.
Yanick Abraham: and as well on the right side. You can see we have a spend tab. It’s a less. It’s a tab that’s not often used, but it’s very useful. Now, you can also control the fields that are showing here via field set. So those are the 2 that I’ve
Yanick Abraham: thought that was worth mentioning as other improvements we have in this release, so.
Rosalie Chassat: Yeah. And for that second one you’d need your admin to go and change those right.
Yanick Abraham: Exactly.
Rosalie Chassat: Perfect. All right. Now, let’s have a look at the more note notable ones, the ones we’re actually gonna be demoing today. And actually, since most of those are, as you can see, related to the resource planner, I figured we’d do a resource, Planner Poll, just ask a couple of questions. So as Yannick is going to show you a screen, he can focus on specific things. So we have a 3 question. We want to know if you’re using the export functionality in the resource planner
Rosalie Chassat: we wanna know if you’re using the scheduled or plan view most and we’ll dive into what each one means. If you don’t know what the means. Just right, I don’t know. And if you’re using the presets and the resource planner as well, these are things we’ve always talked about, but we’re just kind of curious to know where people sit in, so I’ll let the poll open and yannick you can start talking, maybe about our 1st one.
Rosalie Chassat: the hiding empty row.
Yanick Abraham: Yes, so this one is very useful. So it’s in the resource planner where you can hide empty rows. So before we add the custom setting that allows you to remove. So some of those empty rows. So
Yanick Abraham: it was a bit tricky because it would remove it for everyone. So now we’ve introduced that as a toggle, as you can see from here. So the concept and the idea is that let me open up, for example, Roxanne Green here, and we can see that she’s assigned on a lot of project which is normal, and some of those projects are still undergoing. But she doesn’t have anything assigned in the next few weeks.
Yanick Abraham: But those line are still showing, and, as you can see, you can scroll a lot just to see a real workload to make sure that you, you are aware of what she’s working on. So this is useful, because sometimes you do want to add some of that scheduling on your resources.
Yanick Abraham: But when you just want to consume and see what your people are working on now, you can easily just trigger that toggle, and it’s gonna now start showing only the rows that have some assignments some hours assignment for that specific resource. So I know this is something that was wanted, and that’s gonna be very useful for several of our customers.
Yanick Abraham: So it’s pretty simple, right? So it’s simply just a toggle. But in terms of usability it changed a lot of things
Yanick Abraham: as well as you can see. As usual, you have that small red icon asterisk here on the right side, meaning that when you select this, you can save those in your preset, so we do encourage you to save those. I’ll do it right away. So now, every time I’m going to open up that specific preset on the planner. It’s going to only show those rows if I want to
Yanick Abraham: like, I said. If I’m if I don’t see my project, and I do want to add an assignment. I can just flip back that toggle and then go and proceed to adding those those new project assignment to my resources.
Yanick Abraham: simple and but very useful.
Rosalie Chassat: Yeah, and yannick, correct me if I’m wrong. But if someone were to export their view from the resource planner while the toggle is on. That would also be keeping those empty lines out right similar to the preset.
Yanick Abraham: Yeah, absolutely. So we have that export functionality here, so you can export as a Pdf or as a Png. So let’s say I’m exporting it with the Pdf. You can see that now. I’m only I’m only showing those line that. Have some some schedule on it, so that export also, take that into account.
Rosalie Chassat: Very nice thanks for that. And before we move on to the next one, maybe I just wanted to do a little recap, just maybe share the result from the poll. Just so everybody can see. Because I’m sure you’re curious. We just talked about the export functionality in the resource, planner. And it looks like most people are not using that. So maybe you’re not aware you can use it. But I know there’s yeah. I’m sure there’s
Rosalie Chassat: some people that are going to be checking out after today. Scheduled versus plan view. It looks like most people are using scheduled, which is good. I think that’s what we want people to do. So good to know. And then the presets. Surprisingly, people are not using the presets as much in the resource planner. I think people are maybe more familiar with the presets in the workspace.
Rosalie Chassat: But we’ve added so many new features and toggles and filters in the resource planner that maybe it’s a good opportunity moving forward, especially after today’s webinar that we focus a lot on resource planner to go and start leveraging those we’ll see. But thank you for answering everyone.
Yanick Abraham: Absolutely so. Time, saver, those presets. The the idea is to really be able to switch between your view and your lenses very easily between your team in my example, for example, this was my professional service team. But you will see in my next my next segment of the demo. I’m gonna be switching to my dev team, and now I will only show my dev team. So absolutely presets are very useful.
Rosalie Chassat: Yeah. And I see a Zack’s comment in the chat saying that the presets are really crucial, especially if you’re making it a default for everybody or sharing it with everybody, which is actually one of the features we’ll talk about. So very good point, Zach. Alright! Let’s keep going.
Yanick Abraham: Okay, next one. It’s we’ve added a new filter project owner on the resource planner. So going back and like, I said, I switched my view. And I’m looking at just my developers. So those are all the project. And if I’m looking at my filter that all my roles of architect UN developer. In this example I only have developers. This being said, I’m showing this through my filter.
Yanick Abraham: and we’ve added a new filter, which is the project owner, which is here on top, meaning that now I can see. Let’s say I just want to see my project, or just the project of some of my resources. So the owner of a project I can add that filter. And now it’s showing only the project that Jenny read own.
Yanick Abraham: And Rosalie, as you know right that there is only one owner, and that is that you can have on either a project or a task or anything within clients. So there’s only a concept of ownership, and accountability goes is very strong.
Yanick Abraham: So that ownership is gonna help as well to just filter out your project as, for example. Or if you wanna look at the project of one of your teammate, you’re gonna be able to do it with that specific filter. And you can stack multiple resources if you wanted to. This being said, if you just want to look for one specific resource, you can add it for one specific resource.
Rosalie Chassat: Perfect.
Yanick Abraham: So we’re adding again, this was a request from our customer to be adding some of those filtering. So this is an attempt to to
Yanick Abraham: facilitate again searching and filtering data across the resource planner.
Rosalie Chassat: I feel like we’ve added one new filter every every last release for the Resource Library.
Yanick Abraham: Okay. So those are small functionality. So the demo is going very fast. But again, very useful.
Yanick Abraham: Me? Yeah, let me go back. So this one, it will be the next one. So the default view is now schedule view. So we’ll talk about the concept of a schedule view versus the plan view. So let me switch back again my preset. So as you can see here from the top right? I’m in the schedule view and you can switch it via the cog icon and the gear icon. You can switch to the plan view easily. What’s the big difference schedule view relates to task. So this means that you have.
Yanick Abraham: as people that are assigned on tasks. So here what I have, it’s my list of project. But when I’m opening up that specific project, I can see that Roxanne is assigned on the design task on that Acme project here.
Yanick Abraham: So this is what the difference between schedule and a plan so schedule mean that you see the task. So if I’m changing back to my plan view now, you can see I don’t have that chevron, or that icon to expand, because those are the hours on the project solely.
Yanick Abraham: and there is benefits of using both.
Yanick Abraham: This being said. We do want to encourage our user to create tasks underneath their project and using the schedule mode. And the way that those those hours are being flown through from task to project. Because those are 2 different numbers that can be shown, and that that specificity is controlled by a pick list a checkbox on the project side of things. So if I’m open up up that specific project and I’m looking in that detail panel
Yanick Abraham: in your configuration section. You can see here that you have sync, project and task schedules, meaning that when this is checked the number of hours for that specific project, or the total number on the project level side will be the same between the schedule and the plan. But in some respects, sometime you want to break that link and meaning. For example, when you sell
Yanick Abraham: at the beginning of a project, you wanna keep, maybe just the project values as plan and use the task assignment as you go on. This is one of the way that some of our customers are using that that that
Yanick Abraham: representation between schedule and plan, so you can uncheck this, and then the numbers will stop syncing between the 2. This being said, most like more and more people are always keeping this as check, and are using the schedule instead of the plan view to look at their data. And the schedule is giving you a lot more functionality, such as looking at your different resource to swap resources based on skills and tasks.
Yanick Abraham: and that scheduled default value is going to be represented in every one of our planners. So in my schedule, the resource planner or the project planner, now they’re going to be defaulted to schedule. That’s why we’ve marked it as well as upgrade consideration. If you want to default back to the plan, you just have to switch it and again use preset and just save it, because this will be remembered within your preset
Yanick Abraham: as well. So this is the way that you can go back. If your team is not using the schedule yet.
Yanick Abraham: please contact us if you want us some guidance, or look at our e-learning and courses, but otherwise you just have to save it in your preset. And this way you’re going to be back to that plan, mode by default.
Rosalie Chassat: Yeah, I think it makes sense that the schedule is not a default based on what people answered on the poll, because most like nobody said that they use most the plan. So it’s just more aligned with whether people are actually.
Yanick Abraham: This was a long time ago when we were more focusing just on the project side of thing and task, and the workspace was not as strong as it is now. People were using a bit more plan. And now a lot more people are using the schedule. This being said, there’s always a use case for the plan as well. But we encourage people to use the schedule
Yanick Abraham: version of it.
Yanick Abraham: Yep, the next one.
Rosalie Chassat: Yeah, that’s 1 we’ve been talking about for so long. It’s finally here.
Yanick Abraham: Preset sharing so
Yanick Abraham: preset again, it’s key when you want to very be efficient with our tools. So we have preset in every one of our interface. So on the workspace, on the planner on the Kanban, we do have those preset. We will see later on that even my deadlines will be coming with presets in the future. And those presets. Sometimes you spend a lot of time defining your preset. In this case, for example, I have a list of resources. I have some specific roles might have some statuses
Yanick Abraham: the way that it’s represented, based on the number of columns, the way it’s group, all that information and all those toggle. I can spend a lot of time to really get what? Exactly what I want to see when I want to look at a specific practice, a specific type of project. So now it’s very easy to share with the rest of your team. So when you click on your preset itself, you just by creating one by saving it or saving it.
Yanick Abraham: another one to clone it. But now you have that share button that allows you to
Yanick Abraham: just yourself can see that presets everybody in the company can see that preset, or you can decide which user as well can see that specific preset. So let’s say I’m I’m sharing it to Jenny Red. And let’s say I think I have. Jim. Let’s say, Jim Black, I’m gonna be able to select and define which preset which resources I want to share that preset with, and just by saving. And then they’re gonna start seeing it in their list.
Yanick Abraham: and it was Ali. You might want to ask, What what is that, icon?
Rosalie Chassat: What is this? Icon.
Yanick Abraham: So this is how you know that this preset has been shared to you. So, for example, I can see here that that trainer, and if I over on top of it it’s very small in the demo screen. But you can see that it’s shared by Jenny Red. So, Jenny red that share that preset with me. And now I can just look at my trainers or my coach that I have. So this is the way that you can know that it’s been a preset that’s been share to you.
Yanick Abraham: So sharing, very interesting, very powerful people were using it on the Workspace a lot. But even with the conversation I had with some of our customer this week, both the identity column and that sharing preset was a big highlight for them.
Yanick Abraham: So yeah, please start using it. It’s a very.
Rosalie Chassat: And if I can add something, because after today I imagine some people already have presets, and they’ll go and share them. Or do you don’t have presets, you’re gonna create them. If I can encourage you to make sure that the naming convention like what you name your presets if you’re gonna share it with everyone in your organization. Make sure it means something to everyone like it’s a little reminder. But just to keep that in mind, because that’s what they’re gonna see on their end.
Yanick Abraham: Really good point.
Yanick Abraham: Okay, next functionality. So if we’re going back, oh, also. And this is an improvement. So those share preset will apply to all your current project resources or user and all future project resources in the past. It was just on on the the time you were sharing it. It was shared with the current user base.
Yanick Abraham: But now it’s gonna be share. If you add a new user, somebody new in the company, they will also have access to that new preset. So this is an add on to that sharing functionality that we’ve put together. And this is true, for not only this resource planner pre preset, but sharing, but also the workspace share.
Rosalie Chassat: Perfect nice making onboarding smoother.
Yanick Abraham: Yeah, exactly less admin work, more customer work.
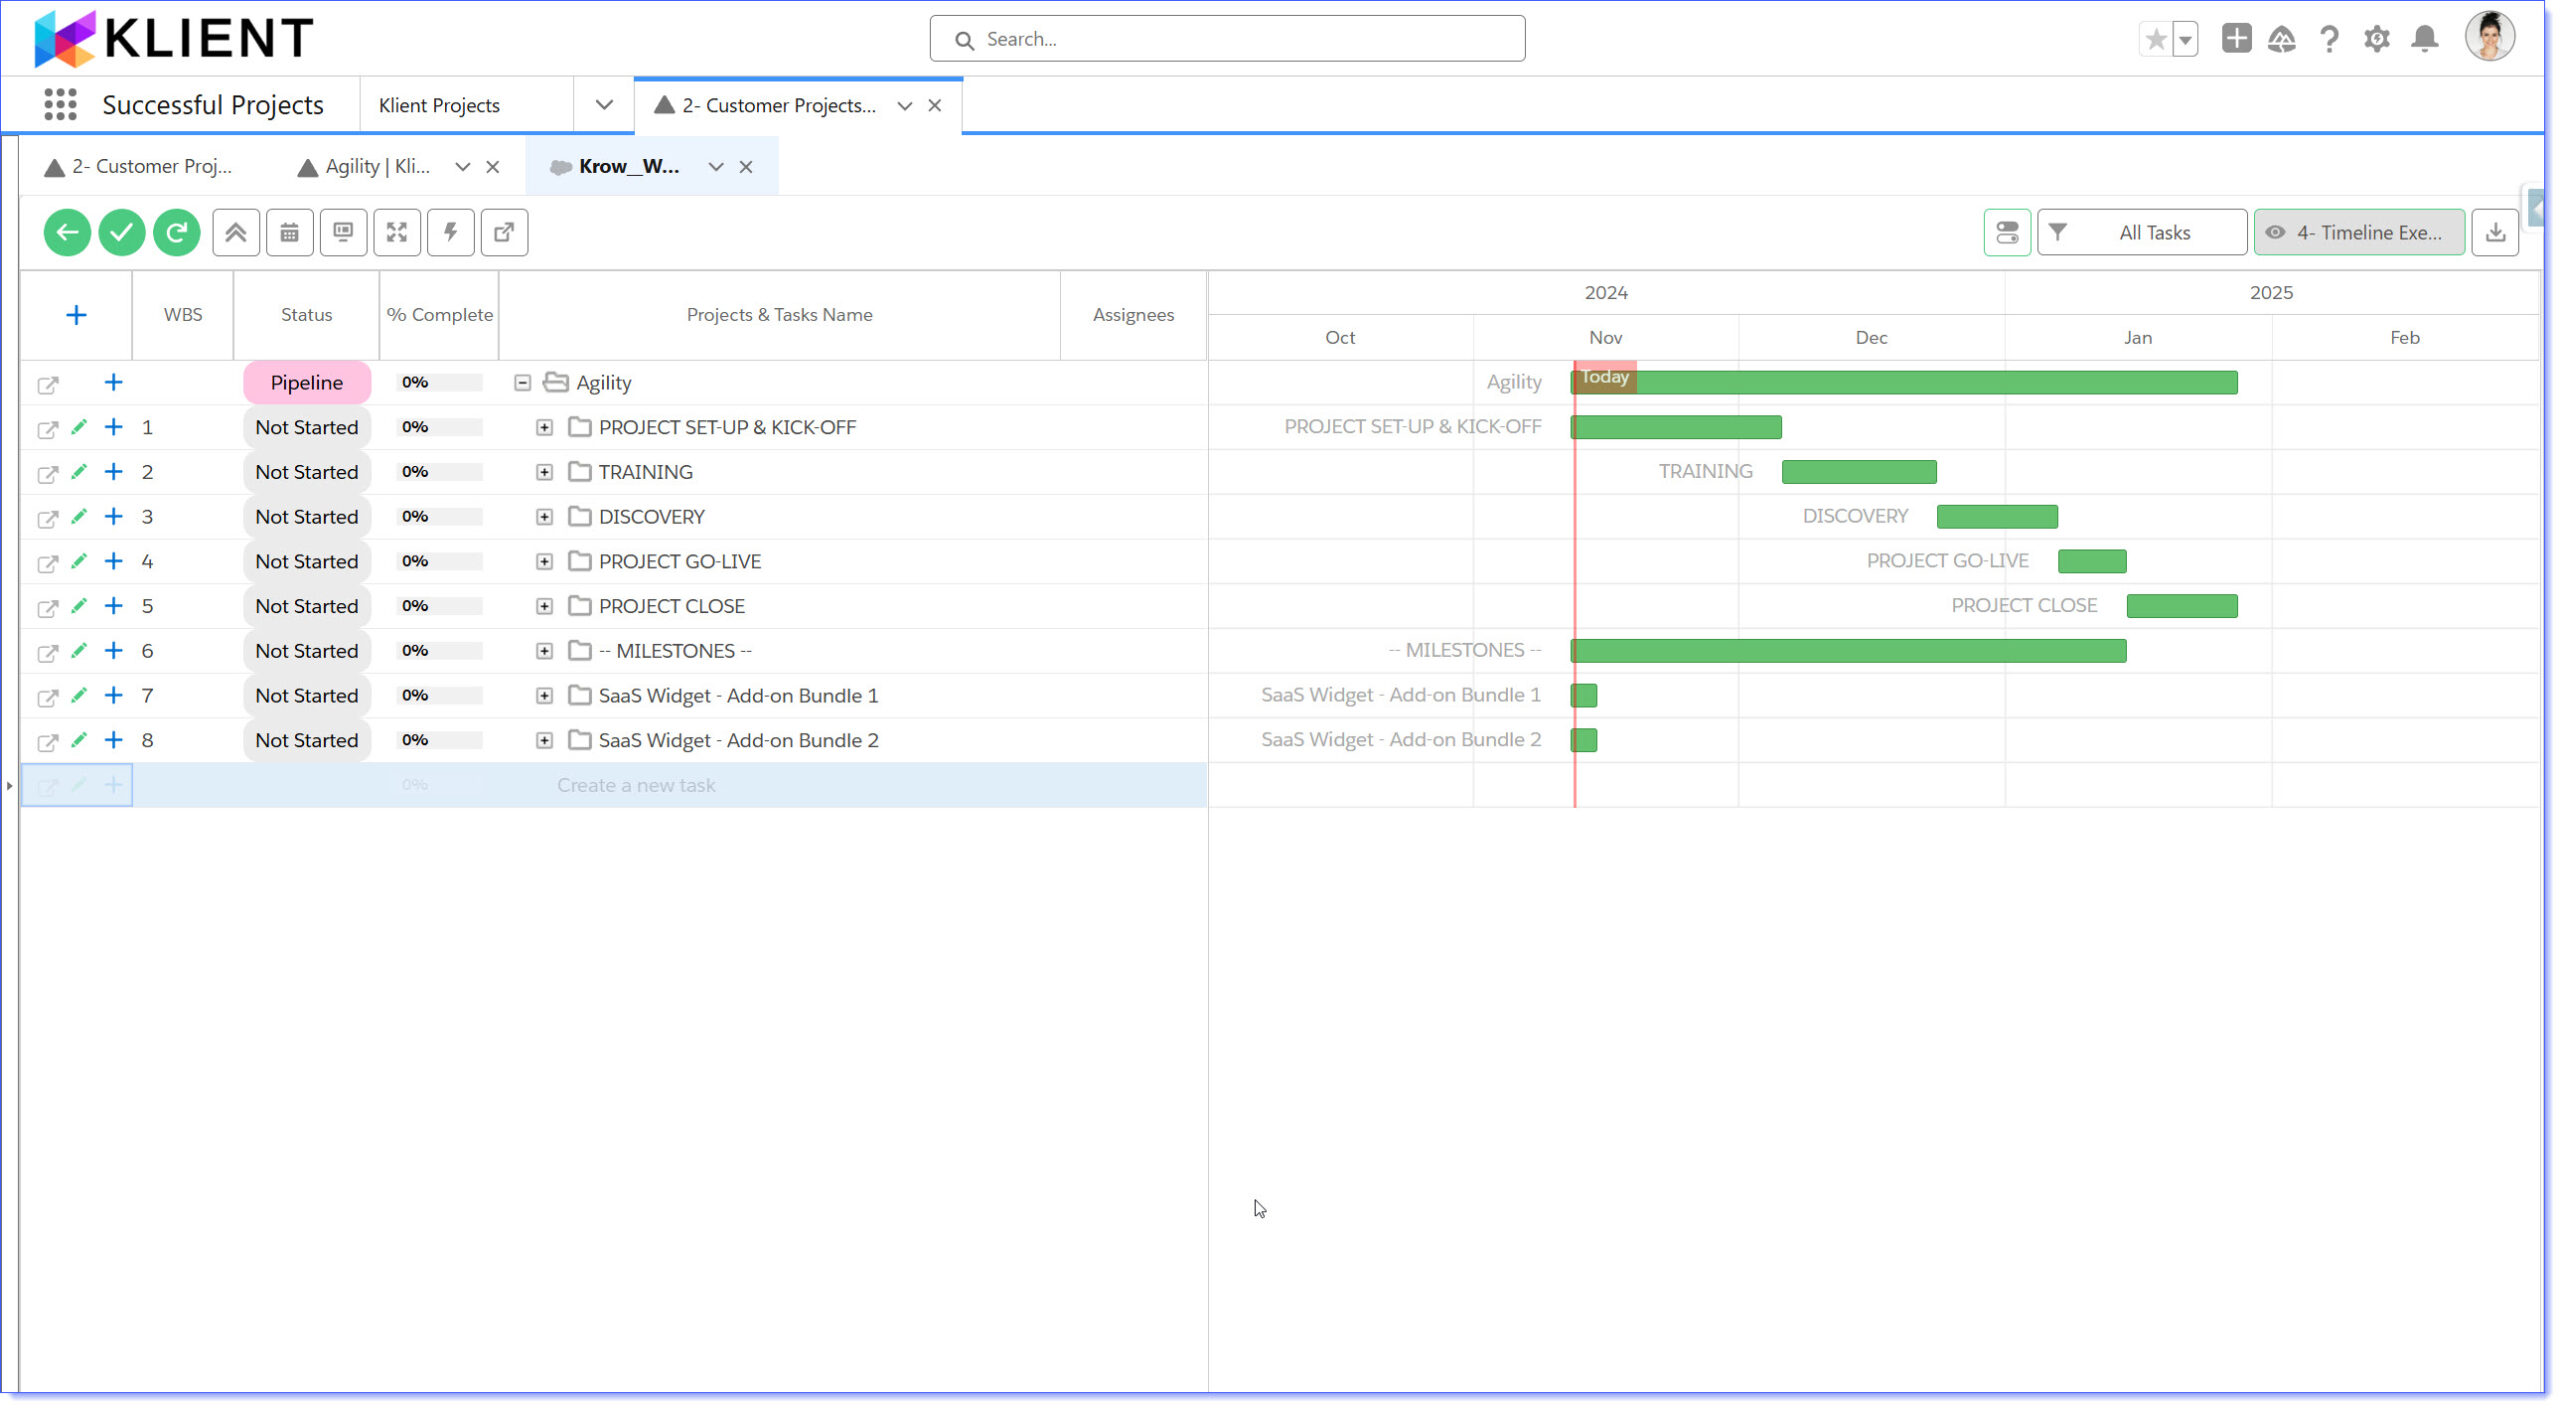
Yanick Abraham: Okay, next thing, Workspace components. So the workspace component default preset. So again, the preset topic. So if I’m going back to my environment here and I’m switching to that specific project. And again, now I’m in the workspace. I have my grid and my timeline, my gantt on the right side, and I have different preset that I’ve set for myself, and I might have shared with my team.
Yanick Abraham: but I also have one. As an admin. I have one that I want the customer, for example, to be able to see, and this one is called timeline. Again. The naming convention like you said so timeline customer, and you can see there’s a new icon on next to it. It’s a globe icon, meaning that it’s being used as a default preset somewhere in your system. And one of those use cases is
Yanick Abraham: to be able to share, for example, in your customer community being able to share a project, timeline to your customer. But you don’t want them to
Yanick Abraham: look at different angles, or have to figure out which preset to to go look into. So this is one of the specific use case. So let me just log in as Billy Blue, which is a customer in this environment, and he has his logging access to access his customer community. So now I’m logged in as Billy Blue.
Yanick Abraham: which has access to some of our project within this environment. So if you open up this project, and, for example, when he’s going to be looking at the timeline, this is a project I want to share with him. I might have some homework that I want to share, that I want daily blue to be able to access and maybe share, file with me, or be able to see what is the status of the budget for this project. But I also want him to have access, for example to the
Yanick Abraham: timeline.
Yanick Abraham: So now that specific gantt or kanban, the workspace that I’ve dropped here, you can see that by default. It landed on that timeline customer preset.
Yanick Abraham: you still have access to flip between the other preset that has been shared with him. He can, even if you give him the right, he can even create his own preset. But by default it’s going to land on that specific preset. It’s called timeline, so I don’t want him to see the grid. I want him to see that specific timeline in our example of our roadmap that we’re going to be sharing later on.
Yanick Abraham: We want them to see, we want our customer, you guys, to see the grid on left side and the Kanban on the right and the statuses. So again, this is what we use to share those. And we’re gonna be using that default preset. And the way that you configure this, if I’m going back to my slide deck
Yanick Abraham: the way you configure this. Let’s say you wanna drop it in the community like I just did
Yanick Abraham: in that. This is the community setup window. You just drop one of our Gantt lightning component in one of your pages. I’m on the project page here. When you click on it. You can see here that I have some option, and we have that preset Id that you can just input. And this is how you might the match between that default preset that’s going to be loaded.
Yanick Abraham: And you all you get that Id. You can access all preset. And this is just for view. Only we don’t recommend to do any changes in that specific object, the client preset. But to get those id you can see here, for example, when you’re listing all your preset, I have that timeline customer that I’ve created. This is the id of that preset, and I just have to copy that information here and now, every time it’s going to be loading
Yanick Abraham: as the default preset.
Yanick Abraham: If I have dropped it on another page. Let’s say I drop it. You can see I have a role map page here as well. If I drop it, that component on the roadmap, I can set up another preset for that role map with the example, I just said, with the grid on the left and the and the gantt on the right. So this is how you configure those preset default preset id for the workspace.
Rosalie Chassat: Nice, and I think, for using it on the customer community. It’s really making it easier, simpler. A lot of our customer. A lot of our customers are saying like, we want the the experience in the community to be as easy as possible, less click. So just having the right view right away is gonna make that possible. Great.
Yanick Abraham: Exactly. And we’re making other improvement in the future release about sharing preset. So you’re gonna be able to share only with the the those preset to your specific customer portal or customer community user. So other improvement are coming in regards of sharing, too. And that small icon. This is what it represent, that this preset is being used as the default preset somewhere in the system.
Rosalie Chassat: Perfect. Thank you.
Yanick Abraham: I’ve shown this on the community, but it could be also done. And if you drop the component in any one of a custom page that you might create, that you want to show a specific project, or you want to show a specific view. You can use that preset not only on the community side, but you can use it as well on any one of our pages that you might have created.
Rosalie Chassat: Perfect. And if you need any help setting those up as well, you can always email, our support team. And we can help you out
Rosalie Chassat: all right.
Rosalie Chassat: And yeah, before we get into that one, I just wanted to launch a quick poll. Let me just
Rosalie Chassat: oh, there it is all right. So let’s a quick poll. I know some customers are using client surveys for end of project surveys, which is what we talk most about. I feel in general. But we’re curious to know if you’re using them for Nps surveys. So I just launched the poll. I don’t know if it worked.
Yanick Abraham: No, I don’t think so.
Rosalie Chassat: No did it?
Rosalie Chassat: Oh, I think I don’t know if it worked anyways.
Rosalie Chassat: Hmm!
Yanick Abraham: I don’t see it.
Rosalie Chassat: There’s something weird on my end. Let’s skip the poll. Then we just wanted to know if you are using Nps surveys at your organization. And if you are, if you’re using client surveys because that’s what we’re gonna talk about Nps surveys now. So you can answer in the chat or we’ll just jump into it actually. And again, just talk about that.
Yanick Abraham: Let’s skip the poll and let’s look at the what it is. So again, nps, it’s a net promoter score, and the default functionality of a net promoter score, it’s really to start to 0. So in the past, our system only started at one. So we made that improvement.
Yanick Abraham: So if I’m going into my survey, so I’m gonna launch my survey configurator.
Yanick Abraham: And here I can see that I have 3 surveys within this specific environment. So if I take my post, go live. Now. You can see that those Nps score start now at 0 before they were starting at one. So the real representation of nps, like I just said, Start at 0. So it will be listed like this. And this will be applied
Yanick Abraham: for all the new Nps survey question that you will be sending. They will include that 0. But it’s backward compatible. So it will not break anything. This being said, there will be a new value in your in your in your survey that you sent to your customer. There will be that new value of 0. But it’s not. It’s not gonna break anything. So it’s backward, compatible. And you can you can do that logic of the Nps calculation based on that 0 as well.
Yanick Abraham: There’s not much I wanted to show here, besides that nice nps that you can use across all our surveys. We use this for internal employee survey as well that we send every week. So always would you recommend our company to our friends, or you can use it at the end of a project like you said, or any other scenario you can use that nps across the board.
Rosalie Chassat: Perfect. I think I figured out why it wasn’t working, because I was still showing the results of the resource planner. Sorry about that, all right. So that kind of concludes all our new features and functionalities that are available in this latest version. So, as always
Rosalie Chassat: now, the poll should be working. We just want to know of all the ones that we mentioned today which one you most excited about. So we’ve got a couple related to resource planner, the default preset and Nps scale. And then did you already upgrade to our latest version released last week? I’m conscious that it was released one week ago, so maybe not. All of you have done it. But it’s always good to know.
Rosalie Chassat: Curious as well if people are waiting for the webinar to upgrade, or they’re upgrading and then doing the webinar. And then
Rosalie Chassat: anyways, so it looks like, oh, yeah, most popular. One resource, planner preset sharing. That makes sense.
Rosalie Chassat: And yeah, most people haven’t upgraded yet, but it’s on the bucket list, which means they’re waiting for the webinar before upgrading. Good that makes sense. Alright.
Yanick Abraham: I had a question with Darian about the Smiley for surveys. So I guess we’re gonna come back to it with the idea of voting. We have one of those idea. That is more question about the survey. So I guess good thing that you’re going to be able to vote for that new idea, and even put the comments. If you want that, Smiley, instead of just the stars.
Rosalie Chassat: All right. Thanks for voting everyone. And what I’ll do. Now, yeah, let’s talk about ideas voting and product roadmap. So on. Our last webinar last month. We did talk to you about our new initiative, where our customers can vote for their favorite ideas. Since then we have received some votes, and our product team has selected the most popular ones, which are the 7 you see on the screen right now, and they will be incorporated to our product roadmap. So let’s have a look at these ones.
Rosalie Chassat: And then these ones will be delivered in the next 3 months. Depending on how complex or simple they are to be
Rosalie Chassat: to be done. So let’s have a look. And, by the way, when you see this medal, Emoji moving forward, it means this is an idea that won the vote. So you may see that in our roadmap, or you may see it in our Ideas section in the community. So if we have a look at which ideas won, and then, if one of you on the webinar today has actually voted or submitted that idea feel free.
Rosalie Chassat: You let us know in the chat.
Rosalie Chassat: So the 1st one project status report customizable template per project type. So right now, if you are using the project status report, you can only save one template. So this is the idea of this feature is to be able to save more templates, because we do know that, depending on the project type that you have and our customers have different project types, you may want to show different information to different customers. So this is again to make this possible
Rosalie Chassat: and then on project status report a feedback. We got as well. Is. You would like to display the logo of your company on the report which makes sense. So these are 2 things that we will be delivering. So yeah, don’t know if you want to add anything on that? Yeah, Nick.
Yanick Abraham: Oh, it makes total sense, because, let’s say, you have a billable project fixed fee versus a project of time and expense. You don’t want to share the same fields hours consume is not something that you want to show on a fixed fee? So this will
Yanick Abraham: solve that that issue, that people were not using the project statuses on some project type. It makes total sense, and then the branding also totally aligned with our strategy to make sure that you can brand all your stuff with your logo. So those will be 2 great new functionality added to the project status report.
Rosalie Chassat: Perfect and then, my timesheet, remember all toggles. So right now, I think if you reload the page toggles like the comment, mode hide weekend. Ps Ps component those ones, they they just default back. So to make sure that it’s remembering whatever was set up. So just again making the easier to use. The platform and less clicks, less manipulation. You have to do on your end.
Rosalie Chassat: Timesheet approval. We have 2 on that one. This is a we don’t talk about time, sheet approval, mass, approval that often. The 1st one task filter boss. So yeah, we’ve added. And I think Zack is happy about that. I see on the chat
Rosalie Chassat: we’ve added a task. New filter field for the task. Yeah, for the
Rosalie Chassat: let me just double check. Yeah, maybe. Yannick, you can talk about that.
Yanick Abraham: Yeah, it’s in the mass approval page. You can filter by project, you can filter by resource. There’s different filters. So now we’re gonna also add a task. So you can just search and just show those tasks more easily. So you don’t have to scroll down the page to find exactly what you’re looking for. There was already a several options that’s been added 6 to 9 months ago. But now this new idea that was submitted by you, most probably by Zach will be developed in the next few release.
Rosalie Chassat: Yeah. And then for the mass approval as well. I think. If you’re using splits mode historically, you’re not able to edit the time comments when you’re approving and then moving forward because we know some people are using the split modes. Then we’ve just made that possible there as well. So probably a specific request from a customer as well.
Rosalie Chassat: I imagine. And then another one for the project workspace exporting to Csv to consider grid columns. So right now you can already export if you’re exporting on Png. Pdf, it is showing the right column when you’re exporting, but not on Csv, so it’s just to make sure that it also applies to Csv,
Yanick Abraham: The column you’re seeing in the workspace will be the exact same column you will have in your Csv. If you had to export some of it. This will be following that the visibility on the workspace.
Rosalie Chassat: Yeah, which is ideal. And I don’t know how many people are exporting Csv. Versus Png. But maybe it makes more people export this way. Now that.
Yanick Abraham: It’s gonna be.
Rosalie Chassat: Arranged and then the last one for the resource planner. Maybe, Annie, if you can talk to that one a little bit.
Yanick Abraham: Yeah. So in the past, as you know, you have an estimated number of hours. For example, you can log times on task, and quite often. Let’s say you scheduling somebody to works on a specific week on some task, but they don’t do their entire work. You can always over schedule or under schedule, and the functionality we had in the past is that you can align the schedule hours with the log hours, meaning that you have that
Yanick Abraham: remaining bucket of schedule hours that are left to be rescheduled. You could only do it on a task by task basis in the past. Now we’re gonna also do it on a project level. And we’re going to provide you even more option. I’ve already seen the the 1st iteration of this development. So you’re going to be able to do several things. So selecting multiple project, one project, several tasks.
Yanick Abraham: So there’s more even option than what the line suggests here. So you’re going to be able to do it overall. There’s another idea that’s still on the community about what do you do with those hours that you are like after the realignment you’re going to be under schedule, most likely. So what do you want to do with it? You want to reschedule at the end. You want to schedule it as a bell curve. So this is still an idea of voting. We didn’t take it that
Yanick Abraham: pass around. But if you guys keep voting for it. Most likely we can take it when we see you next time on the next webinar.
Rosalie Chassat: And hopefully that one is going to make more people use this functionality. Because right now, it’s yeah, like you mentioned a little bit hidden in the task panel. So yay.
Rosalie Chassat: all right. And then, because we have those 7 ideas that one, we’ve moved them to our product roadmap, we’ll actually remove them from the Ideas section as well. But we’re adding 7 new ideas. So you have total of 20 ideas to vote for. These are the 7 ideas that we’ve added based on feedback, that we got feature requests, etc. So just to have a quick run through it missing time, sheet notification to use an email template right now, you’re
Rosalie Chassat: bit limited on what that email is. So just giving you more flexibility. Here again, these are all things to be voted on. So if there’s any of these that you’re setting thumbs up and you’re excited about, then the next step is to go vote for them right? And then, my timesheet comments, mode right now, when you’re using the comments mode, which is something we released quite
Rosalie Chassat: recently. You’re limited, in which field you can edit. So just having more options there on what you can change like project, field task, field, etc. Workspace show count of task. So right now, when you’re looking at the workspace.
Rosalie Chassat: there’s no real way for you to know how many tasks are included in there. So the feature request would be for that.
Yanick Abraham: Even on the standard record feel of even in salesforce is difficult to know exactly how many you have. So this is, gonna be
Yanick Abraham: prove it’s gonna prove very useful to know how many tasks you have across your project.
Rosalie Chassat: Yeah. And I don’t know what like. When you have presets and filters on as well, it makes it even less clear. So just getting that information straight up. Support, pick list, field dependencies and grid. I know this. Yeah, all these came from customers, but I don’t remember which customer specifically. But yeah. So when you select an option in a pick list field, if there’s another dependent one, you’ll be able to only show the the options that are logical from the previous one that you selected
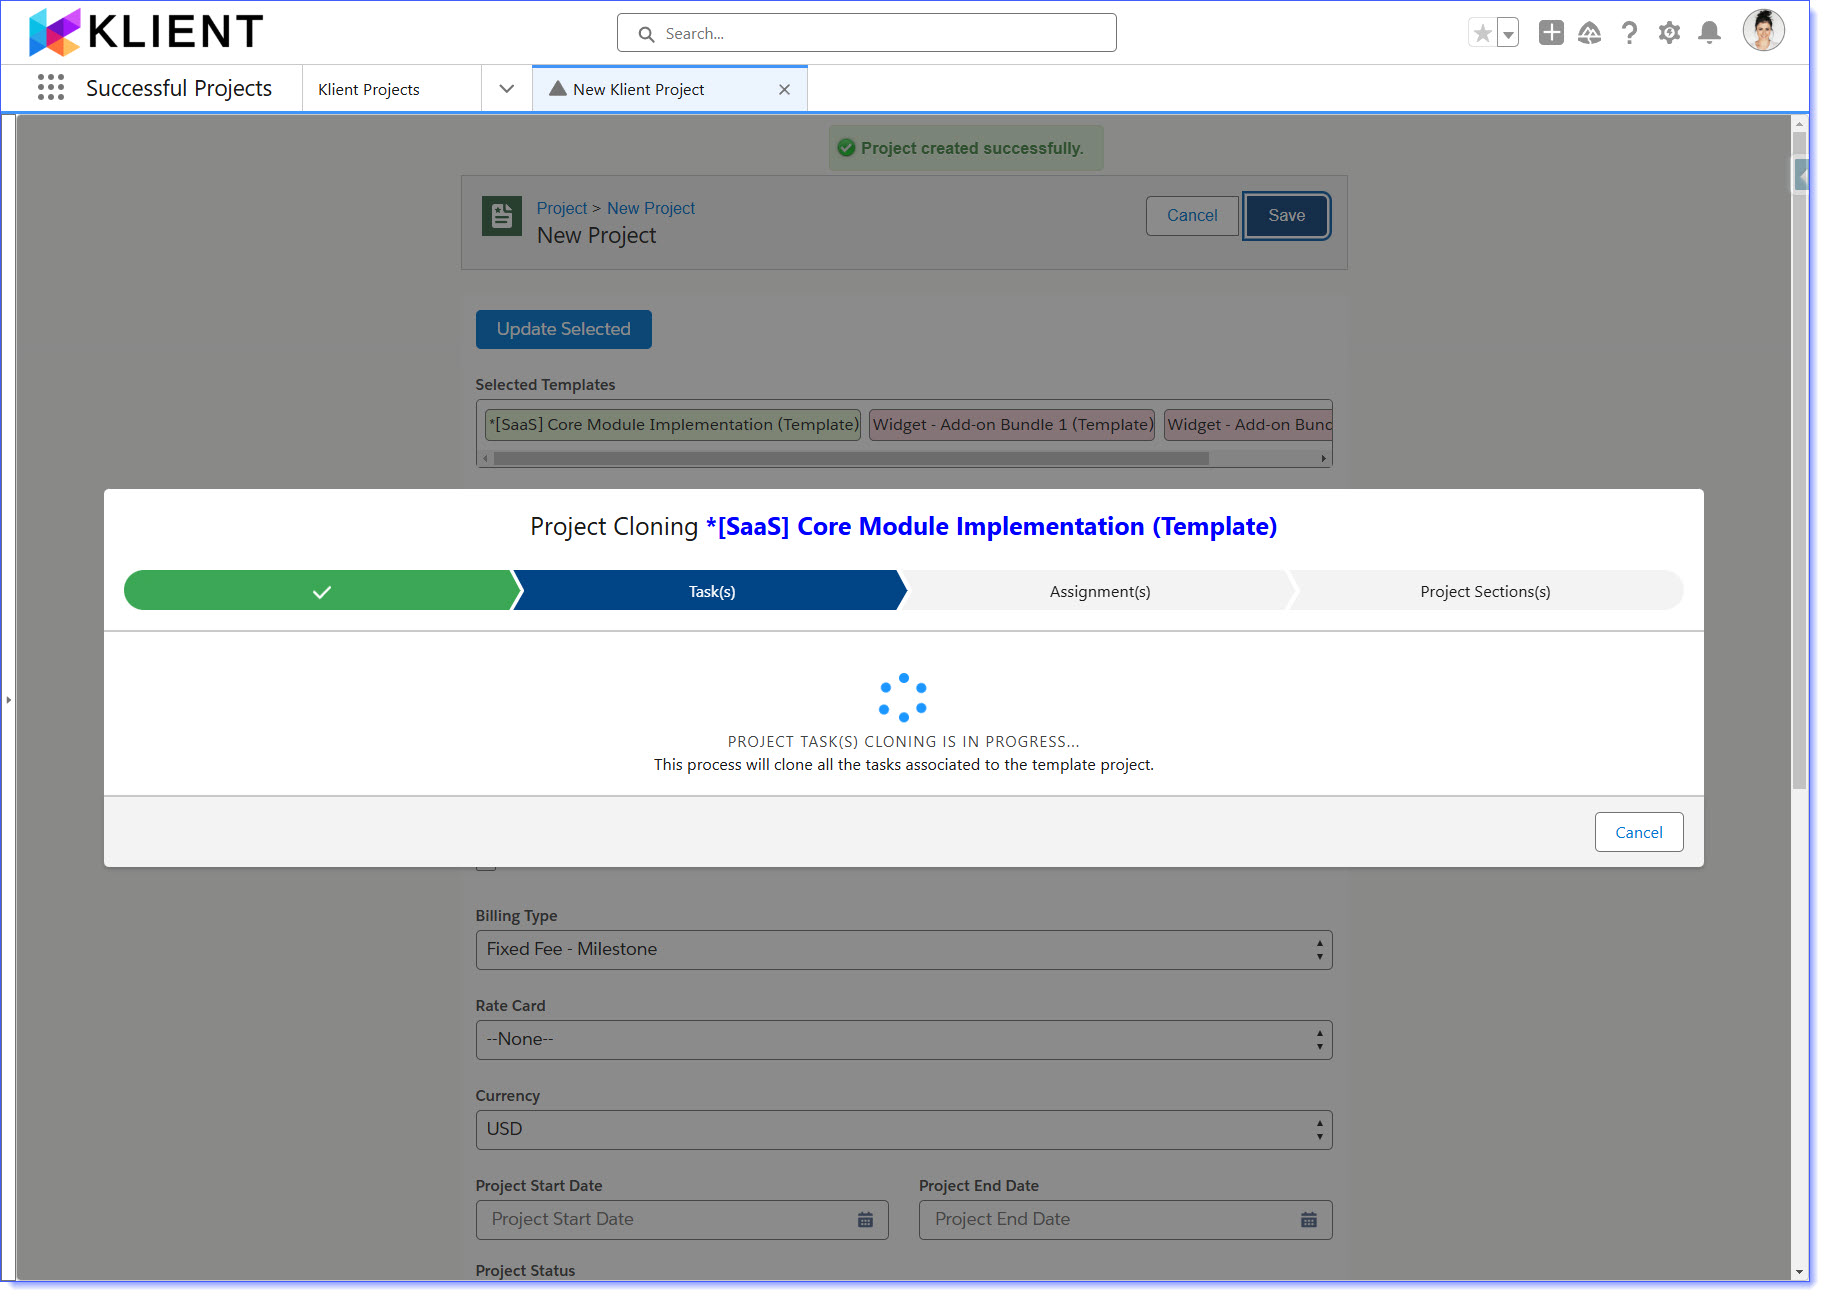
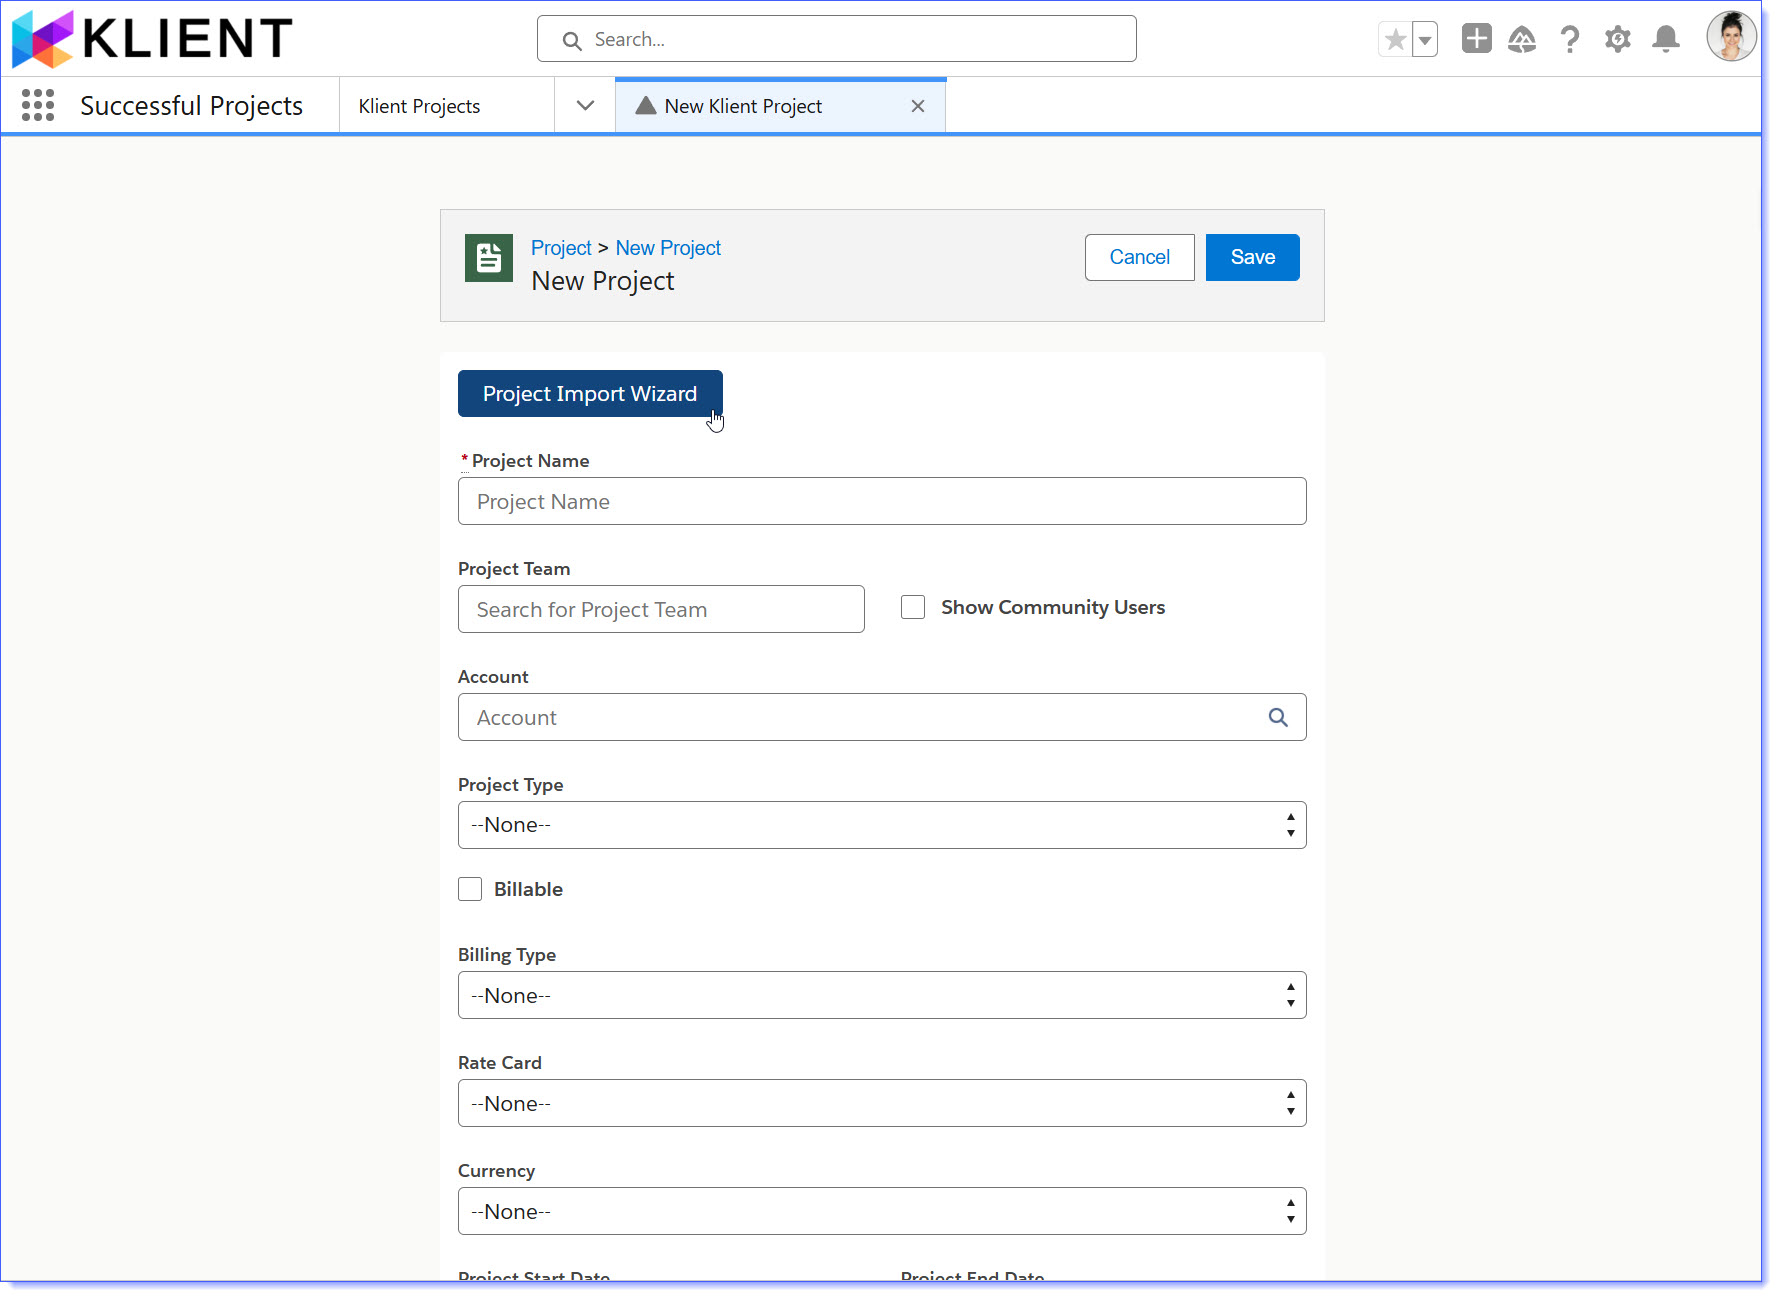
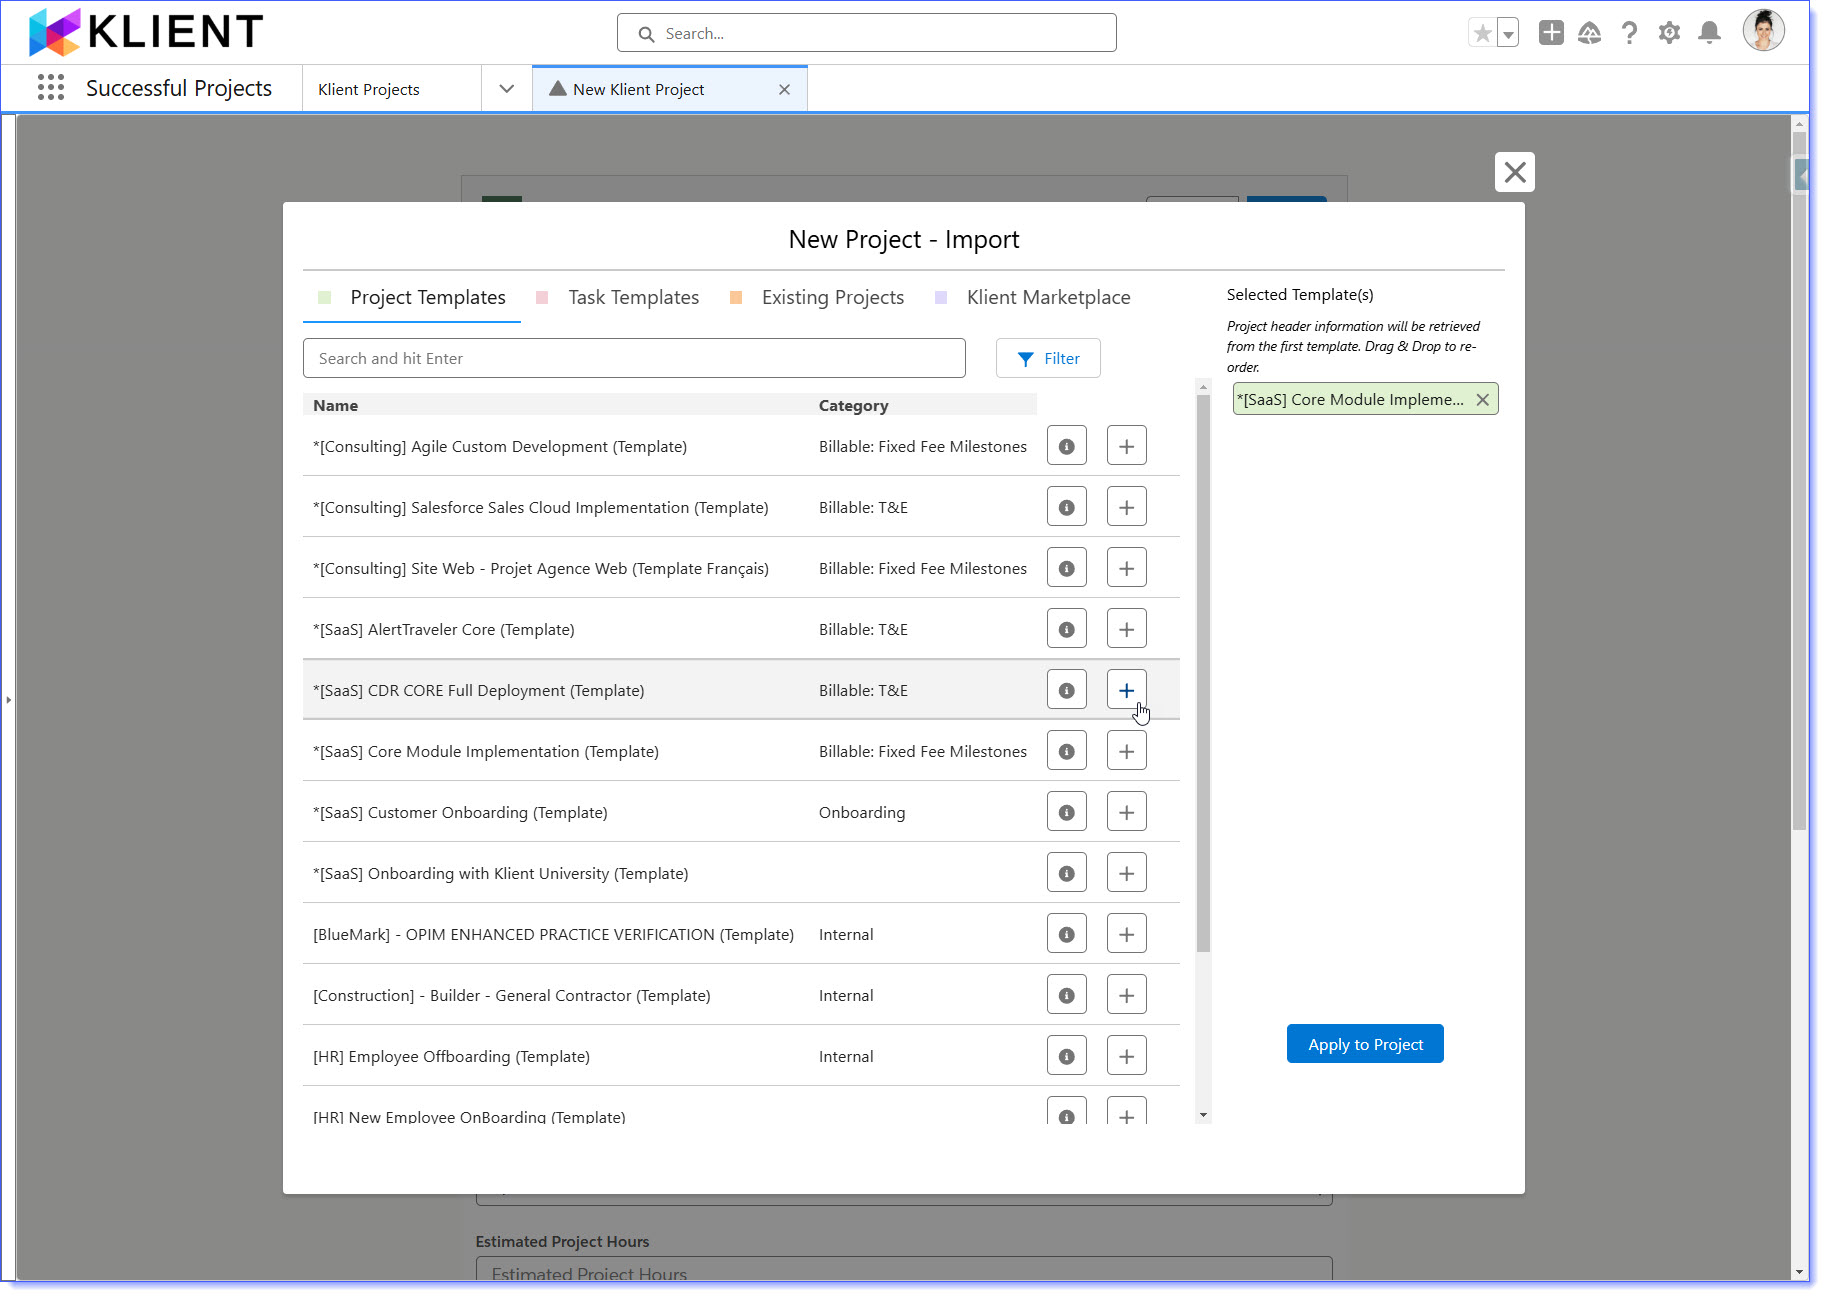
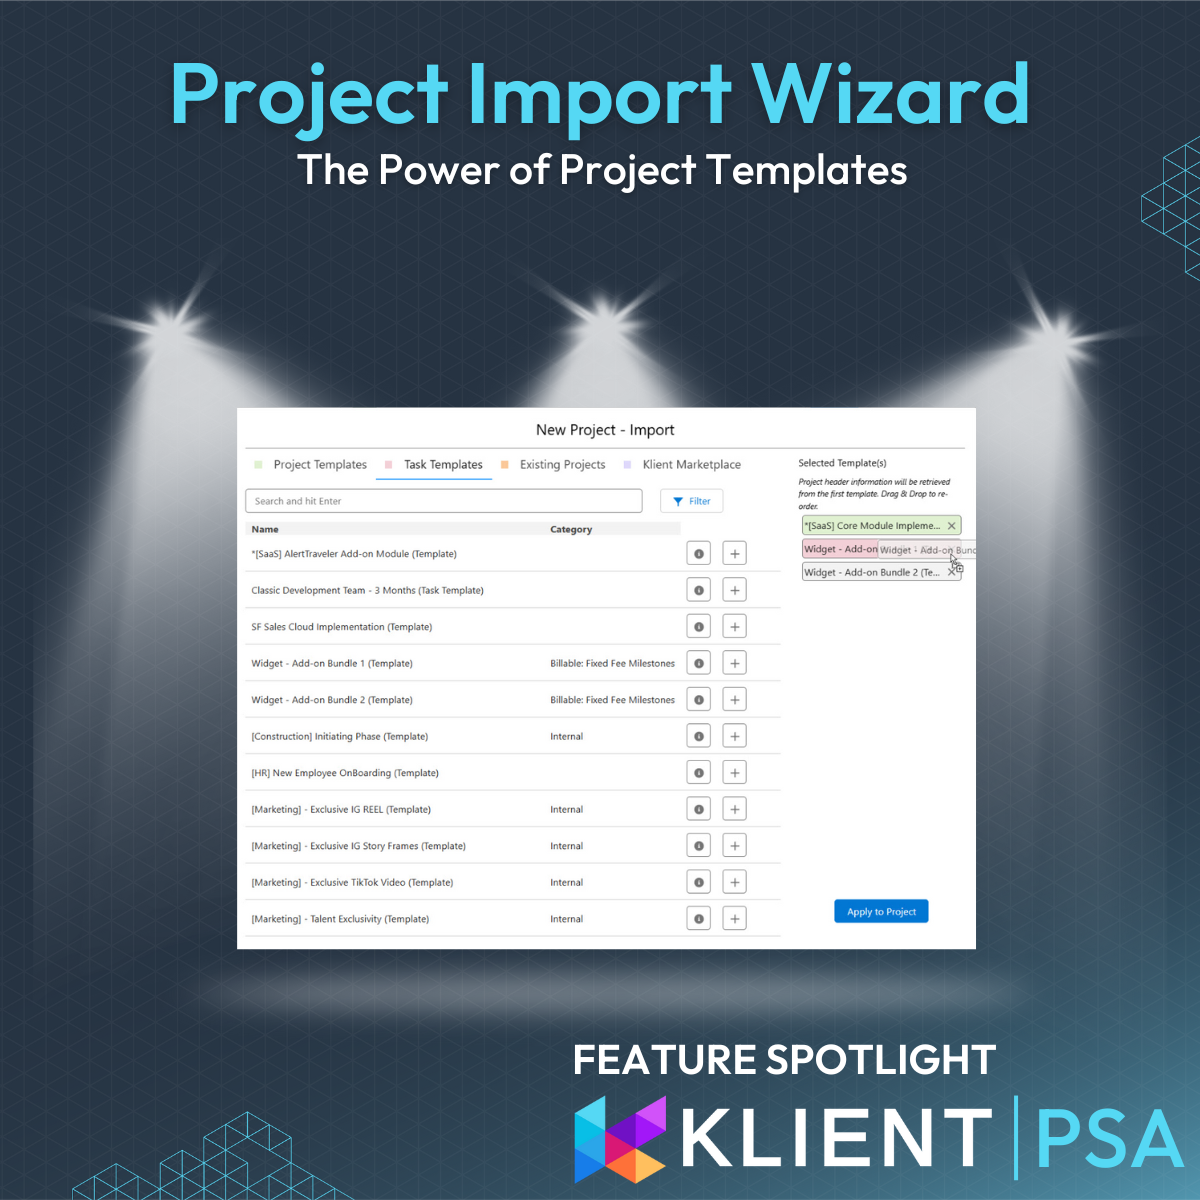
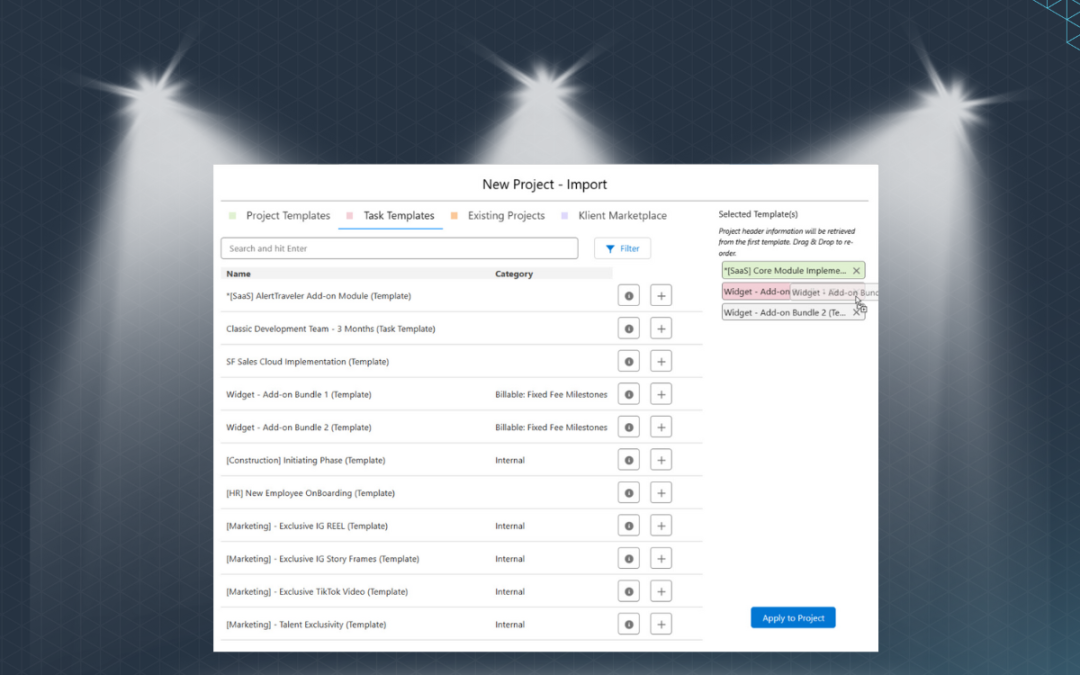
Rosalie Chassat: project, import, resort, create project and task template without assignment. Yannick, I think you wanted to mention something about that one.
Yanick Abraham: Yeah. So the idea is that when you create a when you’re using our project and port wizard, it’s gonna recreate the exact project as you have it, including the project assignment. But let’s say, for a specific reason. You don’t want to have those assignment, and you just want to leave those assignment blank. You’re gonna have an option now. But the idea here to vote on it would be that you have a checkbox saying, Do you wanna remove the assignment and leave it empty. So you can assign other people or another subset of people.
Yanick Abraham: So that’s the that’s specific idea. It’s it’s that concept here.
Rosalie Chassat: Perfect and display assigned assigned task, only setting. I think that’s a little setting that we’ve added an option for right.
Yanick Abraham: So now again, it’s a custom setting that’s you can apply on a specific user. But it’s global to the entire platform. And the idea here is to be able to have that
Yanick Abraham: per project basis or even per project assignment basis, meaning that maybe you only see on that specific project the task that you’re assigned on. While, let’s say I’m the project manager. I’m myself. I would see all those tasks so that the idea is either on the project or on the project assignment, be able to to to toggle that setting, so that now we have in a custom setting so.
Rosalie Chassat: These are considerations in your organization. Then make sure to vote for that and then the last one, the survey which I think is related to what? we got as feedback earlier. So being able to have additional question types.
Rosalie Chassat: so haven’t defined what those would be. But this idea is up for voting. So if you are looking to have more idea types and make sure to vote for that one so ranking matrix form we’ve mentioned, like Smiley faces. Whatever it is, just make sure to vote for those ones. Even you can add for any of the ideas I think you’re able to add comments as well. So if you want to add further ideas, be sure to do that.
Yanick Abraham: And I added Smiley’s, it’s not in description. I’m sure we’ll update our our idea list soon. But please go ahead and and vote for that idea. And if you have other types that you would like and or if you want to specify exactly what you want with Smiley. You can always put some comments as well.
Rosalie Chassat: Perfect, and then before, like as we move to the next thing. So we talked about the new ideas, the ideas that were voted up. Next step is to vote for your favorite ideas. I just put up a poll because I’m curious. This is the second time we’re talking about this. So it’s still recently relatively new. Did you already vote for some ideas on our community? Yes, you did. No, because you weren’t aware you could do that. No, you wanted to. You just
Rosalie Chassat: didn’t have time with Easter and everything or no, you just don’t want to vote for client product ideas which would be surprising. If you’re joining today’s webinar, I feel like you would have like a minimal interest, at least. And then the next question, Will you go vote for any of the new ideas, and I see everybody said, Yes, so that’s very good as a reminder. All you need to do is make sure you have a community login. So log into the community. Go to the ideas. Tab
Rosalie Chassat: there you can see all 20 ideas if you scroll down. But easiest would be to just click on the sorting option and sort by recent. So you’re gonna see, you can see the dates that it was submitted. You’re gonna see all the recent one to 7 new ones at the top.
Rosalie Chassat: So you can go and review for each one. You have the name of the feature, and then you always have a description under. If it’s not clear to you, you can always add comment, and ask us, what this is, but should be pretty clear, and then, as you vote, the most popular one again will be doing this exercise on the next webinar, and just putting those back on our roadmap
Rosalie Chassat: and then, speaking of our roadmap, that Yannick is showing right now. This is another tab that you have on the community. You can see this is updated by our team. You can see everything that’s coming. You can see the due date or next release is actually coming. 50.2 coming on May 9.th
Rosalie Chassat: So all the ones at the top you can see these will be delivered. You can see the light bulbs as well, which means the ideas are coming from customers, the ones that won the vote. So you can see on the middle. There’s already my time sheet. Remember toggle state that is coming on the next release, and it was just voted out. So
Rosalie Chassat: voted in. So that’s very positive, and some other ones that take a little bit more time
Rosalie Chassat: an investigation, and otherwise, I think. Did you want to add something on the roadmap? Yannick? Are we good.
Yanick Abraham: No, I think we’re on. We’re on time. So let’s move on. But a lot of cool stuff coming. Yeah.
Rosalie Chassat: Yeah. And finally, a couple of reminders of best practices to follow. So we’ve included them all on the presentation. But today, what I wanted to bring your attention to is the 3rd bullet. So, as always, we encourage you to email our support team at support@client.com, or create a support case from the community. With that being said, please make sure that when you are reaching out to our team
Rosalie Chassat: you include only one issue problem, question or feature request per per case. This will help us prioritize, and making sure, we can focus on one thing at a time, especially the feature requests one per case, and it’s just gonna help everybody.
Yanick Abraham: Communication wise. It’s gonna help as well. And for you guys also. And the status will be per case basis. If you put 5, we have to ourselves manually create 5 ideas for you or 5 step, because we want to track each one individually. They might not be resolved all at the same time. So please just one per case.
Rosalie Chassat: Perfect. And I think that, concludes our webinar, the last thing I will be doing is actually launching our end of the webinar survey. If you can take 5,
Rosalie Chassat: 1 min, 5 seconds to just fill in the survey. And otherwise I will be sending you a follow up email after today’s webinar, probably tomorrow, with a recap of what we talked about. And of course I encourage you to sign up for our next webinar, which will be usually it’s towards the end of the month I’ll have the exact date always on Thursday at 11 Am.
Rosalie Chassat: Eastern time. So thank you so much. And oh, may 20. Second. Thanks, Isabel. We’ll see you next time. And yeah, have a great rest of your day.
Yanick Abraham: Thank you. Everyone. Always a pleasure. Thank you. Rosary.
Rosalie Chassat: My.
OUR HOSTS

Yanick Abraham

Rosalie Chassat
Customer Success – Klient
TIMESTAMPS
00:00 Introduction & agenda
04:40 Highlights of v50.2.2
07:03 Resource Planner “Hide Empty Rows” Toggle
11:30 Resource Planner “Project Owner(s)” Filter
13:30 Resource Planner Default View is Now “Scheduled”
17:38 Resource Planner Preset Sharing Upgrade
21:13 Workspace LWC Component Default Preset
27:16 Surveys improvements
30:35 Product Roadmap & Ideas Voting
43:13 Conclusion
Explore Our Past Webinars
Missed a session? No problem! Dive into our on-demand webinar library to discover the latest updates, feature spotlights, and practical tips to maximize your Klient PSA experience.


Replace all your tools with Klient, Salesforce #1 PSA platform
Run your entire SaaS and consulting business on a single professional service automation platform native to Salesforce!


 Share via Email
 Book a meeting
 Plan Your Schedule: Check the agenda and highlight must-attend sessions so you don’t miss a beat.
 Connect with Peers: The best insights often come from chatting with like-minded professionals over coffee (or cocktails!).
 Visit Booth #829: If streamlining operations, optimizing resources, and boosting revenue sound good, this is where you need to be!

 Detect issues early – Identify potential problems before they impact project timelines.
 Watch this Project Survey chapter from our latest video:


 Project details
 Faster Project Setup
 Consistency Across Projects
 Estimate Faster, Forecast Better
 How We Do It at Klient